AE Machine
A generative percussion engine for Max/MSP 9
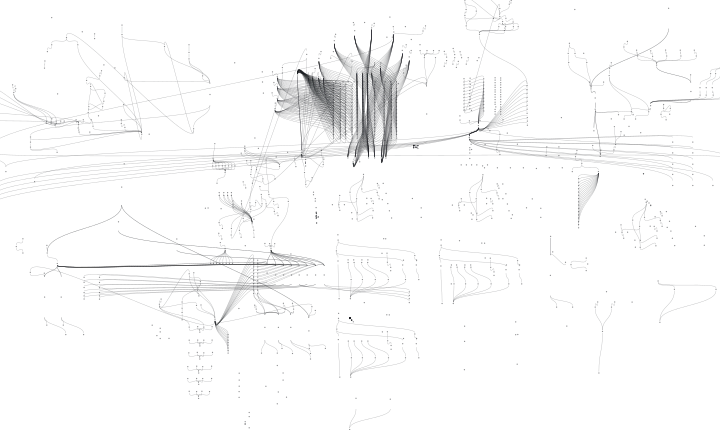
The wiring of the machine: 1,237 patch cords, drawn from the file itself.
A Max patch is just JSON, so I read every box position and every connection with a small Python script
and traced each cord as a Bézier curve, hairline ink on white. Nothing is composed: where the drawing darkens,
the machine is dense. I spent months laying out these boxes without knowing I was drawing this.
Foreword
Every instrument has an origin story. This one begins with someone else's screen.
In the summer of 2023, Autechre streamed a series of untitled tech demos. For a few hours, the world got to look directly at Sean Booth's working environment: a sixteen by sixteen transition matrix deciding which step is allowed to follow which, drum triggers scattered and reassigned by chance, cascades of step machines feeding each other, and modal percussion patches speaking through Modalys, IRCAM's physical modelling engine. Most people watched them as a curiosity. I studied them for months, frame by frame, the way you study a score.
Two things stayed with me. The first was the grammar: sequencing treated not as a line to walk but as a network of permissions, where the music decides its own next move inside rules you compose. That idea is the heart of this machine, and I have pushed it as far as I could. The second was a dependency: those beautiful modal drums leaned on Modalys, an external engine, magnificent and licensed and living outside the patch. I made the opposite choice. Every resonator in AE Machine, every modal voice, every membrane and bar and bell, is written from scratch at sample level, inside the patch, owned entirely. Not because Modalys is not extraordinary. Because I wanted to be accountable for every sample in the signal path, and because an instrument you hand to other people should not stand on software you cannot hand them with it.
And yet, for a long time after those demos, the idea sat still. I had the grammar in my head and no urgency to build it. What set it moving again was not another famous screen but a friend's: Marko Prsa, whose patches I had the luck to see up close. Watching his system at work, alive and personal in a way no product ever is, the itch came back, and this time it did not pass. Some debts are a pleasure to declare: his music lives at modcycadia.bandcamp.com, and it deserves your ears.
Which brings me to what this actually is, and it matters that you know it before you go further. AE Machine is not commercial software in the ordinary sense. Nothing here was designed by a product team or rounded off by user testing. This is my working method, the environment I built night after night for my own music, packaged so that you can play it. When you get it, you are getting research: the reading, the listening, the failed versions, the decisions. Some corners will feel idiosyncratic, a control living where I needed it to live, a behaviour tuned to my ear rather than to convention, a workflow that assumes you will listen before you understand. That is not a rough edge waiting to be sanded off. That is the instrument.
This manual exists precisely for that reason. It is the map I drew while walking the territory, so that the idiosyncrasies become character instead of confusion. Read it with the machine running. Trust your ears over any paragraph in it, including this one.
Where the ideas come from
Most of what this machine does was worked out on paper long before Max was open. For years I filled notebooks studying two Eurorack modules that treat a sequence as something you write rather than a row of steps you fill in: the monome Teletype, where patterns live inside small scripts with variables, conditions, delays and a stack, and Ornament and Crime, which among many other things hands you chaotic attractors as ordinary modulation sources. The page below is one of those notes, kept exactly as it was written.
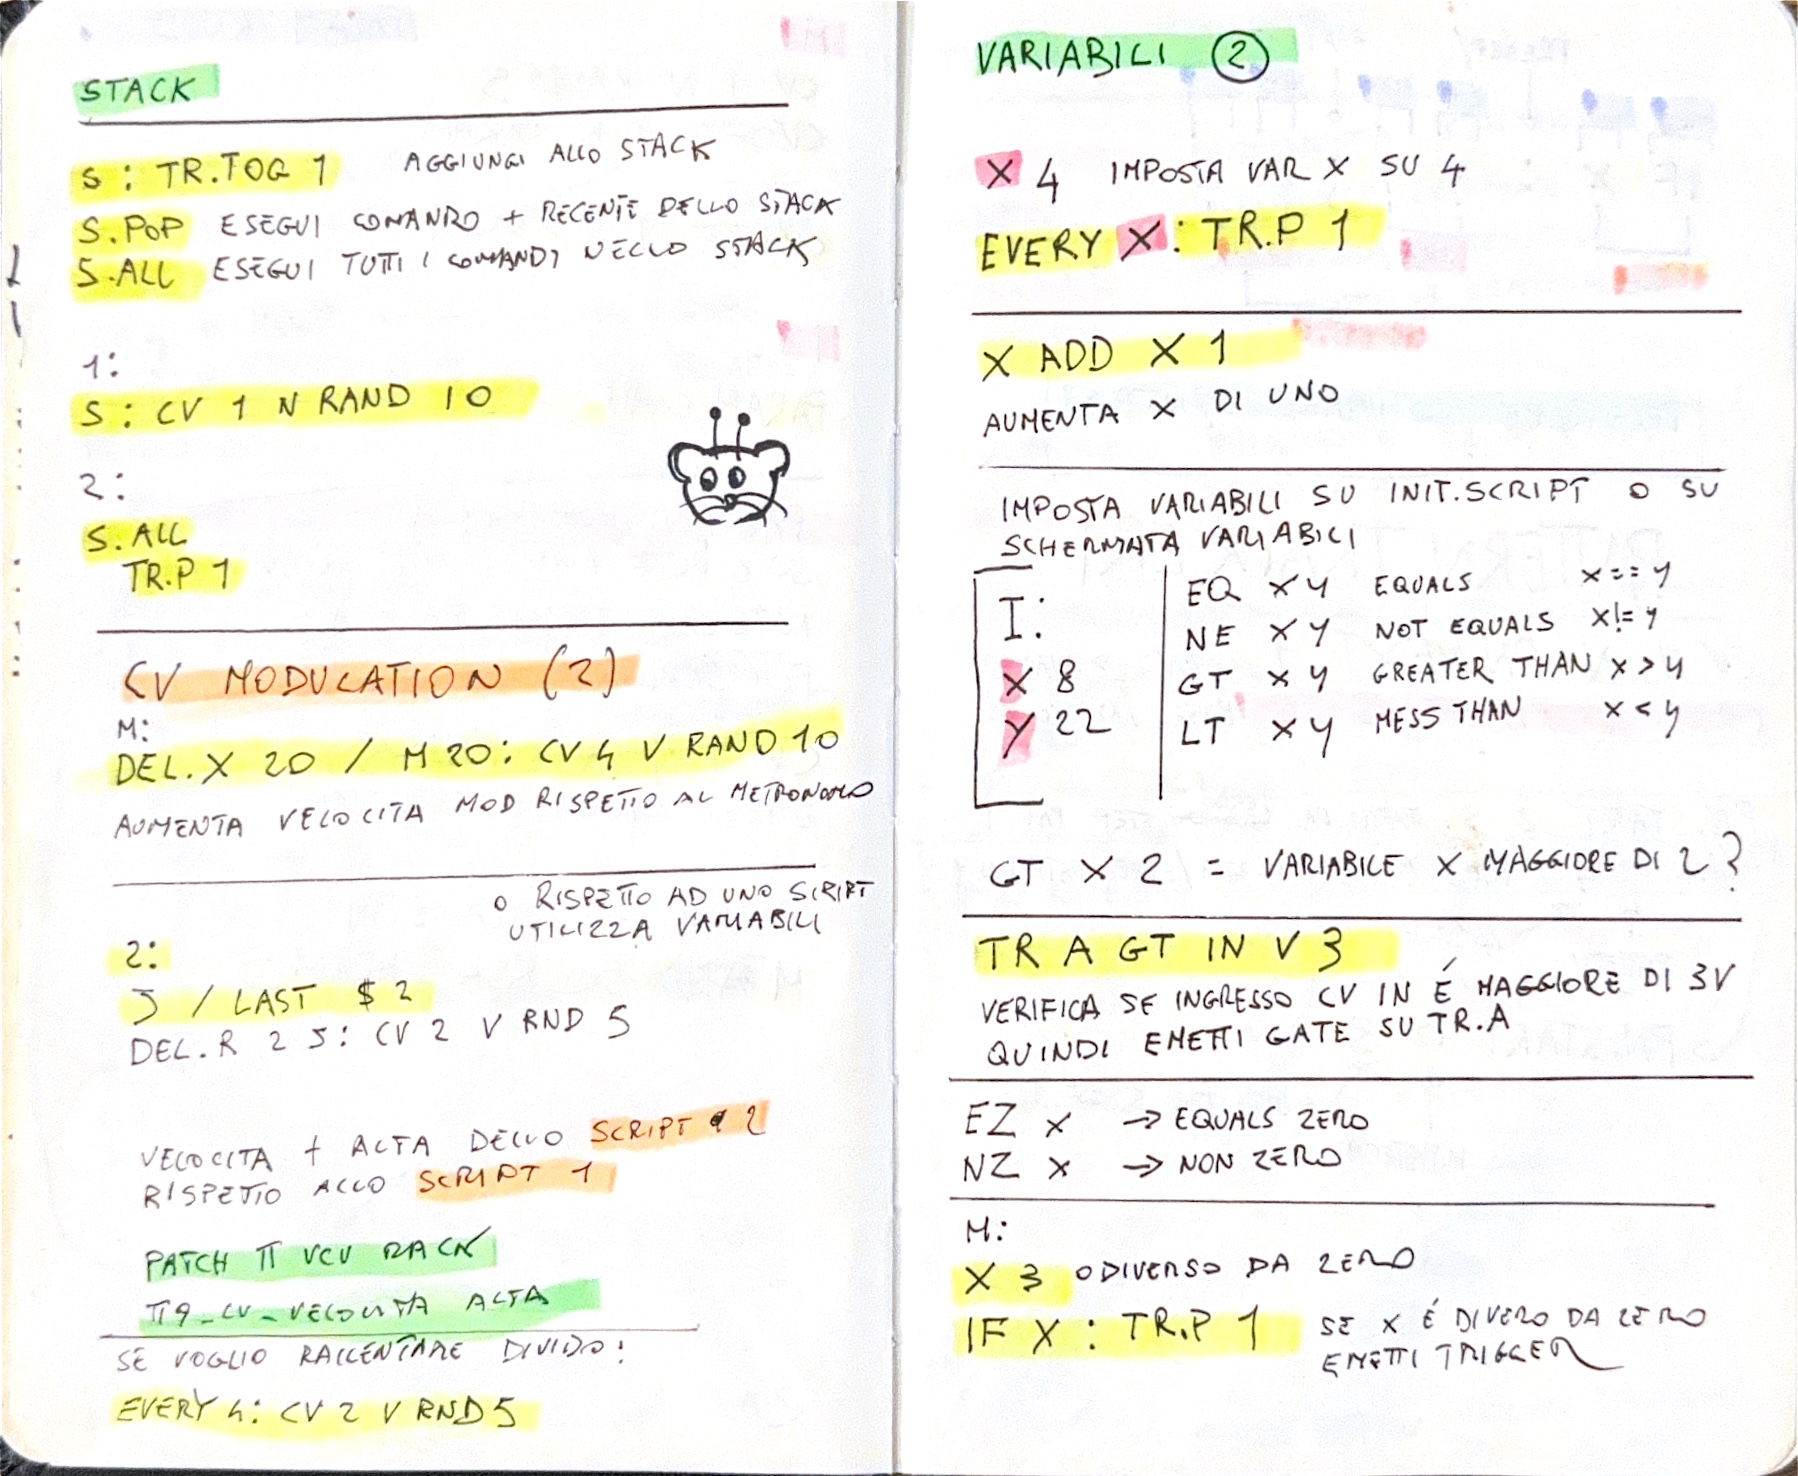
One page of many. Teletype study notes: the stack, variables, comparison operators, triggers that fire only when a condition holds, scripts running against the metronome at their own rates. The grammar of this machine started on pages like this one. (The little mouse is by Arianna, my partner, who leaves small works of art in my notebooks. Of everything on this page, it is the piece I would save first.)
The habits formed there run all through AE Machine. A trigger that fires only when a condition is true grew into the probability jumpers. Scripts running beside the clock, each at its own rate, are the same thinking behind the modulation banks. And the attractor that Ornament and Crime taught me to treat as a musician's tool rather than a mathematical curiosity ended up at the centre of the Terrarium. When I call this machine packaged research, this is what the research physically looked like.
And all of it is written here. There is a normal way to build an instrument like this one, and it is a good way: you drive an existing modelling environment from Max, let something else solve the physics, and spend your time on the musical layer above it. Serious people work exactly like that and get magnificent results. This machine does not. Every voice in it is written from scratch, down to the material engine in chapter 30, where a struck disc is worked out from density, stiffness and geometry: the sixteen mode frequencies come out of Bessel functions solved inside the patch, the resonators are hand-written DSP, and the chaos that moves them is three lines of differential equation running at audio rate. No sample libraries and no licensed engine underneath: every sound this machine makes on its own is made by code written here. You can bolt an external drum synthesizer onto it if you own one, and appendix F explains how, but nothing in the instrument depends on it and nothing is missing without it.
That started as stubbornness rather than principle, and it turned into three things you can feel. The instrument has no dependencies, which is why it runs on a plain unlicensed copy of Max and why it will still run when the next plugin format arrives. Every number inside it is reachable, which is how 264 parameters can be handed over to a chaotic attractor without asking anyone's permission. And when something sounds wrong there is no black box to blame: the fault is mine, in a file I can open, and that turns out to be the only condition under which an instrument really becomes your own.
What it sounded like is on film. Since the first nights I have kept a public video diary of the build: a playlist of short videos in chronological order, from the earliest sketches to the machine as it is today, still growing as the work does. No single video covers the whole timbral range, and none of them tries to. Watched in sequence they show the one thing a manual cannot: the instrument growing up, month by month, mistakes included, and how it sounded at every stage of the way. If you want to know what you are actually buying into, that playlist is the most honest demo there is.
The machine at a glance
| Synthesis | Eleven note-driven voices (FM, modal, drone, hats, sub, string, metal bass, crack, kick) plus two free-running pads and the Big Modal material engine |
| Sampling | A slicing sampler with drawable shape lanes, three pitch-tracked stereo samplers, and an eight-channel clustering sampler |
| Sequencing | 16-step grid, eleven animatable properties per step, step order decided by a 16 × 16 Markov matrix |
| Orchestration | A modulo note sieve that re-orchestrates the pattern when you transpose it; the full cycle repeats only after 840 notes |
| Modulation | One modulator per parameter on every voice panel, seven probabilistic FX banks, and a chaotic matrix reaching 271 targets over 111 internal buses |
| Effects | Six shared processors wired into a 6 × 6 feedback matrix, two micro delays, and a master chain with parallel saturation |
| Recording | A thirty-second looper with hand-drawable playhead curves, and a stem recorder that writes 27 files in one press |
| Presets | 96 scene slots plus a 40-slot material bank for the Big Modal |
| Requirements | Max/MSP 9.1 or later, macOS or Windows, FluCoMa from the Package Manager |
The full specification sheet, counted module by module from the patch itself, is in appendix G.
How to read this manual
The machine is large. You do not have to understand all of it to make music with it, and this manual is built so you can stop reading at any point and still be able to play.
Part 1 gets sound out of it in ten minutes. If you read nothing else, read that. Parts 2 to 6 take one subsystem at a time and explain what it does, what every control changes, and what happens when you push it. Parts 7 to 9 cover saving your work, recording it, and playing live. The appendices are lookup material: the note map, the parameter index, the list of internal buses.
Every chapter title carries the name of the file it describes, like this: FM Voice aemd_fm. If you open the patch and start clicking around, that name tells you where you are. Parameter names are written exactly as they appear on the panels, in the same lettering: what you read as OVR FBK on the looper is OVR FBK here. If you can see it on screen, you can find it in this manual with the same name.
Contents
Part 1 · Getting started
contents1What this machine is
AE Machine is a machine that writes rhythm and then plays it with instruments it builds from scratch. There are no drum samples inside it. Everything you hear at the start is synthesis.
Most drum machines separate two ideas cleanly: a pattern says when something happens, and a sound decides what you hear. This machine keeps a third idea in between, and that third idea is the whole design.
Every step of the sequencer carries a note number. That note does not just set a pitch. It decides which voice answers. The FM voice answers on some notes, the modal voice on others, the sub on others again, and the cycles they answer on are all different lengths: four, three, five, six, seven, eight. Because those lengths never line up, the combination of voices that fires changes constantly, without anyone programming it. Melody and drum kit become the same gesture.
On top of that sits a probabilistic sequencer that does not walk 1, 2, 3, 4. It walks a network. And on top of that sits a chaotic modulation system that wanders through the machine changing parameters and putting them back.
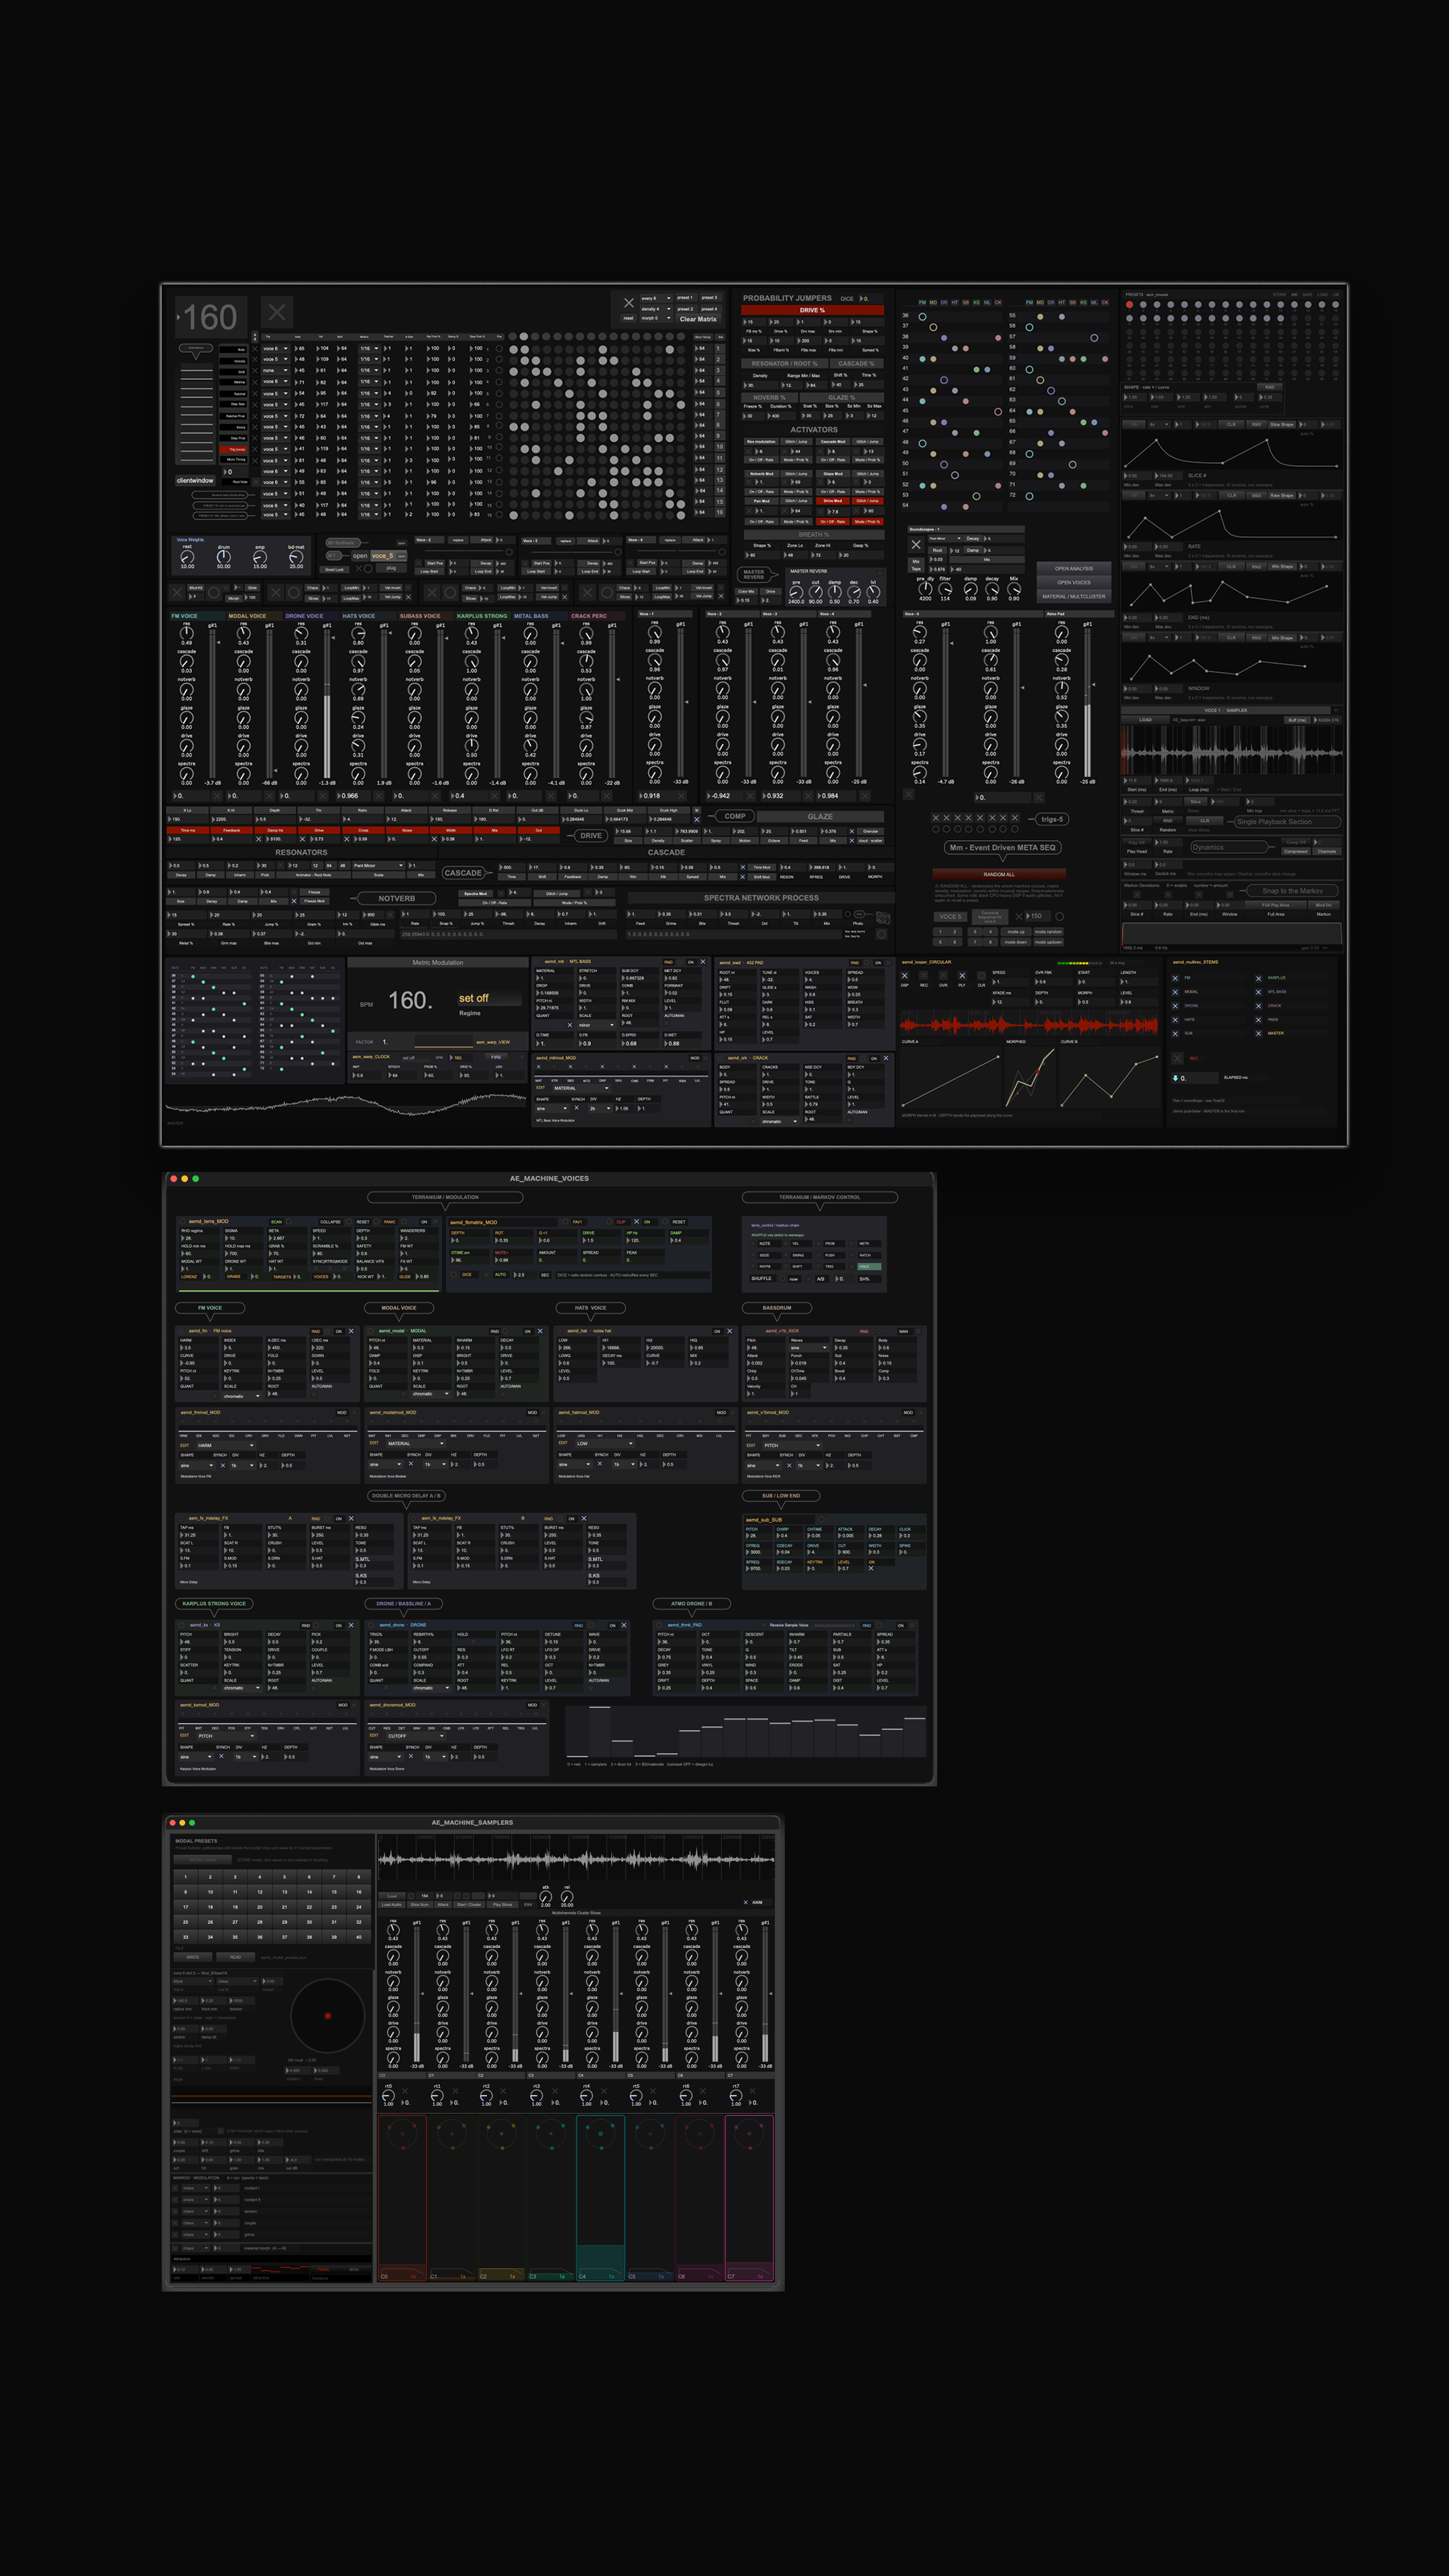
The whole machine. Everything is on one surface: the eye learns it faster than a menu system. Chapter 4 walks through it region by region.
What it is good at
- Beats that never repeat literally, but stay recognisable
- Turning one sample into an hour of material
- Percussion that sounds like an instrument nobody built yet
- Long generative sessions you record and mine afterwards
- Live performance where you steer rather than trigger
What it is not
- A fast way to program a straight four-to-the-floor
- A machine that does the same thing twice unless you tell it to
An instrument, and a quarry
There are two ways to use this machine, and you do not have to choose between them, or master one before the other pays off.
The first is the obvious one: a self-playing instrument. You shape a preset, set the systems in motion, and it carries a whole piece on its own. That way is deep and it takes study. Nobody sits down at this and produces a finished track in the first afternoon, and this manual does not pretend otherwise.
The second way works from the first hour, and it is worth stating plainly because it is easy to overlook: the machine is a construction-material generator. Load a factory preset, press record, let it run for ten minutes, and then go cutting. What you pull out of that recording, a bar of hats, a kick figure, a fill, a texture, a half-built phrase, is material with a quality of timing and timbre that no sample pack contains, because it was never played the same way twice. You assemble those fragments into your own productions, quantised or not, made in this machine or anywhere else.
Everything in this manual serves both readings. Chapter 11 explains why the fragments are worth quarrying, and chapter 53 gives you the tool that makes the harvest effortless: one button that records every voice to its own file. Start as a miner. Become a player when the machine has taught you its logic.
contents2What you need, and how to install it
Requirements
| Max/MSP | Version 9.1 or later, macOS or Windows. No paid license required: see below |
| Screen | Perfectly usable on a laptop; a larger display simply shows more of the surface at once |
| CPU | Apple Silicon, or a reasonably recent Intel or AMD. The machine runs at roughly 40 to 55 percent of one process with everything on, and has been tested comfortably on a two year old Windows laptop |
| RAM | 4 GB free is plenty |
| Audio | Any interface. A buffer of 256 or 512 samples is a good starting point |
Installing
- Copy the whole
Machinefolder wherever you like. Keep it together: the project file expects its own subfolders. - Copy the contents of the separate audio download into
samples/. - Install FluCoMa, the one external dependency: in Max, open the Package Manager, search for FluCoMa and click Install. This works identically on macOS and Windows. If the Max Console ever complains about
fluid.objects it cannot find, this step was skipped or done while the project was open: install the package, then close and reopen the project. - Open
Machine.maxproj, not the patch file. Opening the project tells Max where everything lives. - Turn on audio. Start at a low volume.
Optional, not required: the machine can host two external drum synthesizers if you already own them, Sonic Charge Microtonic and the Gearmulator Elektron emulators (which need firmware from hardware you own). If they are not installed the instrument simply plays without them: every voice described in this manual is built in and nothing else in the machine depends on their presence.
Machine.maxpat directly, Max will find most files anyway, but not reliably. The project file is what defines the search path.
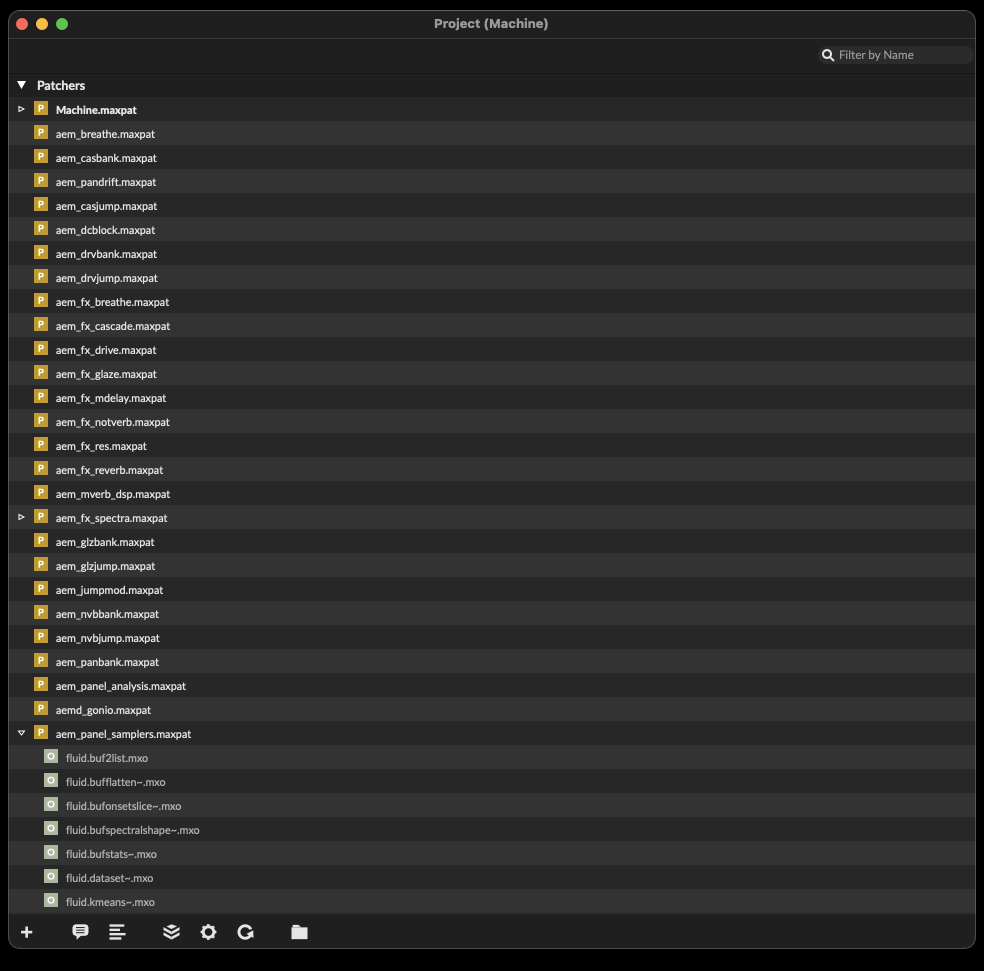
The project window. Ninety-four patchers, twenty-five scripts, the preset library and the recordings folder.
An open instrument, by choice
One decision deserves a word here, because it shapes what you are holding. I could have packaged AE Machine as a sealed standalone application: one icon, no visible insides, nothing to break. I chose not to. What you get is the full Max project, every patcher openable, every cable visible, every line of every script readable. Unlock the patch and you are looking at the actual working method this manual keeps referring to: how the voices are wired, how the buses run, how the modulation reaches its targets. Nothing is hidden and nothing is obfuscated. If you bought this partly to learn, that is where the learning is.
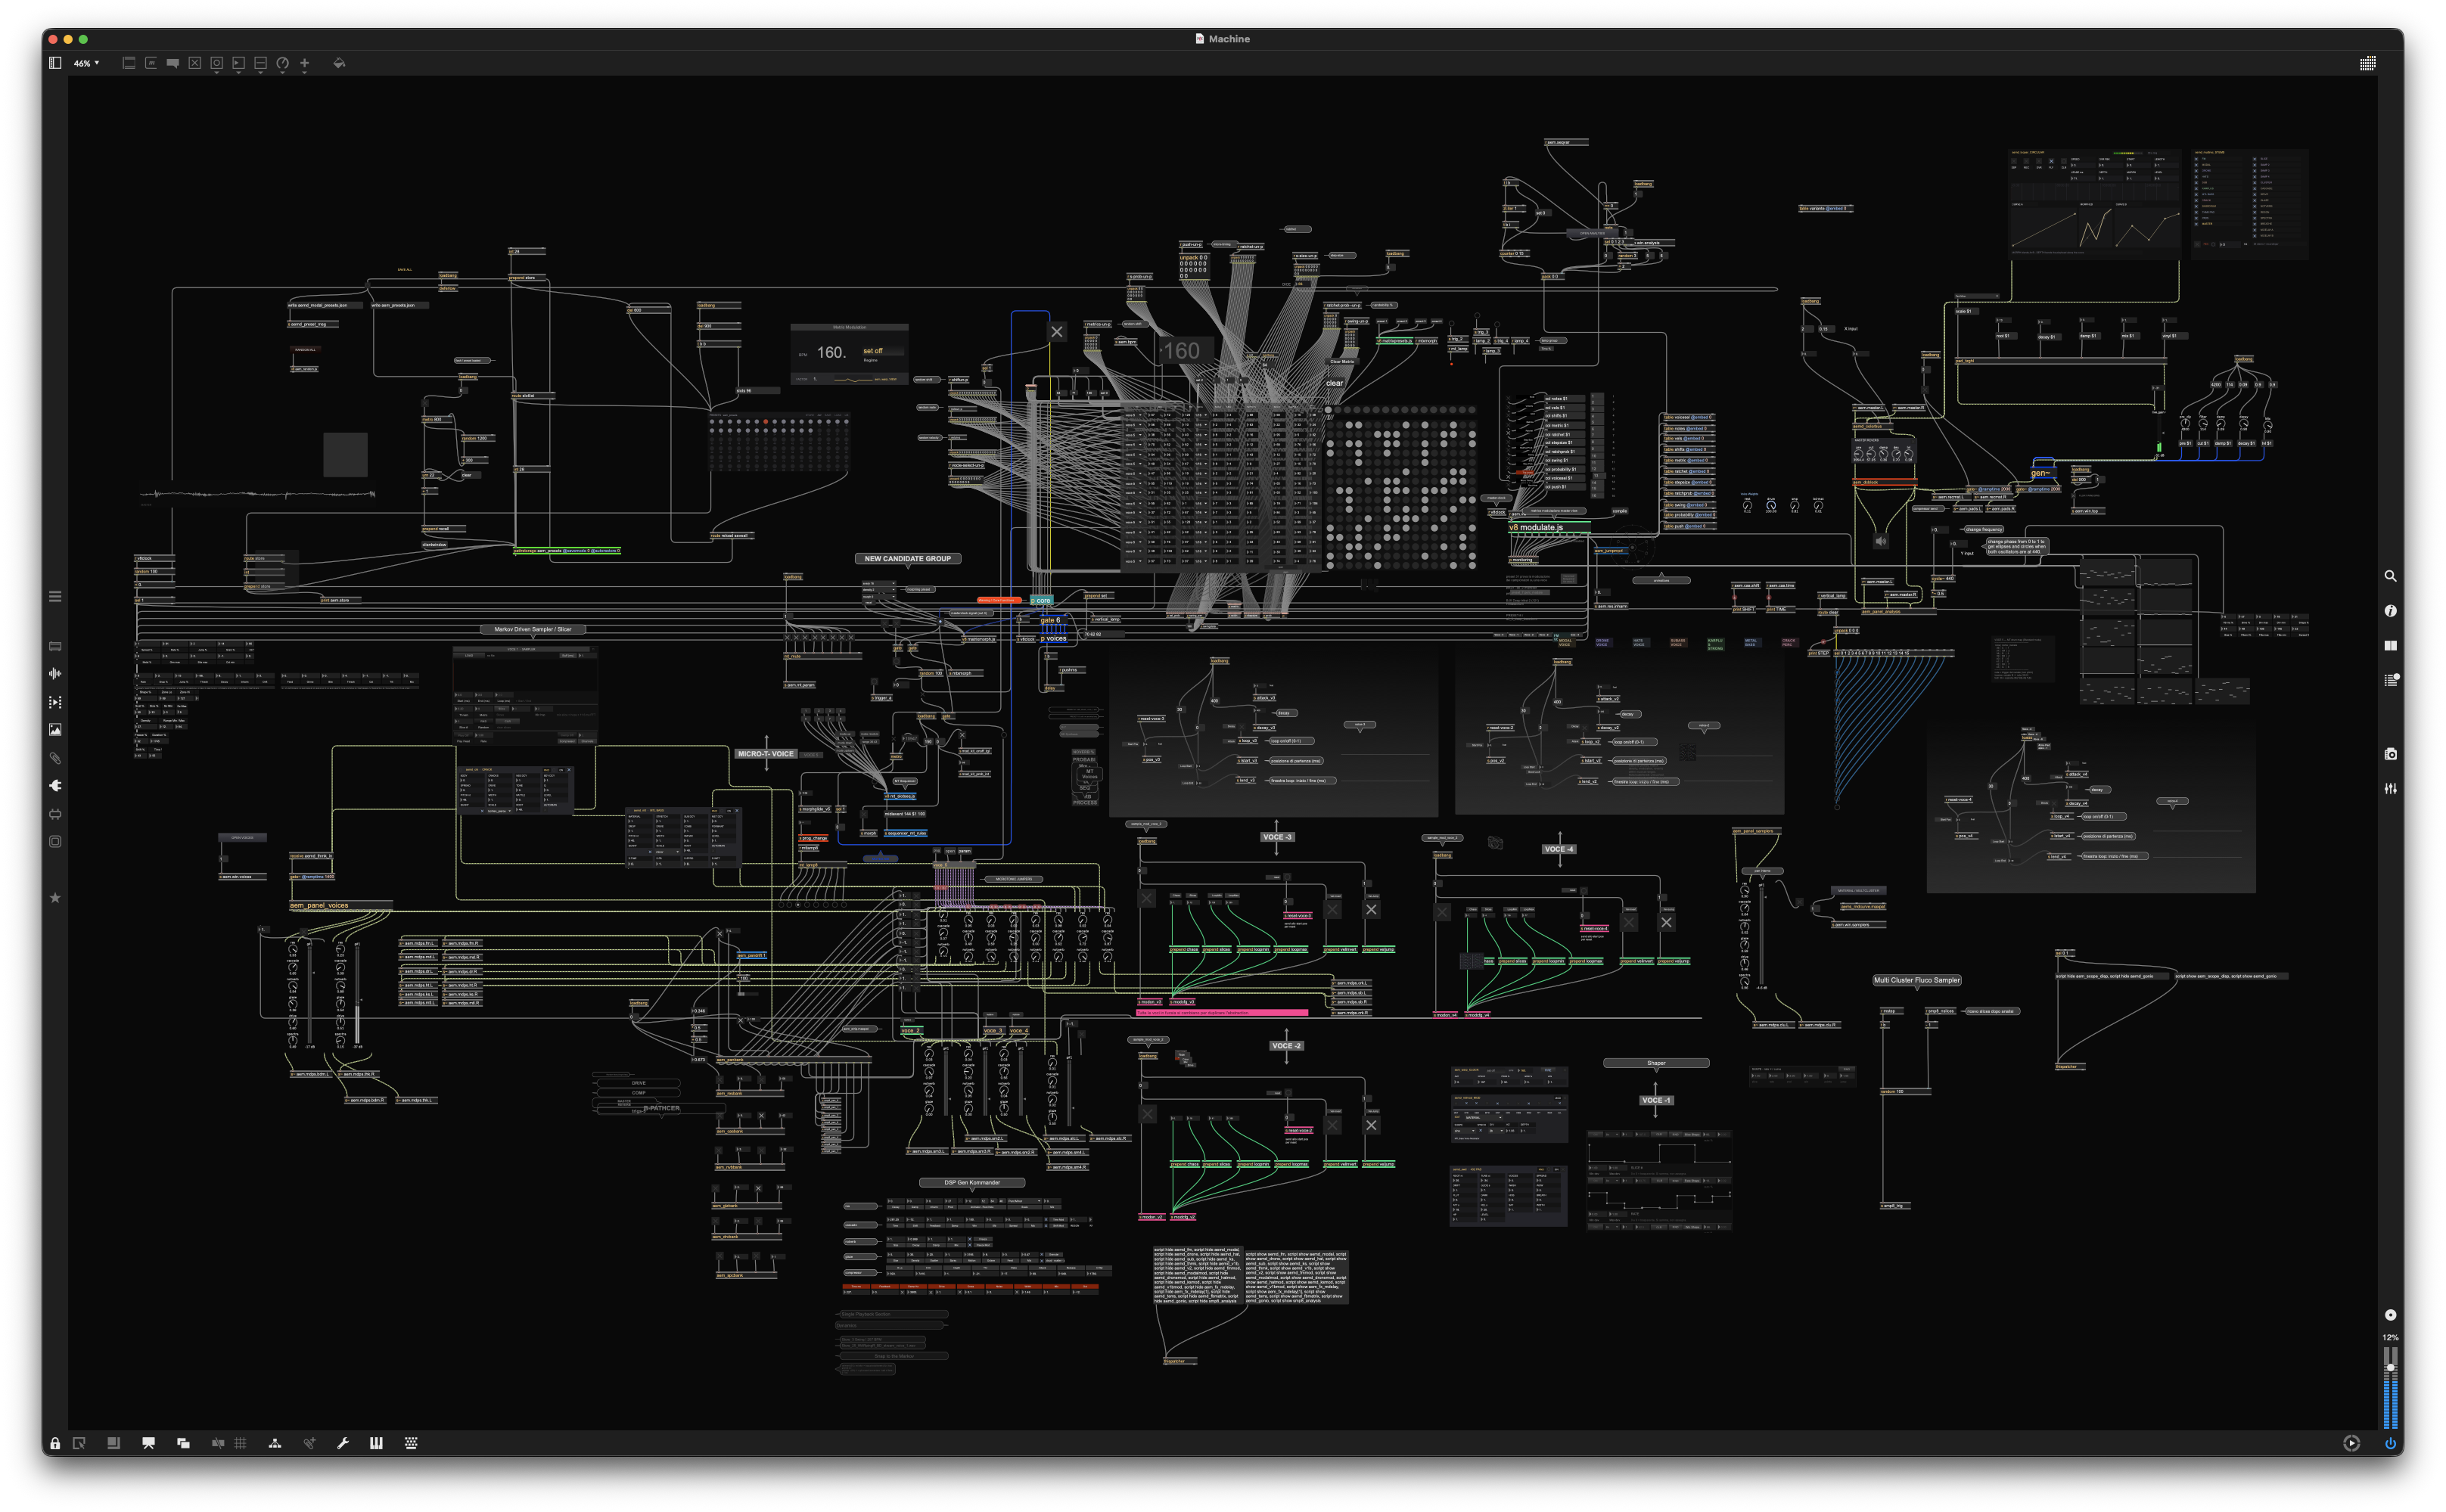
The machine with the panels off. The same patch you play, unlocked: the sequencer feeding the voices, the Markov matrix, the voice groups with their gen~ cores, the samplers, the buses. Every cable in this picture is doing something you have heard.
contents3The first ten minutes
The fastest way in is to load a preset, listen, and only then start turning things.
Step one: make it play
- Turn audio on in Max.
- Find the preset grid in the upper right of the screen: ninety-six small dots in a rectangle, with a header that reads
PRESETS · aem_presets. - Click slot 1. The dot turns red. That is the active preset.
- Find the big BPM number on the left and the transport toggle next to it. Turn it on.
Sound. If there is none, jump to appendix D.
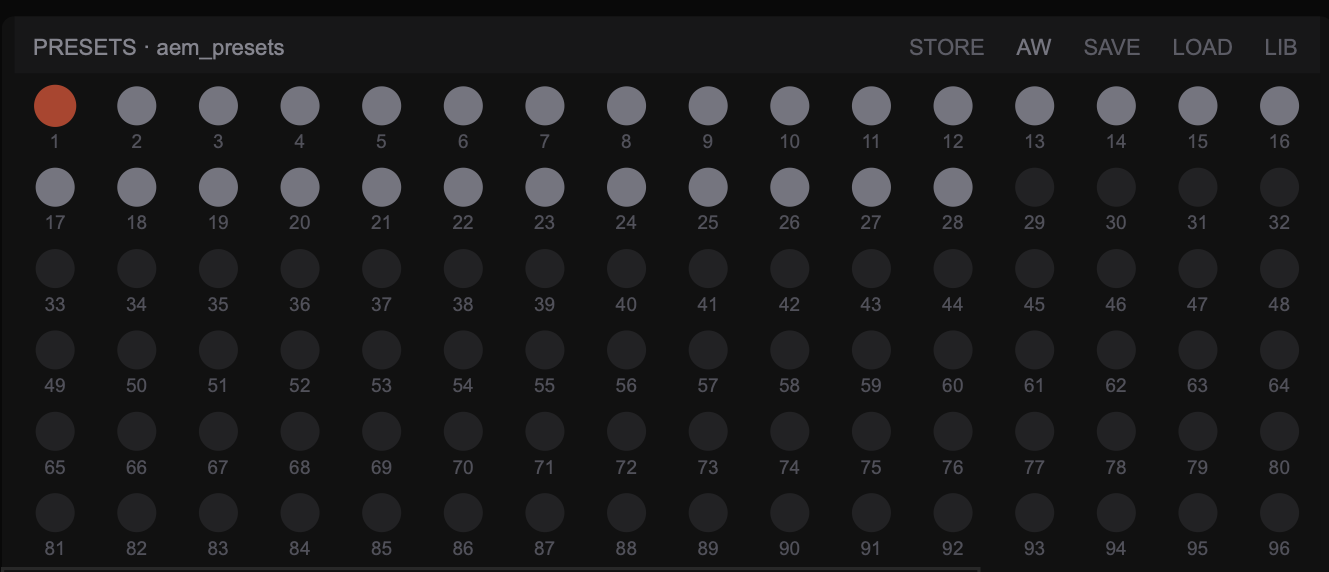
The preset grid. Grey dots are empty slots, light dots are saved, the red dot is what you are hearing now. Hovering tells you the state of a slot in the header.
Step two: change what you hear without breaking anything
These four moves are safe. None of them can destroy your preset, because nothing is written to disk unless you explicitly save.
- Try other presets. Click slots 2 through 35. This is the factory library: the first twenty-eight are pure synthesis, and the last group carries its own samples, which load themselves on recall, slices and all. Slots 1 and 28 are the most stable references: they were built to sound the same every time.
- Move the voice faders. The mixer strip is the row of vertical faders in the middle. Each one has a coloured label above it: FM, MODAL, DRONE, HATS, SUB, KARPLUS, METAL BASS, CRACK. Pull one down and hear what leaves.
- Turn the dice up. Find
DICEin the Probability Jumpers box, upper middle. It is at 0. Take it to 20. The effects start jumping on their own. - Turn on elastic tempo. Find the
aem_warp_CLOCKpanel at the bottom. Flip its toggle. The tempo starts breathing: it thins out, accelerates, brakes, and relaunches at a related speed.
Step three: save your own
- Get the machine into a state you like.
- In the preset grid header, click STORE. A red border appears around the grid: it is armed.
- Click an empty slot, for example 40. It saves and disarms itself.
One thing to know before you trust your saves
A preset is a place, not a photograph. Recall the same slot twice and it may not sound identical, and this is the architecture working, not a fault.
Three things are moving underneath. Modulators that run free, not locked to a musical division, resume from wherever their cycle happens to be, so the same settings arrive at a different moment of their motion. Everything probabilistic, the dice, the step probabilities, the jumpers, is rolled fresh: the preset stores the odds, never the outcome. And the machine arrives at a preset from somewhere: the previous state leaves a wake, sustained voices and long envelopes need a moment to settle, and for the first seconds you are hearing the machine finding its way into the saved configuration rather than the configuration itself.
What is exact: every value you dialled is restored precisely, every time. The recipe is exact. The weather around it varies. If you need a recall to be as repeatable as possible, sync your modulators to a division instead of leaving them free, keep the dice at 0, and give the machine a few seconds to settle after the click. Chapter 46 tells the full story of what is saved and what stays alive.
The other way in: building from nothing
Starting from a preset is the fast way, and it is the one I would recommend for the first hour. But sooner or later you will want to hear the machine with none of my decisions in it, and the path is short enough to describe in one page.
- Clear the ground. Recall a preset you do not care about, then set every Trig to
none. You now have the whole machine configured and nothing playing, which is a much better starting point than a blank slate. - Choose the family. Set Trig to
voce 5on eight or ten rows. This is the lane where the eight synthesis voices live and where the note picks the instrument. - Write notes, not melody. Put numbers between 36 and 72 in the Note column. On this lane a note is an address, not a pitch: 36 fires the FM voice alone, 37 the modal voice alone, 59 fires four voices at once. Keep appendix A open and choose deliberately, or write nonsense and see who answers. Both are legitimate.
- Press play. The transport toggle sits next to the big BPM number.
- Open the voices window and look. This is the step that is easiest to skip, and it is the one that teaches you the machine: you can see which voices are receiving and which are silent, and match that against what you wrote.
- Make it breathe. Two columns, no more, for now: Step Prob around 70 so the pattern stops repeating identically, and Metrics different on a few rows so the steps stop being the same length.
- Now touch the sound. Go into a voice that is actually sounding and turn its controls while the pattern runs. Never design a sound in silence: in this machine you are not shaping a note, you are shaping how a voice answers a stream of them.
voce 1, which is an empty lane, or on none; the voice you addressed is muted in the mixer; or the notes you wrote all belong to voices you have turned down. Appendix D covers the rest.Once that works, everything else in this manual is an answer to a question you will now be in a position to ask. That is the honest order: make it play first, understand it second.
contents4A tour of the screen
Everything is visible at once. That is deliberate, but it means you need a map. Here is the surface, region by region, starting top left and moving clockwise.
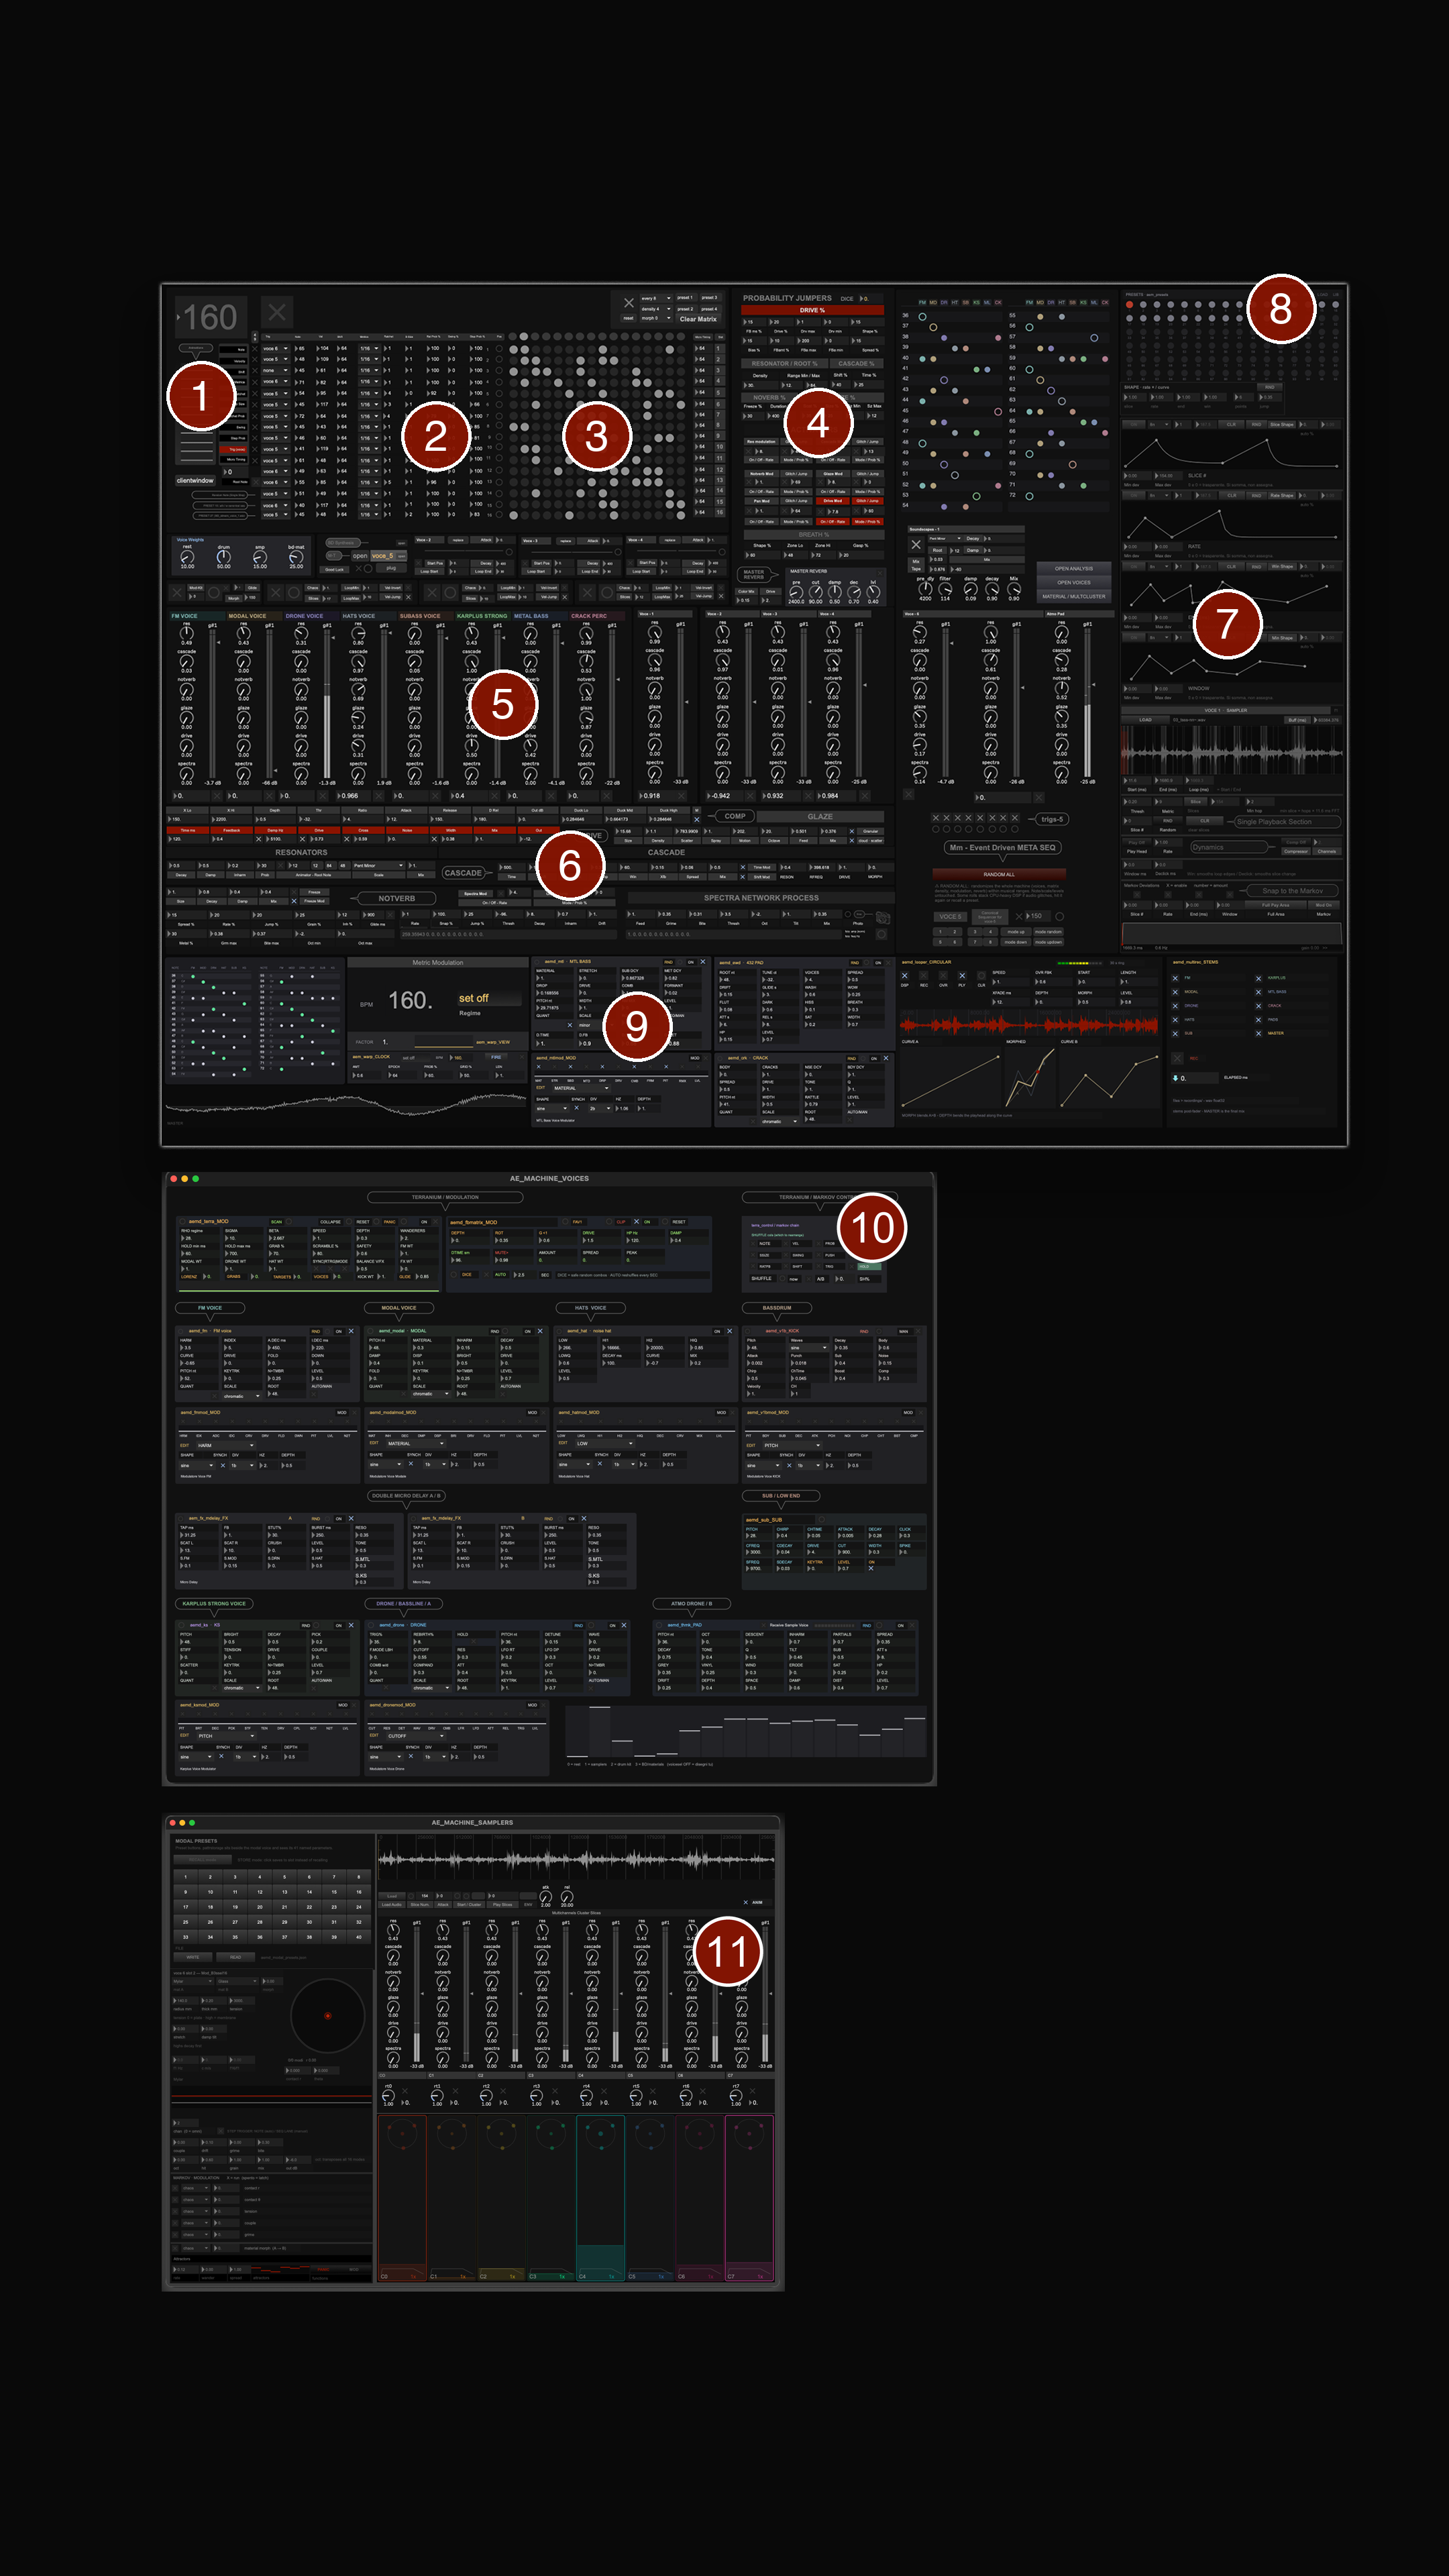
The nine regions, plus two windows. Numbers refer to the list below. 1 to 9 live on the main surface; 10 and 11 are separate windows, opened from the buttons described just after the table.
| Region | What lives there | Chapter |
|---|---|---|
| 1. Transport | BPM, master clock, master gain, the sequencer's step readout | 6 |
| 2. The grid | Sixteen rows, eleven columns. The pattern itself | 6 |
| 3. Markov matrix | The 16 × 16 dot field that decides step order | 7 |
| 4. Jumpers | Probability jumpers, the global dice, the activators | 12 |
| 5. Mixer | Fifteen channel strips with sends, pan, mute, compressor | 31 |
| 6. Effects row | Resonators, Cascade, Notverb, Glaze, Drive, Spectra, Breathe | 31 to 37 |
| 7. Slice sampler | The slice sampler and its four shape curves | 26, 27 |
| 8. Presets | The ninety-six slot grid and its command bar | 46 |
| 9. Bottom row | Elastic tempo, the lower voice panels, looper, stem recorder, master scope | 11, 21, 22, 25, 51, 53 |
| 10. Voices window | Terrarium and the feedback matrix, the voice panels with their modulators, the micro delays and the sub | 15 to 25, 38, 39, 41, 44 |
| 11. Sampler window | The big modal preset bank, samplers 2 to 4, the multicluster | 28, 29, 30 |
The three extra windows
Three buttons on the right open separate windows. They exist because the main surface ran out of room, and because keeping heavy graphics closed saves a lot of CPU.
| OPEN VOICES | The voice panels, their modulators, Terrarium, the feedback matrix and the two micro delays aem_panel_voices |
| MATERIAL / MULTICLUSTER | The sampler window: slice sampler, multicluster, big modal aem_panel_samplers |
| OPEN ANALYSIS | Meters, scope, stereo field aem_panel_analysis |
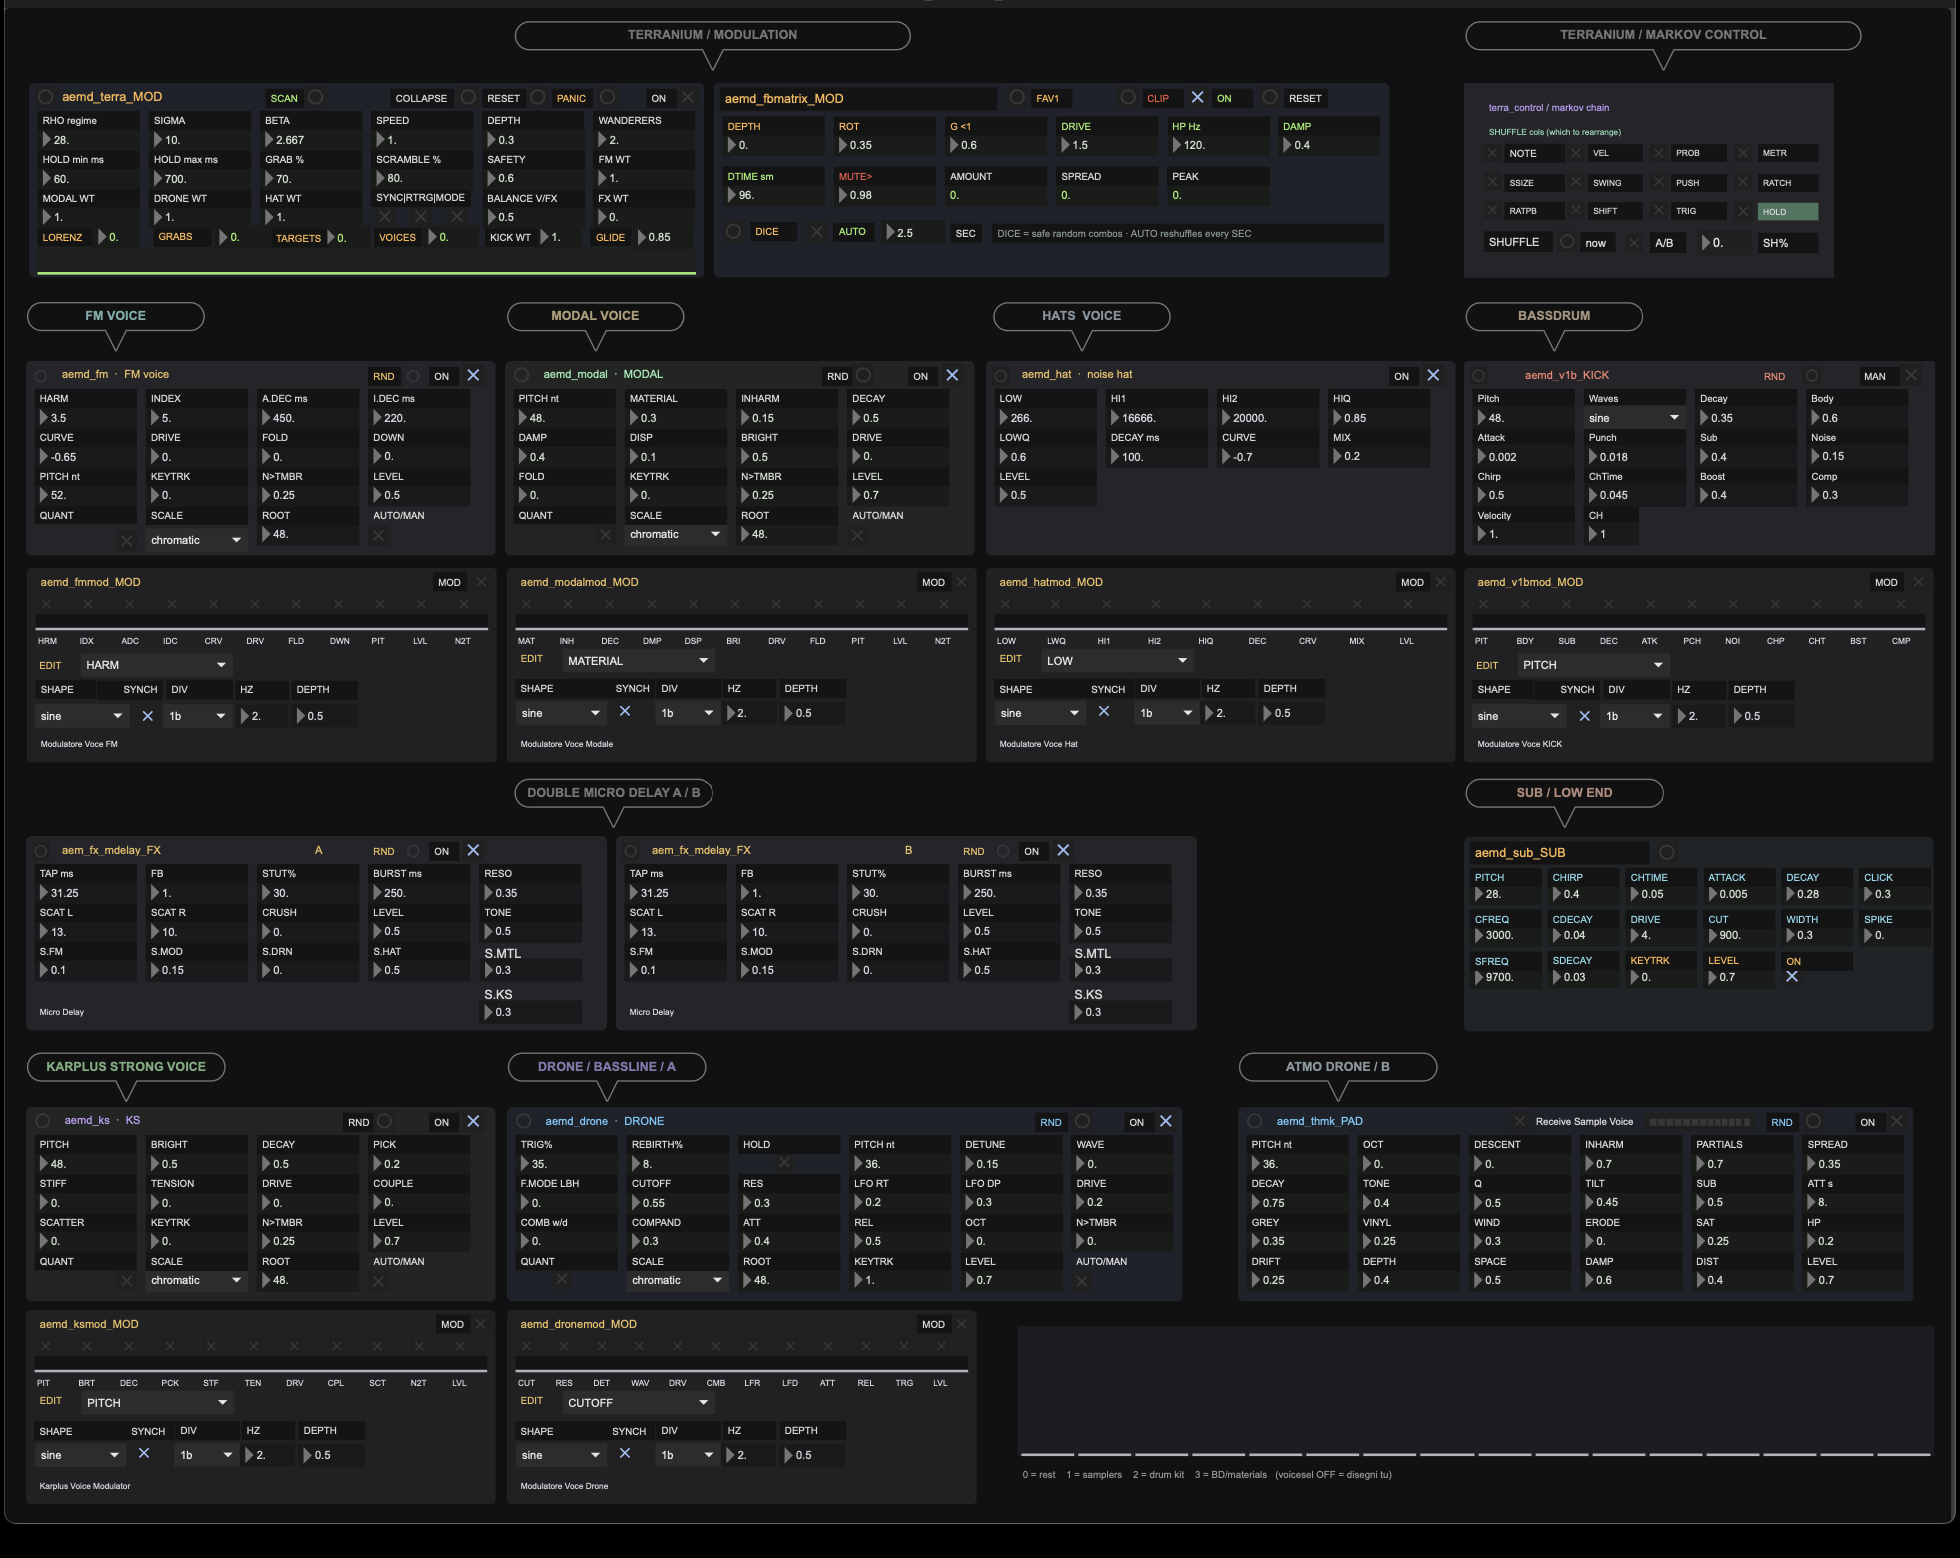
The voices window. Modulation at the top: Terrarium on the left, the feedback matrix beside it. Below, the voice panels, each with its own modulator panel underneath. The two micro delays and the Sub voice sit in the middle row. Every panel here has its own chapter in Part 3.
Knowing what is sounding
On an instrument with this many sources, the most useful skill is not sound design, it is orientation: at any moment, knowing which of the twenty-odd things that could be sounding actually is. The machine gives you three kinds of witness, and it pays to learn to read them early.
The lamps. Most voice panels carry a small lamp that flashes on every trigger the voice actually plays. A lamp flashing while you hear nothing means the sound is there but buried or faded; a lamp dark while you expected notes means the dispatch never reached the voice, and the Trig column is the place to look. Lamps tell you about events.
The faders. The mixer strips are live faders: they draw the signal passing through them in real time. A strip that dances is a voice that sounds. This is the fastest full-picture check there is: one glance across the mixer row tells you exactly who is playing, before your ear has even separated the layers. Faders tell you about signal, with one exception worth knowing by heart: the strips carry the voices, not the effect returns, so an effect that sustains itself can keep sounding while every fader sits perfectly still: Glaze's granular residues (chapter 35) and a frozen Notverb (chapter 34) both do it by design. That is why their Mix controls are painted red, and why each panel carries a small pale meter of its own that moves only when that effect is the one you are hearing.
The meters. Several processors expose their own: the convolution processor's display, the master scope in the analysis window, the counter on the looper panel. When you are unsure whether a processor is doing anything, its own meter is more honest than the mix.
And the method, when something sounds and you cannot tell what: pull the strips down one at a time and watch what leaves the picture. Thirty seconds of that beats ten minutes of guessing. The same trick in reverse is essential when auditioning the tape processor (chapter 52): what you want to hear is often under what is playing.
contents5Five rules that will save you trouble
1. Store captures everything, always
There is no partial save. Pressing STORE writes the state of the entire machine into that slot: every voice, every effect, every modulator, the pattern, the matrix. This is what makes presets so powerful, and it is why you should never store onto a slot you want to keep.
2. What is alive does not get photographed
Presets save settings. They do not save what the machine is doing at that instant. The contents of the looper buffer, the position of the chaotic modulator, the current phase of every LFO, the result of the last dice roll: none of that is in the file. Chapter 46 goes through this in detail, because it is the single most common source of confusion.
3. Turn off what you are not using
Every voice has an ON toggle that mutes its DSP entirely. Every panel window you close stops drawing. Graphics cost more than you expect: closing the voice window is worth more CPU than muting three voices.
4. Feedback is real feedback
The feedback matrix genuinely routes effects into each other. It is protected by design, it cannot run away, but it can get loud in the musical sense. Start at DEPTH 0 and come up slowly, and treat its level like any instrument's.
5. The samples do not load themselves
None of the samplers reload their audio when you open the patch. Buffers come back empty. If a preset sounds thin compared to what you remember, check whether its sampler had a file loaded.
Part 2 · The generative core
contents6The sequencer: sixteen steps, eleven columns
The pattern is a table. Sixteen steps down, eleven properties across. Every property is independent, and every one of them can be animated.
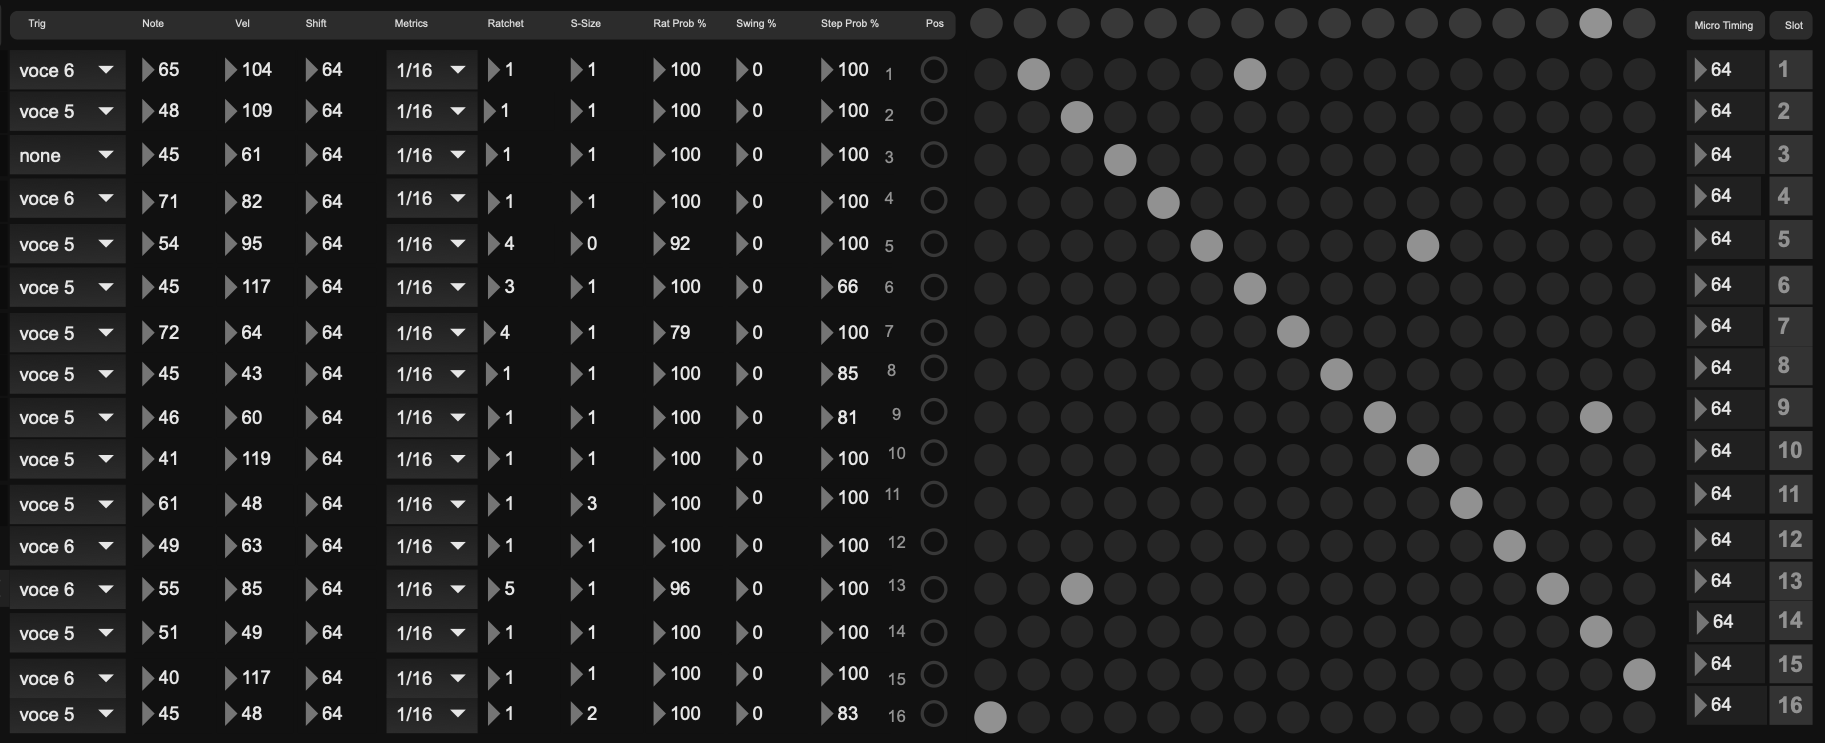
The grid. One row per step. The Pos column on the left lights up to show where the sequencer actually is, which is not necessarily where you would expect: see chapter 7.
The eleven columns
| Column | What it does | Range |
|---|---|---|
| Trig | Which family answers this step. none is a rest | menu, 7 entries |
| Note | The note number. Sets pitch and chooses the voice | 0 to 127 |
| Vel | Velocity. Loudness, and in the samplers much more | 0 to 127 |
| Shift | Micro-detune, centred on 64 | 0 to 127 |
| Metrics | The note value of this step, from 1/4 down to 1/64, plus triplets and dotted | 10 entries |
| Ratchet | How many retriggers inside the step | 1 to 8 |
| S-Size | Multiplies the step length | 1 to 4 |
| Rat Prob % | Chance the ratchet actually fires | 0 to 100 |
| Swing % | Shortens and lengthens alternate steps | 0 to 100 |
| Step Prob % | Chance this step plays at all | 0 to 100 |
| Micro Timing | Pushes the event early or late, up to 25 ms either way. 64 is centre | 0 to 127 |
Trig: the seven families
none | Rest |
voce 1 | Empty. No voice listens on this lane, so a step set to it is silent. See chapter 14 |
voce 2, 3, 4 | The three stereo samplers |
voce 5 | The drum kit. All eight synthesis voices live here, sorted by note. See chapter 14 |
voce 6 | Kick and big modal |
voce 5 family can also drive an external drum synthesizer: the machine is pre-wired for Sonic Charge Microtonic, and other instruments can be integrated. Without any plugin nothing is missing, the eight synthesis voices carry the family entirely. Details in appendix F.
How a step becomes time
The chain is worth knowing because it explains why the machine can feel elastic even with swing at zero:
BPM → note value from Metrics → multiplied by S-Size → multiplied by Swing → multiplied by the elastic tempo factor → that is the step length. Then Micro Timing delays the event itself by up to 25 milliseconds without moving the clock.
- Set Trig to
voce 5on eight or ten rows and leave the others onnone. Everything now plays through the sieve, which is the part of the machine that decides who answers. - Write some Note numbers, anywhere between 36 and 72. Do not think about pitch: you are choosing which instruments answer, not which notes. Appendix A is the map, and it is worth keeping open the first few times.
- Press play. Then set Step Prob to something like 70 on half the rows, so the pattern stops repeating identically.
- Now open the voices window and look at what is actually sounding. Some rows will be silent, and that is normal: the note you wrote belongs to a voice you have muted or turned down.
contents7The Markov matrix
A normal sequencer goes 1, 2, 3, 4. This one goes wherever the matrix lets it.
The sixteen by sixteen dot field is a map of permitted moves. Each row is a step; the dots in that row are the steps it is allowed to jump to. When more than one dot is on, the sequencer picks one at random each time it passes. That is the whole idea, and it is why one programmed pattern produces many different readings.
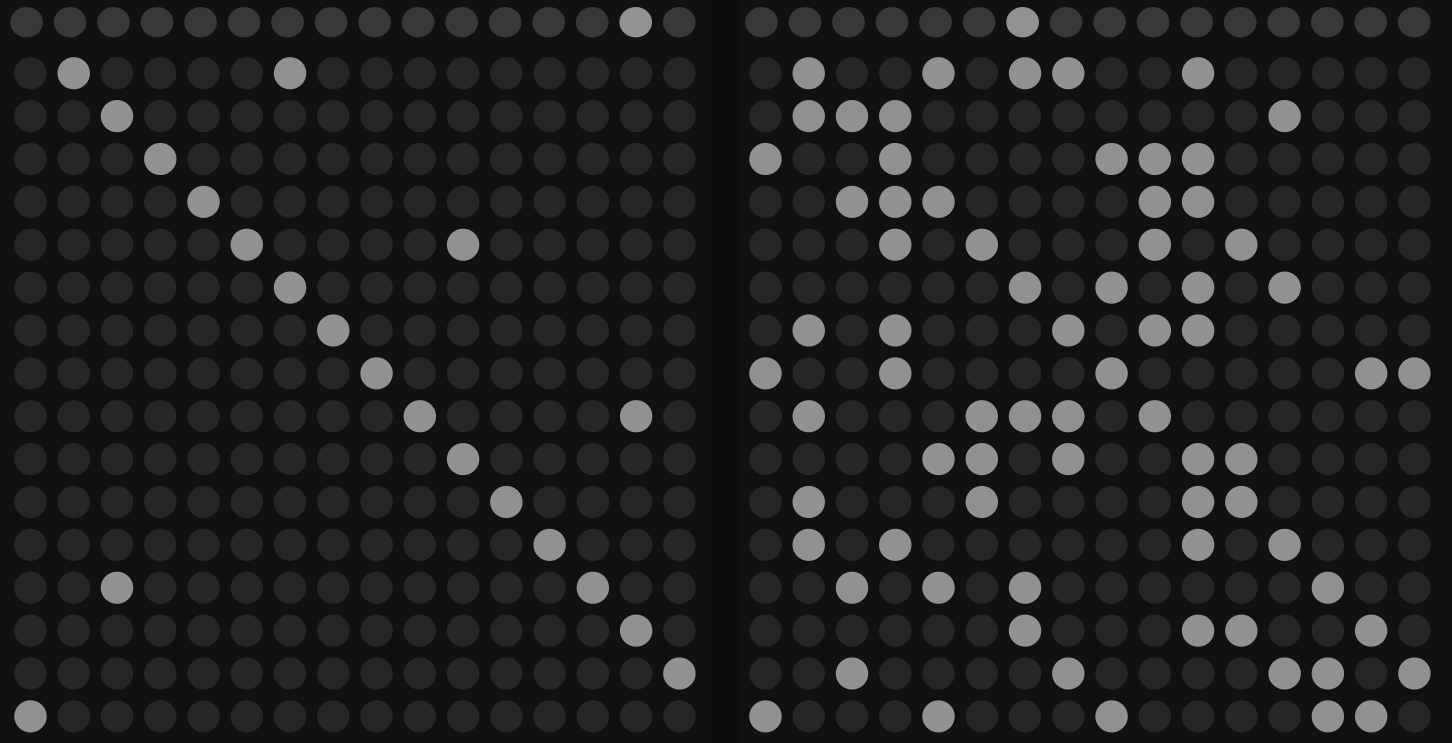
Left: the plain chain, every step pointing at the next. Right: a dense matrix. Same sixteen steps, completely different music.
The four starting points
| Preset | Shape | Sounds like |
|---|---|---|
| 1 | Straight chain | A normal sixteen step loop. Use it as a reset |
| 2 | Chain with returns every four | Bars that fold back on themselves. Still danceable |
| 3 | Five three-step cells, bridged | Rolling triplet feel against the grid |
| 4 | Wide permutation plus jumps of three | Dense, unpredictable, no downbeat |
Working with it
- Draw it by hand. Click cells. Row = where you are, column = where you can go.
- Clear Matrix empties it.
- Fewer dots is stronger. A matrix with two exits on three rows and one exit everywhere else gives you a recognisable loop with three moments of doubt. That is usually more musical than a field of dots.
contents8The matrix that rewrites itself
The matrix can also edit itself while you listen. This is where a pattern stops being a pattern and becomes a process.
Turn on the toggle next to the three menus near the matrix and it starts working.
| Control | What it does | Values |
|---|---|---|
| every | How many steps between rewrites | 8, 16, 32, 64, 128 |
| density | Extra jumps added per step, on top of the plain chain | 0 to 4 |
| morph | 0 rewrites the whole matrix. 1 mutates it gradually | 0 or 1 |
Rewrite throws the map away and draws a new one. You hear a clear before and after. Mutate removes one or two jumps and adds one or two, so the grammar drifts. Over a few minutes the music becomes something else and you cannot point at the moment it changed. That second mode is the more musical of the two by a distance.
contents9Column animation
Each of the eleven columns can be set moving on its own. The mechanism is a shift register: the column rotates by one position every step, and now and then a new value is injected at the top.
The toggles are in the Animations column beside the grid, one per property. Turn one on and watch its multislider: the values slide along the sixteen steps, so a figure you programmed at step 1 arrives at step 2, then 3, and slowly decays into something else as new values enter.
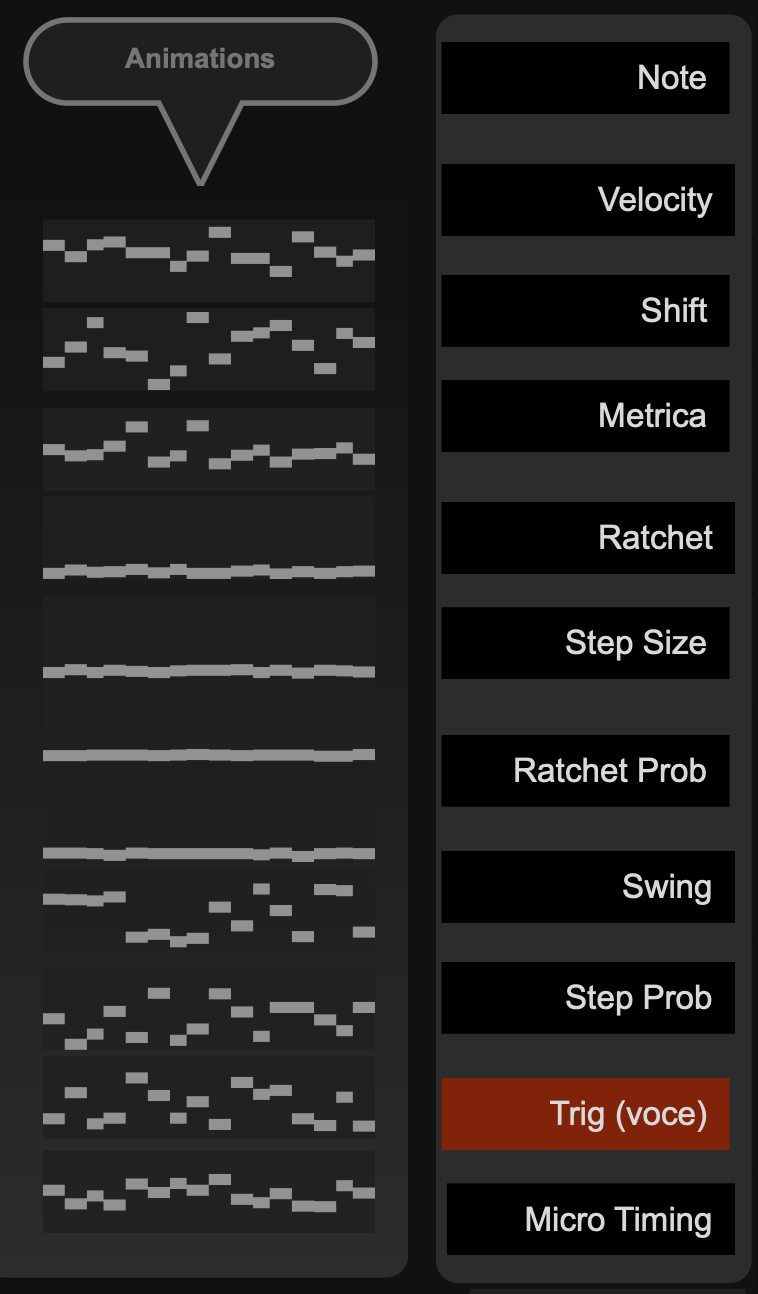
Eleven small displays. Each shows the current contents of a column. Watching them is the fastest way to understand what the machine is doing to your pattern.
Which ones to animate
| Subtle | Structural |
|---|---|
| Shift, Vel, Micro Timing | Note, Trig, Metrics, Step Prob, Ratchet |
Animating Note is the big one, because in this machine notes choose instruments. A rotating note column makes the same rhythmic figure migrate from the kick to the modal voice to the sub. Animating Metrics is the other big one: it makes the pulse itself irregular.
contents10Voice weights
When the Trig column is animated, something has to decide which family comes up. Five dials set the odds.
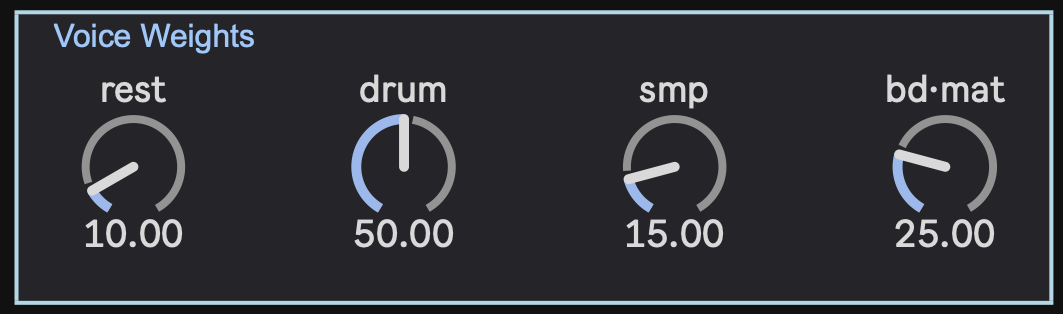
Five dials, the whole character. This small panel decides what kind of machine you are listening to.
| Dial | Chooses | Default |
|---|---|---|
| rest | Silence | 10 |
| voce 1 | The bass drum voice (chapter 14) | 0 |
| drum | The drum kit, all eight synth voices | 51 |
| smp | One of the three samplers | 15 |
| bd·mat | Kick and big modal | 25 |
They are weights, not percentages: what matters is their proportion. Raising rest to 40 gives you a sparse, spacious pattern. Taking smp to 0 removes the samplers from the draw entirely.
Do not let the size of this panel fool you: these five dials are the macro control of the machine's character. They do not change any sound, they change which voices play, and that is a deeper lever than any filter. All the way toward drum the machine is a drum machine. Push rest and it becomes sparse and architectural, the same music with air inside. Raise smp and the sample material comes forward. In a live set, slowly rebalancing these five dials is one of the most musical gestures the machine offers: the pattern never changes, the set of voices playing it does.
Drawing the orchestration by hand: Voice Dispatch
There is a third way to orchestrate, and it lives in the voices window (window 10 on the map in chapter 4), bottom centre: a lane called Voice Dispatch. Sixteen bars, one per step, four possible heights. It is exactly the same decision the four dials make by chance, except here you write it yourself, with the mouse, in one gesture.
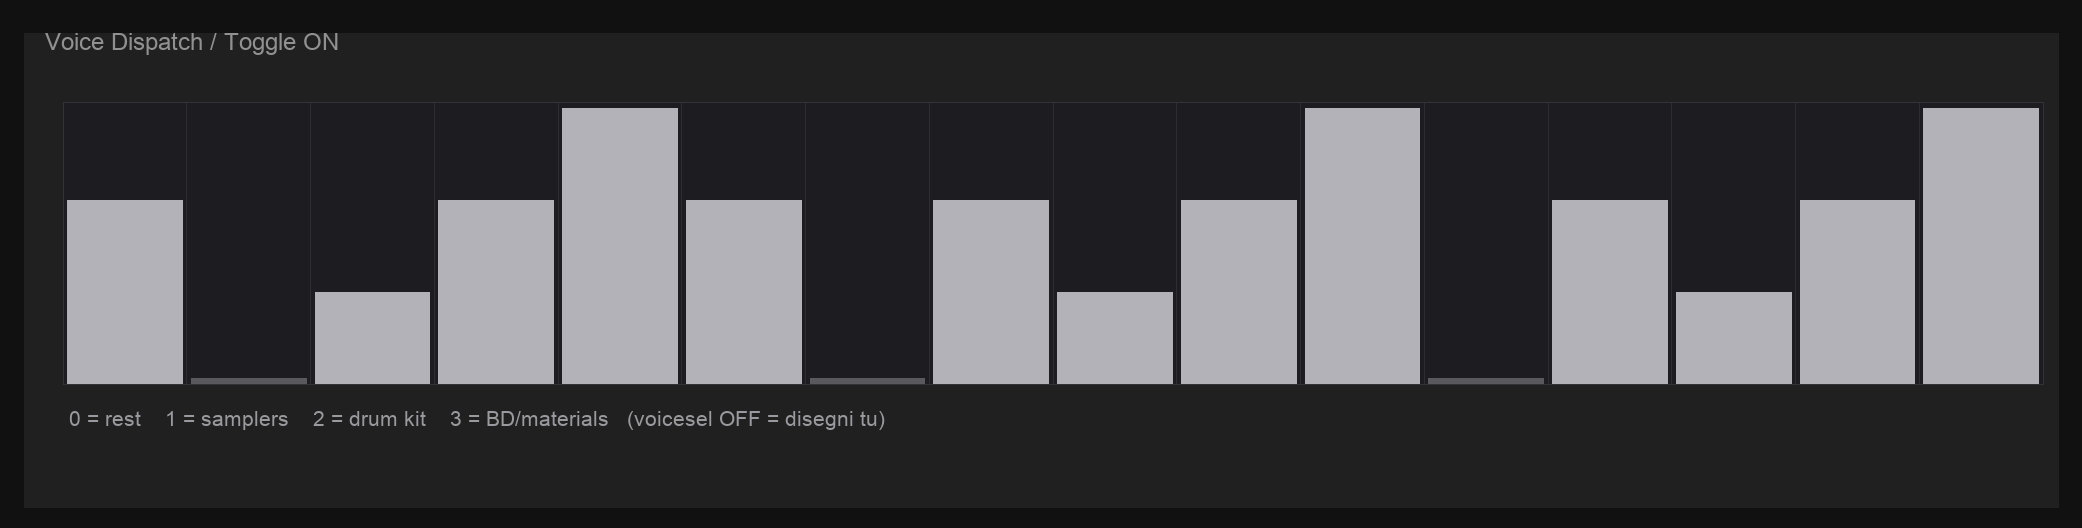
An orchestration you can draw. Each bar is a step; the height is who plays it. The legend is printed right under the lane.
| Height | Who plays that step |
|---|---|
| 0 | Nobody. A rest |
| 1 | One of the three samplers, picked for you |
| 2 | The drum kit, through the sieve of chapter 14 |
| 3 | Kick and big modal |
The lane listens only while the Trig animation is off, which is what the printed reminder means: with the animation running, anything you draw would be reshuffled a step later. Turn the animation off, drag across the sixteen bars, and the whole Trig column rewrites itself instantly to match your drawing.
So the full picture is: the Trig menus for placing one voice on one step with precision, the four weight dials for letting chance decide, and this lane for when you already hear the orchestration in your head and just want to write it down. Sketching rhythms this way is surprisingly fast: silence, silence, kit, kit, sampler, silence, kick reads like a drawing because it is one.
contents11Elastic tempo
Instead of running at one speed, the clock can move in arcs: it thins out, accelerates, brakes, and relaunches at a tempo mathematically related to the one it left.
This is the Autechre trick of metric modulation, made automatic. The panel is aem_warp_CLOCK at the bottom of the screen, and the readout beside it, Metric Modulation, shows what is happening.
M RRND 150 2000. It tells the metronome script to re-roll its own interval on every tick, anywhere between 150 and 2000 milliseconds: the clock never runs at a tempo, it runs inside a range. I built whole patches on that one line, and I loved it, but it is pure chance, a blind roll every tick. Elastic tempo keeps the conviction and replaces the blindness with logic: the clock moves in shaped arcs instead of jumps, every new speed is mathematically related to the one it left, and the whole journey passes through named phases you can read on the panel. From a dice roll to a grammar: same instinct, ten years of listening in between.
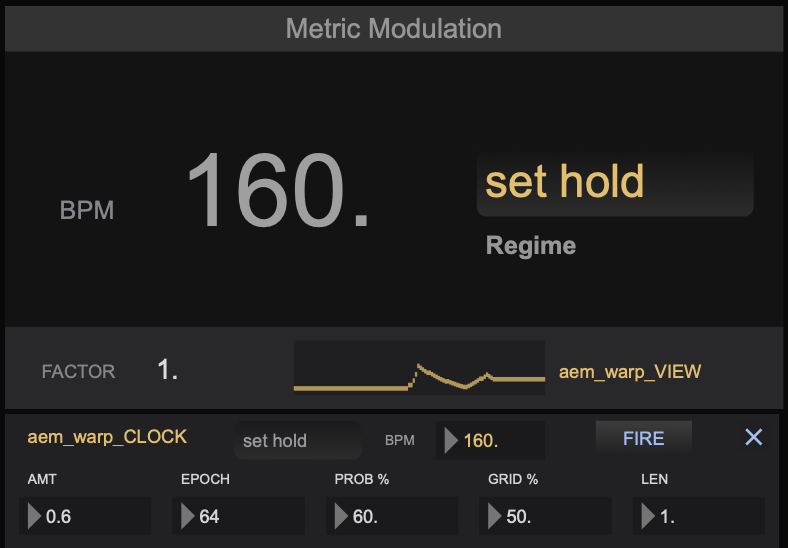
The readout. The large number is the tempo you are actually hearing. The graph is the history of the stretch factor. The word underneath names the phase the machine is in.
| Control | What it does | Range | Default |
|---|---|---|---|
| ON | Master switch. Off means the factor is exactly 1 | toggle | off |
| AMT | How far the tempo is allowed to move | 0 to 1 | 0.6 |
| EPOCH | Steps between episodes | 8 to 512 | 64 |
| PROB % | Chance an episode actually starts when due | 0 to 100 | 60 |
| GRID % | Chance it lands back on the original tempo instead of a related one | 0 to 100 | 50 |
| LEN | Scales the length of all four phases | 0.25 to 3 | 1 |
| FIRE | Starts an episode now | button | — |
The four phases
| sparse | Slows down. The pattern opens up |
| accel | Speeds up past the original tempo |
| brake | Pulls back |
| relaunch | Settles onto a new plateau and holds it |
The plateaus are not arbitrary. The machine will only land on 0.5, 2/3, 3/4, 4/3, 3/2 or 2 times the original tempo: exact ratios, so the new tempo is musically related to the old one. Half speed, two thirds, and so on. With GRID % high it usually just returns to the original.
Where the groove comes from
Elastic tempo is not a standalone effect. Its real power appears when it runs together with the rest of the timing machinery: the Markov matrix reordering the steps, and the timing columns, whether you set them by hand as static offsets, a few milliseconds of Micro Timing here, a touch of Swing there, or let column animation move them on its own. Stacked like this, the machine becomes highly unpredictable, but in a way that stays musical, because every layer bends time around a pulse instead of abandoning it.
What comes out deserves its proper name: groove, in the strict sense of the word. Groove is not a pattern, and it is not randomness. It is systematic deviation from the grid: events that land consistently early or consistently late, by amounts too small to read as mistakes and too deliberate to read as noise. Quantised drums have no groove by definition, since every hit sits exactly on the grid. Human players have it because their timing deviations are not errors, they are habits. This machine has it because its deviations are generated by rules: the same event never lands twice in the same place, yet it always lands somewhere the rules allow. That is exactly the territory where a rhythm starts to feel played rather than programmed.
This suggests a way of working that is easy to miss, and worth stating as a goal in itself: use the machine as a groove quarry. Record it, then cut the half-built phrases out of the recording, a bar of hats that accelerates into the turnaround, a kick figure that leans ahead of the beat, a fill that brakes and relaunches, and drop those fragments into your quantised productions. The point is not only to let the machine play whole tracks on its own. It is to harvest timing that no grid and no humanise function will ever give you, and let it infect the music you make elsewhere.
Why it sounds human, and why the modal drums most of all
There is no humanise button anywhere in this machine, and that is deliberate. A humanise function adds random jitter to a fixed recording, which is why it so rarely convinces: the sound of the hit never changes, only its position and its volume, so what you get is a sample being nudged around rather than an object being struck differently. Everything here works the other way round, and the modal voices are where it becomes obvious.
Start with what varies before the sound exists. Every one of the sixteen steps carries its own Vel, its own Micro Timing of up to 25 milliseconds either way, its own Shift, its own Ratchet and Rat Prob %, its own Step Prob %, its own Metrics and S-Size, and, the one people do not expect, its own Swing %. That last point is worth stopping on. In every drum machine ever made, swing is a single global amount applied to the whole pattern, which is precisely why heavily swung machines all swing the same way. Here it is a column like any other: step 3 can lean while step 11 sits straight, and the amount of lean can differ from one step to the next. What that produces is not a swung pattern, it is a pattern with a shape in it.
On top of those sixteen rows sit the things that move: elastic tempo bending the pulse to exact ratios, the Markov matrix deciding which step happens at all, column animation quietly walking the columns while you listen. None of this is a randomiser dropped over the top; each layer is a rule, and the layers interact. Two of them alone would read as sloppiness. All of them together read as a player, because that is roughly the number of independent things a player is also doing.
Then comes the part that only physical modelling can do. In the Modal Voice the sound is not a recording, it is eight tuned resonators struck by a burst of noise, and the strike is described by parameters, not by a file. So when velocity changes, the object is not played louder: it is hit harder, which moves BRIGHT, shifts the balance between low and high modes and changes how fast the upper partials die. When a modulator moves DECAY or DAMP a little between one hit and the next, the resonance itself reshapes. The variation lands in the timbre, exactly where the ear looks for evidence that something physical happened, instead of landing only in the level, where the ear immediately smells a machine. Two consecutive hits are the same object struck twice, never the same recording twice.
That is the whole trick, and it took a long time to get right: not one clever randomiser, but many small deviations of different kinds, timing, dynamics, and material, arriving from independent rules that never quite line up. Nothing is quantised to feel safe and nothing is randomised to feel alive.
If you would rather hear this than read about it, there is a video of the machine playing where the percussion is doing exactly what this section describes. It is one of dozens in the chronological playlist linked in the foreword, recorded as the work went along rather than assembled as a demo.
contents12Probability jumpers and the dice
Seven small modules sit and wait. When they receive a signal they throw dice and rewrite effect parameters, in tune where it matters.
Each jumper owns one effect and has its own probabilities. They all fire from the same two sources: the global DICE control, which rolls once per step, and the note-injection link described in chapter 9.
| Jumper | Changes |
|---|---|
| DRIVE % | Delay time and drive amount. Delay time is tuned: it picks an octave and a scale degree, then converts that pitch into a delay length |
| RESONATOR ROOT % | The root note of the resonator bank |
| CASCADE % | Delay time and pitch shift amount |
| NOTVERB % | Freeze on and off, and for how long |
| GLAZE % | Grain size and scatter |
| SPECTRA | Rate, jump, grain, inharmonicity, octave, metal amount |
| BREATH % | Duck depth and trigger |
DICE
One number, top of the jumper box, default 0. It is the percentage chance, on every single step, that all seven jumpers fire at once.
| 0 | Nothing moves. The effects stay where you left them |
| 5 to 15 | Occasional surprises. Good for long sessions |
| 25 to 40 | The effects become an instrument in their own right |
| 60 and up | Constant reconfiguration. Chaotic, and CPU heavy |
contents13Scales, root, and microtonal tuning
The voices can be quantised to a scale, and the scales are defined in cents, not semitones. That means the machine can play tunings a keyboard cannot.
Six voices have a SCALE menu, a ROOT number and a QUANT toggle: FM, Modal, Drone, String, Metal Bass and Crack. Scale and root are shared, so setting them on one voice sets them everywhere. The on and off switch is per voice, so you can leave the drone free while everything else is in tune.
| Scale | Degrees | Character |
|---|---|---|
| chromatic | 12 equal | No quantisation in practice |
| major, minor | 7 | Familiar |
| pentatonic | 5 | Nothing can clash. Good under dense patterns |
| wholetone | 6 | No root, floating |
| ji_major | 7, just intonation | Pure thirds and fifths. Audibly calmer than equal temperament |
| et19 | 19 equal | Nineteen notes per octave. Steps of 63 cents |
| bohlen_pierce | 13 | The octave is not an octave. The period is a perfect twelfth, 1902 cents. Strange and coherent |
Custom tunings
The quantiser accepts a list of cents directly, so any tuning is possible: send it scale 0 150 300 450 600 750 900 1050 for eight equal divisions, or any list of ascending cent values, plus period for the repeat interval. There is a working example of this in aem_quant_bench.maxpat.
Part 3 · The voices
contents14How a note finds its voice
This is the central mechanism of the machine. It takes two minutes to understand and it explains almost everything about how the music behaves.
First, the six lanes
Every step in the pattern carries a Trig setting, and that setting decides which lane the note is sent down. The lanes do not work the same way as each other, and knowing which is which saves a great deal of confusion later.
| Trig | What answers | What the note number does |
|---|---|---|
none | nothing | A rest |
voce 1 | The bass drum voice, described at the end of this chapter | Punctual. The voice answers every note on the lane, like any other voice. Rests and uncertainty belong to the sequencer's prob% column, where you decide them step by step |
voce 2 3 4 | Samplers 2, 3 and 4, one lane each | Real pitch. Every note on the lane plays that sampler, transposed to the note |
voce 5 | The eight synthesis voices, all at once, through the sieve below | Chooses the instrument. The note decides which voices answer, and also sets their pitch |
voce 6 | The kick and Materials / Big Modal, sharing the lane | Only even or odd matters. Each of the two has a chan setting that claims one half of the notes, or all of them. Pitch comes from the voice itself, not from the note |
Two more things sit outside all of this. The Deep Pad and the Tape Pad ignore notes entirely: they are switched on and they run. The slice sampler is not on a lane either; it follows the step clock, so it plays with the pattern rather than being addressed by it.
Then, the sieve on voce 5
When a step sends voce 5, all eight synthesis voices receive the same note. Each one then checks whether the note belongs to it, using a simple test: divide the note by my number, and see if the remainder matches mine.
| Voice | Plays when | Every |
|---|---|---|
| FM aemd_fm | note ÷ 4 leaves 0 | 4th note |
| Modal aemd_modal | note ÷ 3 leaves 1 | 3rd note |
| Drone aemd_drone | note ÷ 4 leaves 2 | 4th note |
| Hats aemd_hat | note ÷ 4 leaves 3 | 4th note |
| Sub aemd_sub | note ÷ 5 leaves 4 | 5th note |
| String aemd_ks | note ÷ 6 leaves 5 | 6th note |
| Metal Bass aemd_mtl | note ÷ 8 leaves 1 | 8th note |
| Crack aemd_crk | note ÷ 7 leaves 3 | 7th note |
Because the divisors are 3, 4, 5, 6, 7 and 8, the patterns of who answers only repeat after 840 notes. In practice they never repeat.
What this means in practice
- Every note has an instrument. There are no silent notes in the working range: check appendix A.
- Seventeen notes are solos. Note 36 is FM alone, 37 is modal alone, 42 is drone alone. If you want a clean single voice, use those.
- Some notes are chords of instruments. Note 59 fires hats, sub, string and crack together.
- Transposing a pattern re-orchestrates it. Move every note up by one and a completely different set of instruments answers. This is the single most powerful move in the machine.
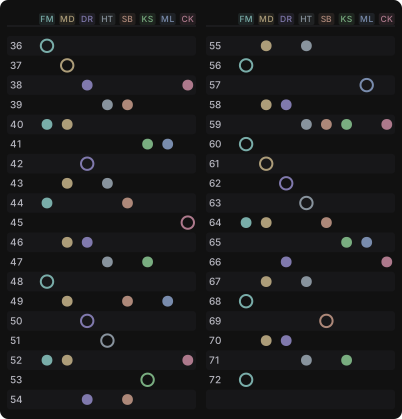
The note map. One row per note, one column per voice. Filled dots mean the voice answers, rings mean that voice is alone on that note. Printable version in appendix A.
The voices outside the sieve
| Samplers 2, 3, 4 voce_2 / voce_3 / voce_4 | On voce 2, 3 and 4 the note is real pitch: it transposes the loaded sample the way a keyboard would, with note 48 as the original. No sieve involved, see chapter 28 |
| Kick aemd_v1b | Answers on voce 6. Its CH control chooses which half of the notes it takes, or all of them |
| Materials / Big Modal aemd_v2 | Shares voce 6 with the kick and splits it the same way: its chan takes one half of the notes, the other half, or all of them. It can also be taken off notes entirely and played by hand from the sequencer lane. See chapter 30 |
| Deep Pad aemd_thmk | Ignores notes entirely. It is a drone you switch on |
| Tape Pad aemd_ewd | Same: a switch, not a note |
The bass drum on voce 1 aemd_bd
The newest voice in the machine, and the one that answers the lane that used to be empty. It is a synthesized bass drum in the non-resonant, inharmonic family: a body with an exponential pitch sweep, a knock of two inharmonic partials that dies in seventy milliseconds, a filtered click, and an asymmetric saturation. It was built to give the rhythm weight without ringing.
No two hits are identical by construction. At every trigger the voice draws three values that shift the decay, the sweep depth, the knock level and the hit's own gain, all scaled by an internal variation amount, so a steady lane reads as a performance rather than a machine gun. Velocity pushes the drive, the pitch start and the decay on top of that.
Its panel, marked VOCE_1 BD, sits on the main surface. Beside the title: the on switch, DICE, and a lamp that flashes on every hit the voice plays.
| Control | What it does |
|---|---|
| RVB | The voice's own rumble reverb, one macro: amount and decay rise together, from a short room glue to a long Basic Channel bed. Band-confined below the mids by construction and ducked by the kick's own hits, so it adds density without ever smearing into the rest of the spectrum. This is the third reverb choice for the bass drum, beside the Notverb send and the master |
| TUNE | The fundamental, in hertz. The note number bends it only slightly: a kick should not play melodies |
| SWEEP | Depth of the pitch drop, in octaves. Low is a thump, high is a zap |
| DECAY | Body length. The useful range for this voice's character is short |
| KNOCK | The inharmonic mid cluster, the struck quality |
| DIRT | Asymmetric saturation drive |
| LSY | A degradation macro: filter, decimation and dropouts in one gesture. At 0 the voice is clean |
| FREQ | Centre of the degradation filter |
| PACK | Packet dropouts: brief holes and repeats, alternating left and right |
| LVL | The voice's own output level, before its mixer strip |
DICE rerolls the voice within musical ranges, and it also reaches a handful of settings that are not on the panel at all, including the degradation mode. Rolling it is the fastest way to find a character; STORE captures whatever it found. The voice has its own strip in the mixer, to the left of the sampler strips, with the same fader and effect sends as every other voice, and its own file in the stem recorder, first in the list (chapter 53). Every factory preset ships with the voice switched off: turn it on, shape it, STORE.
contents15FM Voice aemd_fm
Two operator frequency modulation with a separate envelope for timbre. The sharp, bell-like, metallic voice of the machine.
A carrier oscillator is modulated by a second oscillator running at a multiple of its frequency. The ratio between them decides whether the result sounds harmonic or metallic; the modulation index decides how much upper content there is. What makes this one percussive rather than synth-like is that amplitude and timbre have separate envelopes: the sound can stay loud while its brightness collapses, which is how real struck objects behave.
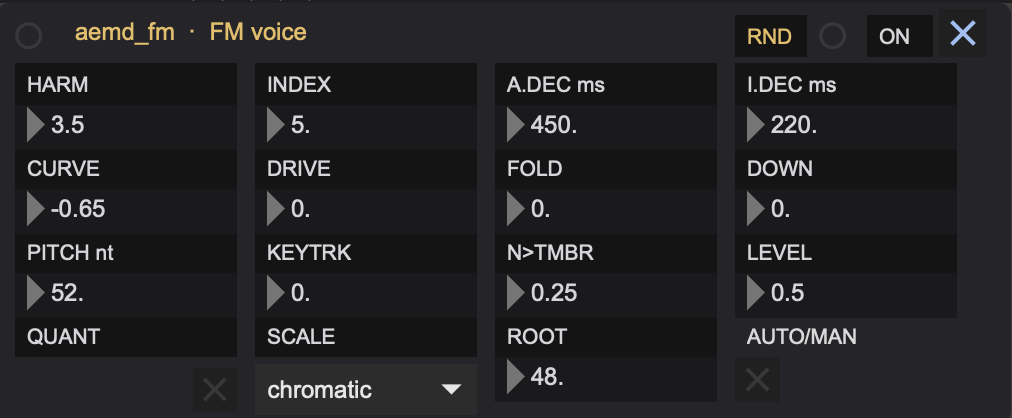
| Parameter | What it does | Range |
|---|---|---|
| HARM | Ratio. Whole numbers give harmonic tones, anything between gives bells and metal | 0.1 to 16 |
| INDEX | Brightness. How much modulation, so how many sidebands | 0 to 50 |
| A.DEC ms | Amplitude decay | 1 to 4000 ms |
| I.DEC ms | Timbre decay. Short values give a bright click that turns into a pure tone | 1 to 4000 ms |
| CURVE | Envelope shape, negative is snappier | -0.99 to 0.99 |
| DRIVE | Soft saturation | 0 to 1 |
| FOLD | Wavefolding, adds hard upper harmonics | 0 to 1 |
| DOWN | Sample rate reduction, digital grit | 0 to 1 |
| PITCH nt | Base pitch when key tracking is down | 12 to 108 |
| KEYTRK | How much the incoming note sets the pitch | 0 to 1 |
| N>TMBR | Higher notes get a higher modulation index | 0 to 1 |
| LEVEL | Output level | 0 to 1 |
Getting sounds out of it
- Wood block: ratio 2 or 3, index low (2 to 5), both decays short, curve negative.
- Bell: ratio around 1.4 or 3.5, index 15 to 25, amplitude decay long, timbre decay short.
- Metallic click: ratio above 8, index high, both decays under 40 ms, a little fold.
- Tuned tone: ratio exactly 1 or 2, index under 3, key tracking at 1.
contents16Modal Voice aemd_modal
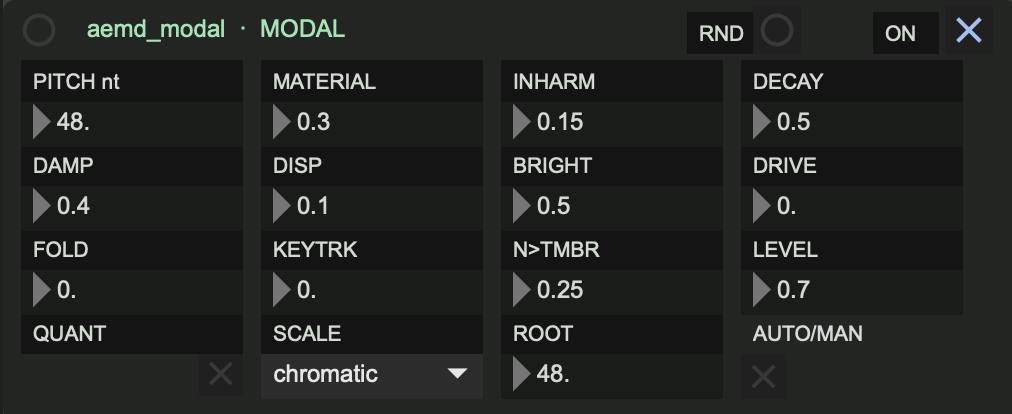
Eight tuned resonators struck by a burst of noise. This is physical modelling: what you set is not a waveform but the shape and material of an imaginary object.
Each of the eight modes is an oscillator that decays on its own. What separates a drum from a bell is not the pitch but the ratios between those modes, and that is exactly what the MATERIAL control changes: it crossfades between five sets of ratios, from tight and drum-like to widely spread and bell-like.
| Parameter | What it does | Range |
|---|---|---|
| MATERIAL | What the object is made of. Crossfades five ratio sets: drum, mixed, harmonic, bell, metal | 0 to 1 |
| INHARM | Stretches the upper modes out of tune. Small amounts sound like real metal | 0 to 1 |
| DISP | Shifts modes apart linearly, a different kind of detuning | 0 to 1 |
| DECAY | How long the object rings, up to about 5.5 seconds | 0 to 1 |
| DAMP | Upper modes die faster than lower ones. This is what makes an object sound damped rather than short | 0 to 1 |
| BRIGHT | Hardness of the strike and the balance between low and high modes | 0 to 1 |
| PITCH nt | Base pitch | 12 to 108 |
| KEYTRK | How much the note sets pitch | 0 to 1 |
| N>TMBR | Note affects timbre as well as pitch | 0 to 1 |
| DRIVE | Saturation | 0 to 1 |
| FOLD | Wavefolding | 0 to 1 |
| LEVEL | Output level | 0 to 1 |
Getting sounds out of it
- Tom: material 0, decay 0.3, damp 0.6, bright 0.3.
- Woodblock: material 0.2, decay 0.1, damp 0.8, bright 0.9.
- Bell: material 0.75, decay 0.8, damp 0.15, inharm 0.3.
- Sheet metal: material 1, inharm 0.6, decay 0.6, bright 1, a little drive.
contents17Drone Voice aemd_drone
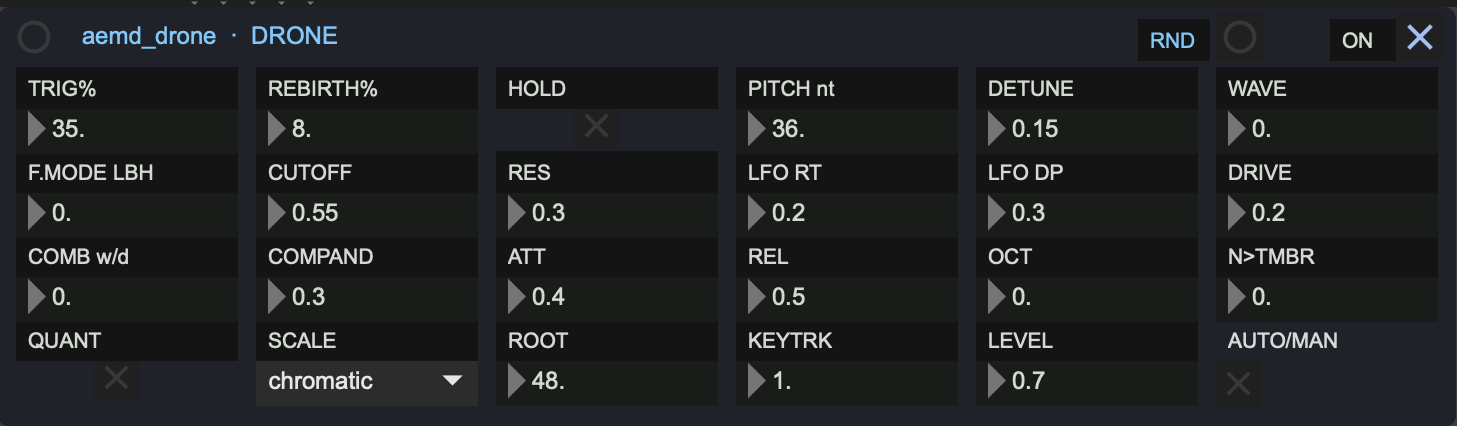
Three detuned sawtooth oscillators through a resonant filter. Unlike every other voice, this one sustains: it holds until told otherwise.
This is the voice that gives the machine its floor. It is also the one that behaves least like the others, so it gets a longer explanation.
| Parameter | What it does | Range |
|---|---|---|
| TRIG% | Chance a note retriggers the drone | 0 to 100 % |
| REBIRTH% | Chance a note moves it to a new octave and re-excites it | 0 to 100 % |
| HOLD | Holds the drone open and ignores incoming triggers | toggle |
| PITCH nt | Base pitch | 12 to 96 |
| DETUNE | Spread between the three oscillators. This is the beating | 0 to 1 |
| WAVE | Morphs saw to triangle | 0 to 1 |
| F.MODE LBH | Filter type: low, band, high | 0 to 2 |
| CUTOFF | Filter frequency, exponential. Below 0.3 is felt more than heard | 0 to 1 |
| RES | Resonance | 0 to 1 |
| LFO RT | Filter LFO speed, 0.008 to 6 Hz | 0 to 1 |
| LFO DP | Filter LFO depth | 0 to 1 |
| COMB w/d | A comb filter tuned to the fundamental. Adds a hollow resonance | 0 to 1 |
| COMPAND | Slow compression. Keeps the drone even | 0 to 1 |
| ATT / REL | Envelope times, up to 4.5 and 9 seconds | 0 to 1 |
| OCT | Octave offset | -3 to 2 |
| DRIVE | Saturation | 0 to 1 |
| LEVEL | Output level | 0 to 1 |
contents18Hats Voice aemd_hat
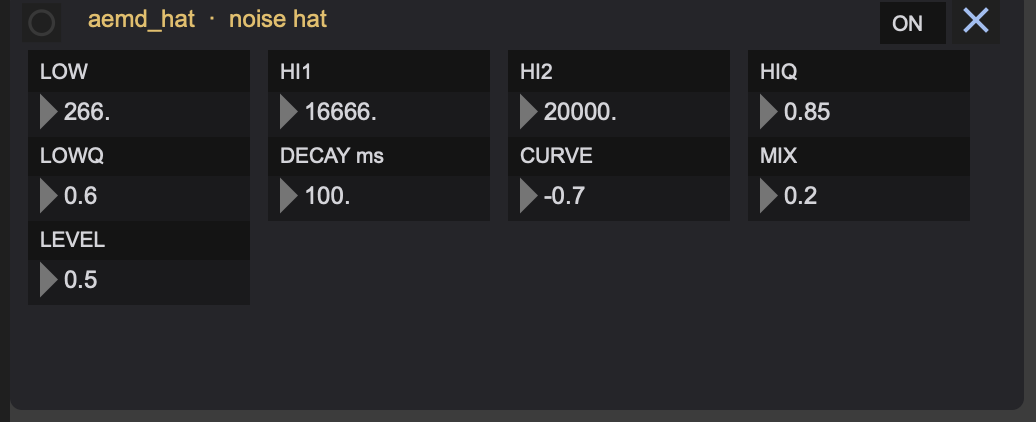
Filtered noise, three bands, one envelope. Simple by design: it is the air of the machine.
A noise source runs into three resonant filters: one low, which gives the tick and the body, and two high, which give the metal. MIX balances them. The whole thing is shaped by a single percussive envelope.
| Parameter | What it does | Range |
|---|---|---|
| LOW | Low band frequency, the body | 20 to 4000 Hz |
| HI1 / HI2 | The two high bands, the metal | 1000 to 22000 Hz |
| LOWQ / HIQ | How narrow each band is. Narrow means more pitched | 0.1 to 2 |
| MIX | Balance of low band against high bands | 0 to 1 |
| DECAY ms | Length | 5 to 1000 ms |
| CURVE | Envelope shape. Negative is tighter | -0.99 to 0.99 |
| LEVEL | Output level | 0 to 1 |
Getting sounds out of it
- Closed hat: decay 25 ms, mix 0.8 towards the highs, curve -0.6.
- Open hat: decay 300 ms, same settings.
- Shaker: decay 60 ms, mix 0.5, Q low on all bands.
- Rim tick: mix 0.1 towards the low band, low around 900 Hz, Q high, decay 15 ms.
contents19Sub Voice aemd_sub
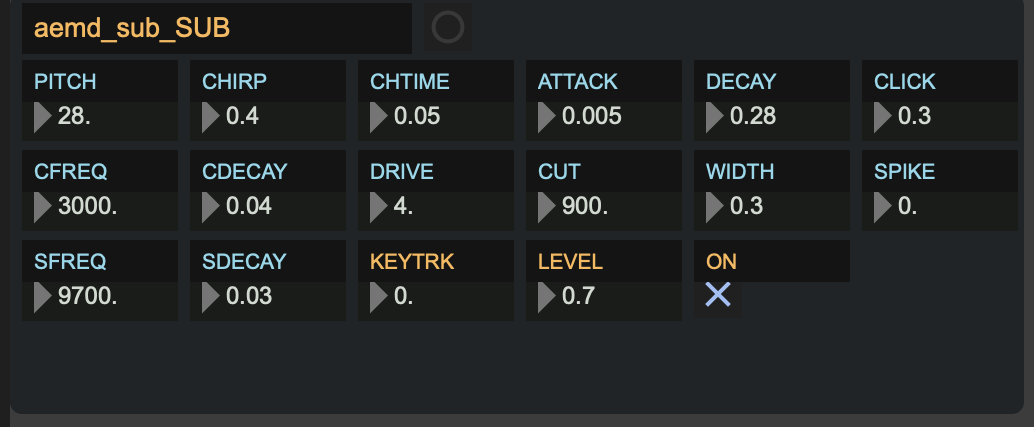
A sine that starts high and falls. The oldest trick in electronic percussion, with two independent transients bolted on top.
The pitch envelope is what makes it read as a drum rather than a bass note: it begins some semitones above the target and slides down exponentially. On top of the sine sit a click (band-passed noise, the skin) and a spike (a high resonant ping with a slightly random frequency, so no two hits are identical).
| Parameter | What it does | Range |
|---|---|---|
| PITCH | Final pitch | 18 to 60 |
| CHIRP | How far above it starts | 0 to 1 |
| CHTIME | How fast it falls | 5 to 300 ms |
| ATTACK / DECAY | Amplitude envelope | 0 to 50 ms / 50 ms to 1.5 s |
| CLICK | Level of the noise transient | 0 to 1 |
| CFREQ / CDECAY | Its frequency and length | 500 to 8000 Hz / 5 to 200 ms |
| SPIKE | Level of the high ping | 0 to 1 |
| SFREQ / SDECAY | Its frequency and length | 4 to 14 kHz / 5 to 120 ms |
| DRIVE | Saturation before the filter | 1 to 8 |
| CUT | Low pass on the output | 200 to 4000 Hz |
| WIDTH | Stereo spread of the two sine phases | 0 to 1 |
| LEVEL | Output level | 0 to 1 |
contents20String Voice aemd_ks
Two coupled strings, plucked. Karplus-Strong synthesis, extended until it can be a kalimba, a bass string, a sitar or a metal rod.
A delay line with a filter in its feedback loop behaves exactly like a string: excite it with noise and it rings at a pitch set by the delay length, losing high frequencies as it decays. This version has two such strings, slightly out of tune with each other, and how much each one feeds into the other is a control.
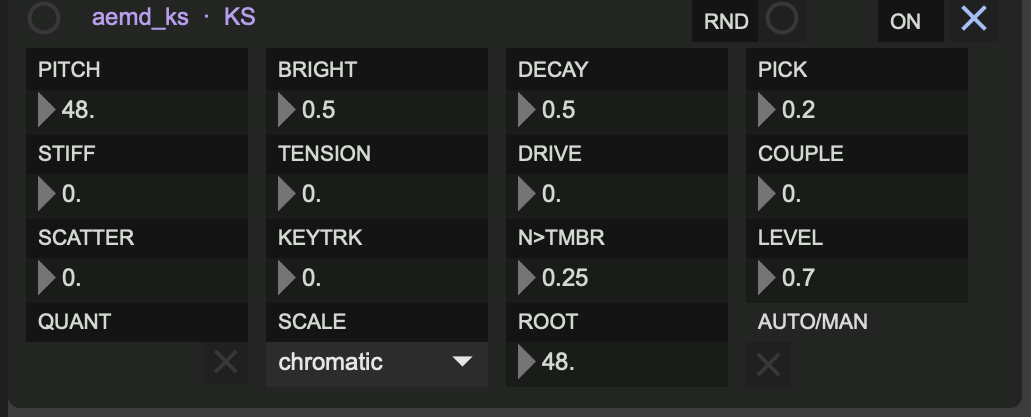
| Parameter | What it does | Range |
|---|---|---|
| PITCH | Base pitch | 12 to 108 |
| BRIGHT | How much high frequency survives each pass. This is the string material | 0 to 1 |
| DECAY | Length of the ring | 0 to 1 |
| PICK | Where you pluck it. Changes which harmonics are missing | 0 to 1 |
| STIFF | String stiffness. Detunes the upper partials the way thick strings do | 0 to 1 |
| TENSION | Pitch bends down as the note decays, like a hard-plucked string | 0 to 1 |
| COUPLE | How much the two strings share energy. At 1 you get beating and a two-stage decay | 0 to 1 |
| SCATTER | Random re-excitations while the note rings. Buzz, sitar, rattle | 0 to 1 |
| DRIVE | Saturation inside the loop | 0 to 1 |
| KEYTRK / N>TMBR | Note to pitch and note to timbre | 0 to 1 |
| LEVEL | Output level | 0 to 1 |
Getting sounds out of it
- Kalimba: bright 0.4, decay 0.5, pick 0.25, stiff 0.1, couple 0.
- Bass string: pitch low, bright 0.8, stiff 0.5, tension 0.3.
- Sitar: scatter 0.5, couple 0.7, bright 0.7.
- Metal rod: stiff 0.9, bright 0.9, decay 0.9, pick 0.5.
contents21Metal Bass Voice aemd_mtl
A sub-bass sine welded to a four-mode metal resonator, with its own ping-pong delay. Built for the low, metallic, refined weight that sits under a track.
Two things happen at once. Underneath there is a deep sine with a pitch drop on the attack. Above it is a small bank of resonators tuned to bell ratios. STRETCH pulls those ratios apart; MATERIAL decides whether the metal is damped or ringing. A comb filter and a ring modulator add the inharmonic edge, and the delay at the end is part of the instrument rather than an effect.
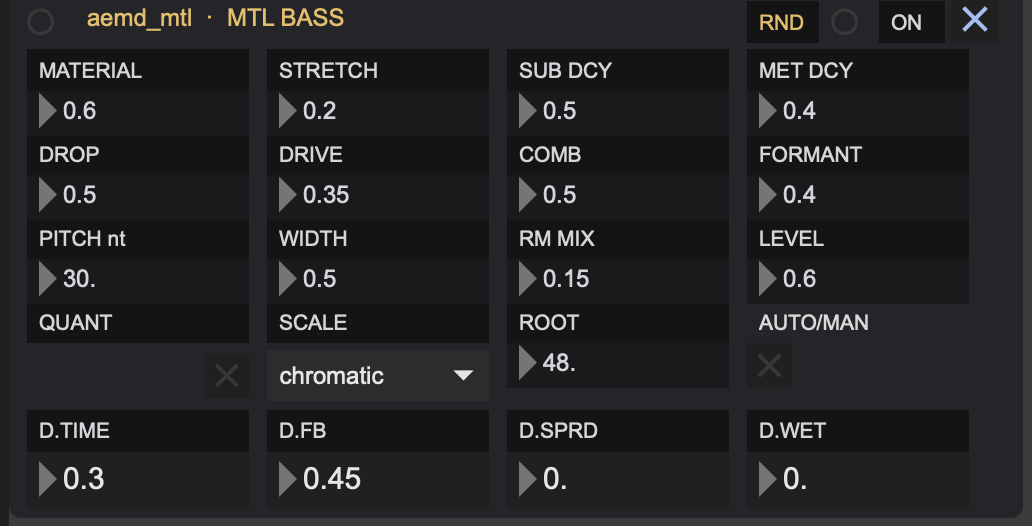
| Parameter | What it does | Range |
|---|---|---|
| PITCH nt | Fundamental | 18 to 60 |
| MATERIAL | Damped to ringing. Also opens the comb feedback | 0 to 1 |
| STRETCH | Pulls the metal partials apart | 0 to 1 |
| SUB DCY | Length of the sub layer | 0 to 1 |
| MET DCY | Length of the metal layer | 0 to 1 |
| DROP | Pitch drop on the attack | 0 to 1 |
| COMB | Tuned comb resonance | 0 to 1 |
| FORMANT / RM MIX | Ring modulator frequency and amount. Vocal, inharmonic | 0 to 1 |
| DRIVE | Saturation | 0 to 1 |
| WIDTH | Stereo spread of the comb | 0 to 1 |
| D.TIME / D.FB / D.SPRD / D.WET | Built-in ping-pong delay: time, feedback, stereo spread, wet | 0 to 1 |
| LEVEL | Output level | 0 to 1 |
contents22Crack Voice aemd_crk
Up to four noise bursts in a row, a tuned body underneath, and a spring rattle. It morphs between rim shot, clap and snare.
The trick is CRACKS. At the lowest setting there is a single burst of noise, which reads as a rim shot. Raise it and you get two, three, four bursts a few milliseconds apart, with the last one longer than the others. That is exactly the anatomy of a hand clap. SPREAD sets the gaps between them.
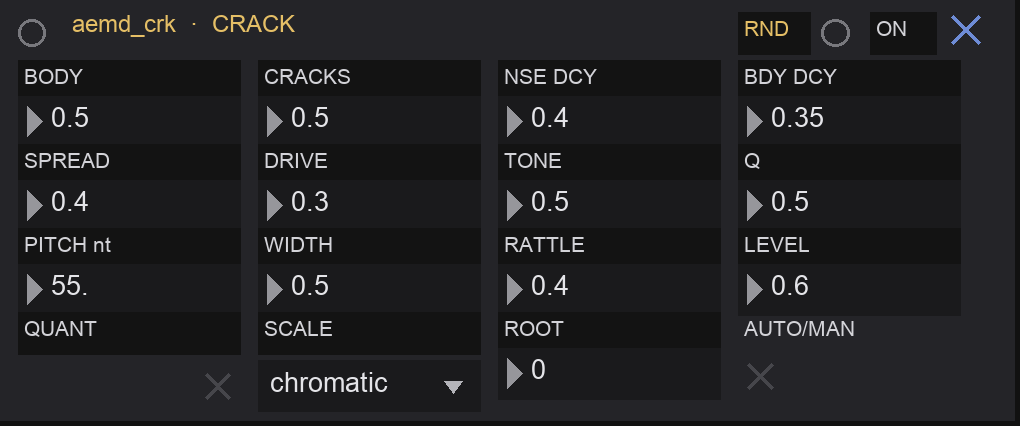
| Parameter | What it does | Range |
|---|---|---|
| CRACKS | Number of bursts, 1 to 4. Rim shot to clap | 0 to 1 |
| SPREAD | Gap between bursts, 4 to 16 ms | 0 to 1 |
| NSE DCY | Length of the final burst, 30 to 400 ms | 0 to 1 |
| TONE | Centre frequency of the noise, 500 to 4000 Hz | 0 to 1 |
| Q | How focused that band is | 0 to 1 |
| BODY | Level of the tuned drum body | 0 to 1 |
| PITCH nt | Pitch of that body | 40 to 72 |
| BDY DCY | Its decay, 10 to 400 ms | 0 to 1 |
| RATTLE | Snare wires. Two short feedback delays that buzz | 0 to 1 |
| WIDTH | Stereo decorrelation of the noise | 0 to 1 |
| DRIVE | Saturation | 0 to 1 |
| LEVEL | Output level | 0 to 1 |
Getting sounds out of it
- Rim shot: cracks 0, tone 0.7, q 0.8, body 0.4, rattle 0, decay short.
- Clap: cracks 1, spread 0.5, noise decay 0.4, body 0, rattle 0.2.
- Snare: cracks 0.3, body 0.6, rattle 0.7, tone 0.4.
contents23Kick Voice aemd_v1b
A single oscillator with a pitch sweep, a wavefolder and a compressor. It answers on the voce 6 family, not on the sieve.
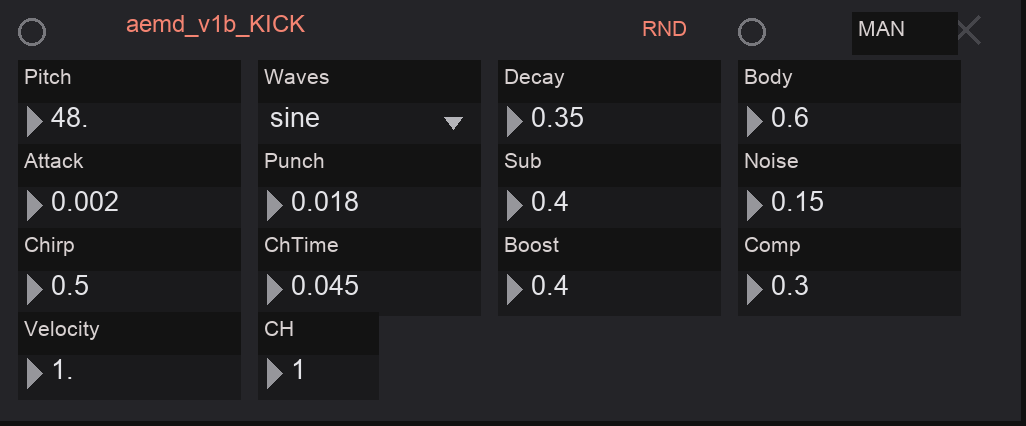
| Parameter | What it does | Range |
|---|---|---|
| Pitch | Fundamental | 18 to 120 |
| Waves | Sine, triangle, saw, square | menu |
| Chirp | Pitch sweep depth, up to eight times the fundamental | 0 to 1 |
| ChTime | Sweep speed | 5 to 150 ms |
| Attack | Softens the transient | 0 to 30 ms |
| Punch | Holds the envelope at full before it decays | 0 to 60 ms |
| Decay | Length | 50 ms to 2.5 s |
| Body | Wavefolding and asymmetric saturation. Grain and harmonics | 0 to 1 |
| Sub | A second oscillator an octave down with a slower envelope | 0 to 1 |
| Noise | Noise on the attack only | 0 to 1 |
| Boost | Emphasises the fundamental | 0 to 1 |
| Comp | Built-in compressor | 0 to 1 |
| CH | CH. 0 takes every note, 1 takes even notes, 2 takes odd | 0 to 8 |
contents24Deep Pad aemd_thmk
Ten resonators held in permanent excitation, sinking slowly downwards, with wind, grey noise and vinyl crackle around them. Ambient in the Thomas Köner sense: a place rather than a chord.
This voice does not answer notes. You switch it on and it starts, taking up to forty seconds to arrive. Its resonators have decay times measured in tens of seconds, and DESCENT makes the whole thing sink in pitch as it plays, so a long take never sits still.
Send to Drone / Excite and Convolution Processor
The bank does not have to excite itself. Next to the transport sits a small panel titled Send to Drone / Excite and Convolution Processor: fourteen switches, one for every voice in the machine, each label carrying its voice's colour so you can read it like the mixer. Flag a voice there, turn the EXCITE switch on this panel, and that voice is routed into the resonator bank as its excitation source. The pad stops being a drone that plays itself and becomes a resonating body that something else plays. Whatever the flagged voices fire strikes ten resonators tuned by PITCH, INHARM and PARTIALS, and what you hear is not the source and not the pad, but the source interrogated by the pad's own physics: transients turn into swells, a rhythmic loop becomes the pulse inside a room, and material that had no pitch acquires one.

The send matrix. Any voice, any combination. The labels use the same colours as the channel strips, so the panel reads like the mixer it taps. Here HATS and CRACK are being sent into the bank.
It is worth being explicit about what this makes possible, because it is easy to read the panel as a utility and miss it. Any drum in the machine can be fired through a tunable resonant space instead of through a reverb. The crack snare through a long inharmonic bank stops being a snare and becomes a struck sheet of metal; the hats become rain on that sheet; the bassdrum becomes a room being hit from outside. Flag several voices at once and the whole pattern plays one instrument: every hit from every flagged voice strikes the same ten strings, and the strings answer with one coherent body. The summing is energy-compensated, so the total excitation level stays constant whether you flag one voice or all fourteen: adding voices changes what plays the bank, never how hard, and nothing needs rebalancing.
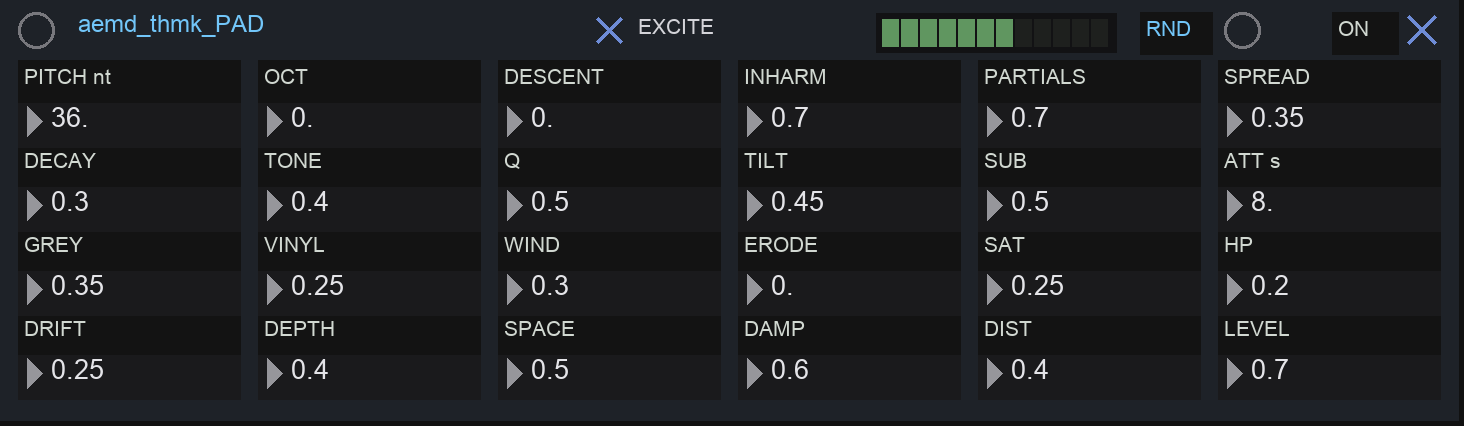
The receiving end. With EXCITE on, the meter beside it shows the incoming excitation. The routing fades in and out over about a second and a half, so it can be switched live without a click.
The recipe, in order:
- Load a file into the slice sampler (chapter 26) and get it playing. Percussive or granular material works best: the resonators need transients to ring.
- On the Send to Drone panel by the transport, flag SLICE. On the pad's panel, switch EXCITE on. The routing crossfades in over roughly a second and a half, so nothing clicks.
- Set DECAY long and INHARM where you like it: low for a harmonic body, high for a bell that turns any source metallic.
- If what you are sending in has a key, set PITCH nt to it. With tonal material this single move decides whether the result belongs to the piece or sits across it.
- Now play with the sampler's rate and slices while the bank rings. This is the whole point, the pad is the instrument and the sampler is the hand.
Making the excitation audible
Two things about this routing are worth knowing, because they decide whether the effect is obvious or nearly inaudible.
The bank hands itself over. The resonators have their own internal excitation, a permanent bed of filtered noise that keeps them alive. As soon as signal arrives from the send, that bed ducks out of the way and the incoming material takes its place as the thing that strikes the strings, fading back in over about a second once the source goes quiet. The exchange is level matched: the pad does not get quieter when you feed it, it simply changes what is playing it. You have to balance nothing.
Shorten the decay. With DECAY long, above 0.7, every resonator integrates everything it receives into one continuous tone, and the incoming material dissolves into that continuum: switching the routing on and off makes almost no difference. Bring DECAY down to around 0.2 to 0.4 and each slice becomes a distinct event, a strike with its own tail. That single control is the difference between hearing nothing and hearing the sampler play the pad.
The send is pre-fader, and that is the good part. Every flagged voice feeds the resonator bank directly, in parallel with its own channel strip, so the strip's fader does not affect what reaches the pad. Pull a fader down and that voice disappears from the mix while the resonators keep being struck by it: you are left with the excitation alone. Leave it halfway and you have a blend, the source and its resonated ghost, with the fader acting as the dry/wet of what is effectively a spectral reverb whose room you have tuned by hand. It is worth saying plainly: with the faders down, the Deep Pad is not a pad any more, it is a ten-band resonant processor, and whatever you flag on the Send to Drone panel is what you feed it. A whole pattern can vanish from the mix and keep existing only as the thing that plays the room.
If it sounds like a convolution reverb, that is because it is one. A resonator bank is an impulse response: strike it and it answers with ten decaying partials. Feeding a signal into it convolves that signal with that response, exactly as a convolution plugin does. The difference is where the response comes from. A plugin loads a recording of a real space, frozen the moment someone fired a shot in a church, and that recording has no key you can change. Here the response is synthesised, and every one of its properties is a control you can move while it sounds: PITCH nt tunes the tail and therefore the whole processor, INHARM turns the room into a bell, DECAY stretches it towards forty seconds, DESCENT sinks it three octaves as it rings. It is a convolution you can play, and unlike any convolution on a recorded impulse, it is a convolution you can transpose into the key of the piece.
Feeding it by hand, without slices
Nothing here requires the slicing engine. Drag across the sampler's waveform with the mouse and the selected region loops immediately, for as long as you hold that selection: no analysis, no slices, no pattern. Point at a two hundred millisecond fragment of a field recording and the resonators are suddenly being played by that fragment, over and over, and the bank turns it into pitch and decay. Move the selection while it sounds and the excitation changes under your hand.
This is the most abstract way to use the machine, and for concrete and experimental work it may be the most useful thing in it. The source stops being a sample you trigger and becomes a surface you scan: a two second recording contains hundreds of usable positions, each of which drives the bank differently, and none of which resembles the original when it comes out the other side. Grain from a contact microphone becomes a low bell; a passage of tape hiss becomes a sustained chord; a fragment of speech, selected short enough, becomes a vowel frozen at a fixed pitch. Nothing in the signal path is a plugin doing this to the sound. It is the sound exciting a physical model you tuned yourself.
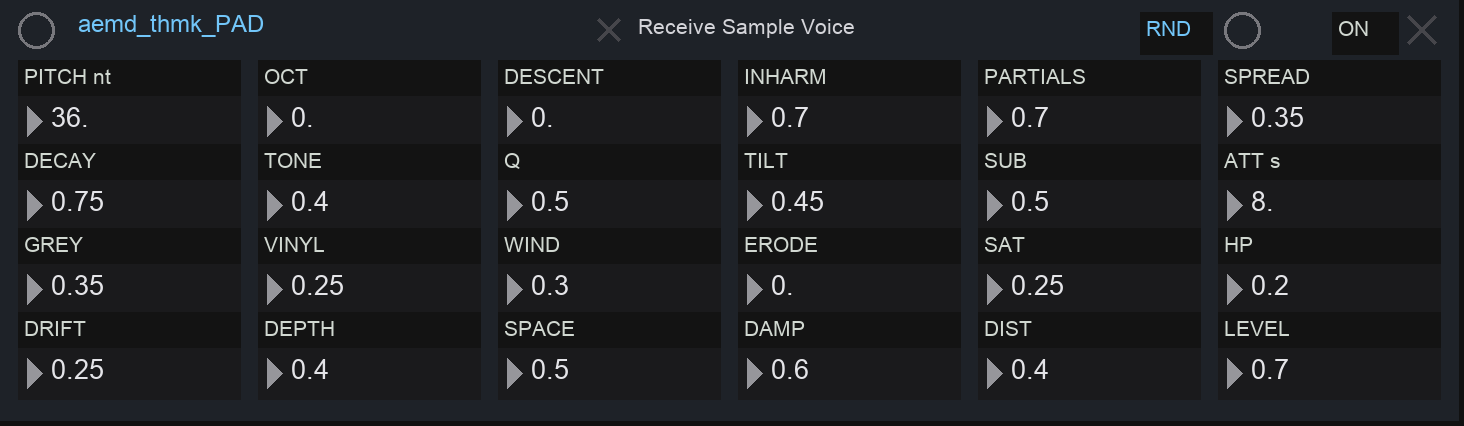
| Parameter | What it does |
|---|---|
| PITCH nt / OCT | Pitch and octave. With EXCITE on, this is the tuning of the processor: see above |
| DESCENT | How far it sinks over time, up to three octaves down |
| INHARM | Harmonic pad at 0, deep bell at 1 |
| PARTIALS / SUB / TILT | Balance between upper modes, subharmonics, and the overall tilt |
| SPREAD / DRIFT | Slow detuning and how fast it moves. This is the breathing |
| DECAY | Ring time, up to about forty seconds |
| ERODE | Progressively removes the upper partials. Ageing |
| GREY / WIND / VINYL | Three noise layers: filtered band, breath, crackle |
| TONE / Q | Colour and width of the grey layer |
| SPACE / DIST / DAMP | Built-in reverb: size, distance, absorption |
| EXCITE | Opens the resonator bank to the voices flagged on the Send to Drone panel. See above |
| ATT s | Attack, from half a second to forty |
| SAT / HP / LEVEL | Saturation, high pass, level |
contents25Tape Pad aemd_ewd
Five triangle voices tuned to 432 Hz, playing a chord that moves on its own, through tape wow, flutter and a wash of comb delays. Warm, dreamy, slightly broken.
The harmony here never moves. Not slowly: never. The fundamental sits two octaves under the root you set, the octave and a low fifth stack on top of it for density, and a pair of quiet colour voices float above. What moves is everything that is not pitch: an internal clock, one event every one to two minutes, sets new targets for the saturation and the tone colour, and the voice slides there over more than a minute, far below the threshold where the brain registers change. You do not hear it move; you notice, at some point, that it is somewhere else. That is the isolationist register this voice lives in, a dense low stratum you can leave on for hours, built for the kind of music where stillness is the event.
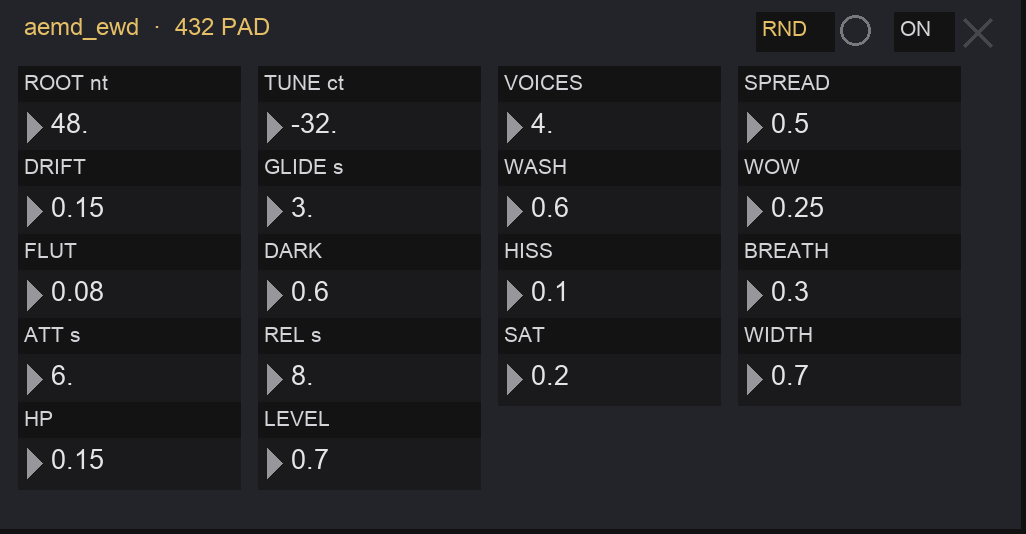
| Parameter | What it does | Range |
|---|---|---|
| ROOT nt | Root note of the chord | 24 to 72 |
| TUNE ct | Global tuning in cents. The default -32 is 432 Hz | -50 to 50 |
| VOICES | How many voices of the chord sound | 2 to 5 |
| SPREAD | Opens the upper voices, and widens the stereo image with it: left and right run slightly detuned copies, and SPREAD sets how far apart they breathe | 0 to 1 |
| DRIFT | Depth of the imperceptible drift on saturation and tone colour. Pitch is never touched | 0 to 1 |
| GLIDE s | How long it takes to get there | 0.05 to 8 s |
| WOW / FLUT | Slow and fast tape instability | 0 to 1 |
| WASH | Four cross-fed comb delays. Turns the pad into a cloud | 0 to 1 |
| DARK | Low pass, from open to muffled | 0 to 1 |
| HISS / BREATH | The surface layer, tape hiss plus sparse vinyl dust that feeds into the wash, and slow amplitude breathing | 0 to 1 |
| ATT s / REL s | Fade in and out, up to 20 and 30 seconds | — |
| SAT / WIDTH / HP / LEVEL | Saturation, stereo width, high pass, level | 0 to 1 |
Part 4 · The samplers
contents26Slice Sampler aems_v1
Load a file, let the machine find its transients, and then play the pieces. The window that moves through the file is itself an instrument.
Loading and slicing
- Press LOAD and choose an audio file.
- Press Slice. The machine analyses the file and marks every onset it finds. The count appears in Slices.
- Thresh controls how sensitive that analysis is: lower finds more onsets. Min hop sets the shortest slice allowed.
- Press Play On. Turn Rate up or down. Negative values play backwards.
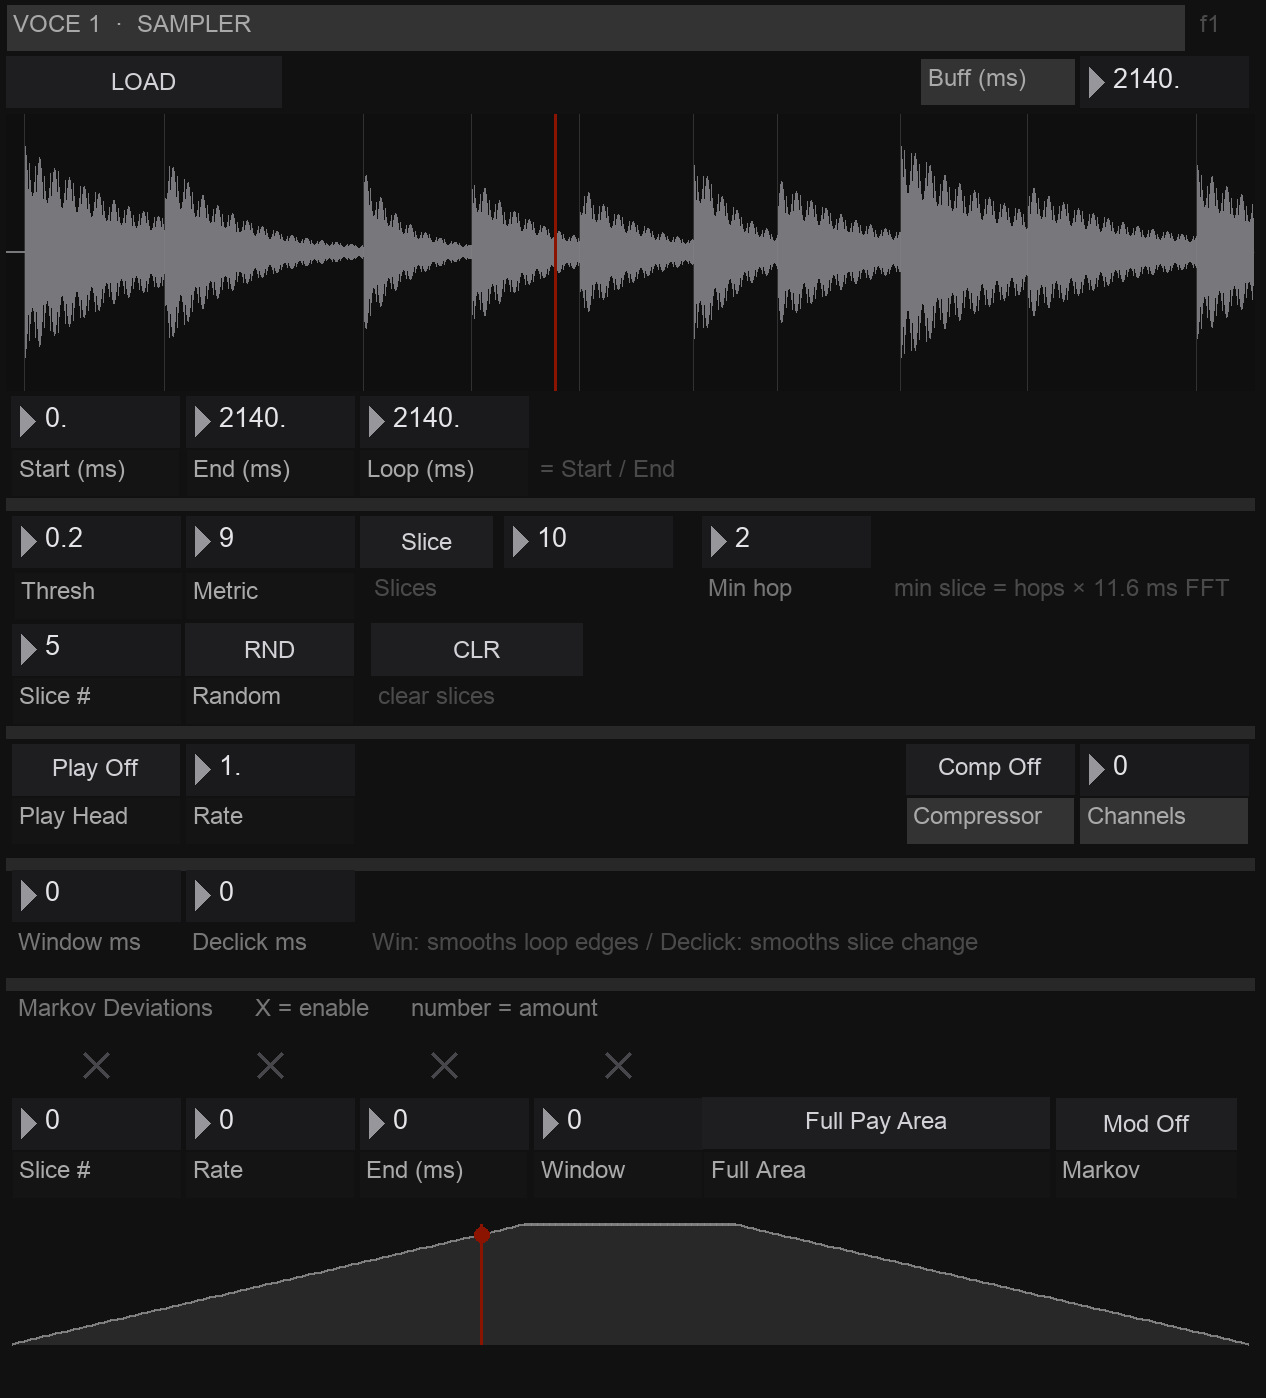
The waveform. Slice markers are drawn over it, and the playhead runs across. You can also drag a selection with the mouse: it writes directly into the loop points.
The window
Two controls shape how the loop sounds rather than where it is:
| Window ms | Window. A fade at each edge of the loop. Long values make it breathe, short values make it click |
| Declick ms | Declick. A fade applied when the slice changes, so jumps do not snap |
When the loop gets shorter than about 50 milliseconds it stops being a loop and becomes a tone, because it is repeating faster than 20 times a second. The display turns that number red when it happens. This is one of the most productive places in the machine to spend time.
Markov deviations
This is the part that connects the sampler to the sequencer. Four lanes read the current step of the pattern and add it to a sampler parameter:
| Lane | Driven by | Effect |
|---|---|---|
| Slice # | The note of the current step | Higher notes select later slices |
| Rate | The note | Playback speed follows the melody |
| End | The note | Loop length follows the melody |
| Window | The velocity | Accents change the grain shape |
Each lane has a switch and an amount. The note is scaled against the range of the note column itself, so it works whatever range you programmed. The master button carries its own state: it reads Mod On while the deviations are live and Mod Off when they are not, and it arrives on.
contents27Shapes: four drawable envelopes aems_shape
Four curves you draw with the mouse, each looping in time with the tempo, each added to one sampler parameter.
They are not envelopes in the ADSR sense. They are loops: a curve that plays from left to right over a musical duration and then starts again. The four destinations are the same as the deviation lanes: slice, rate, end, window.
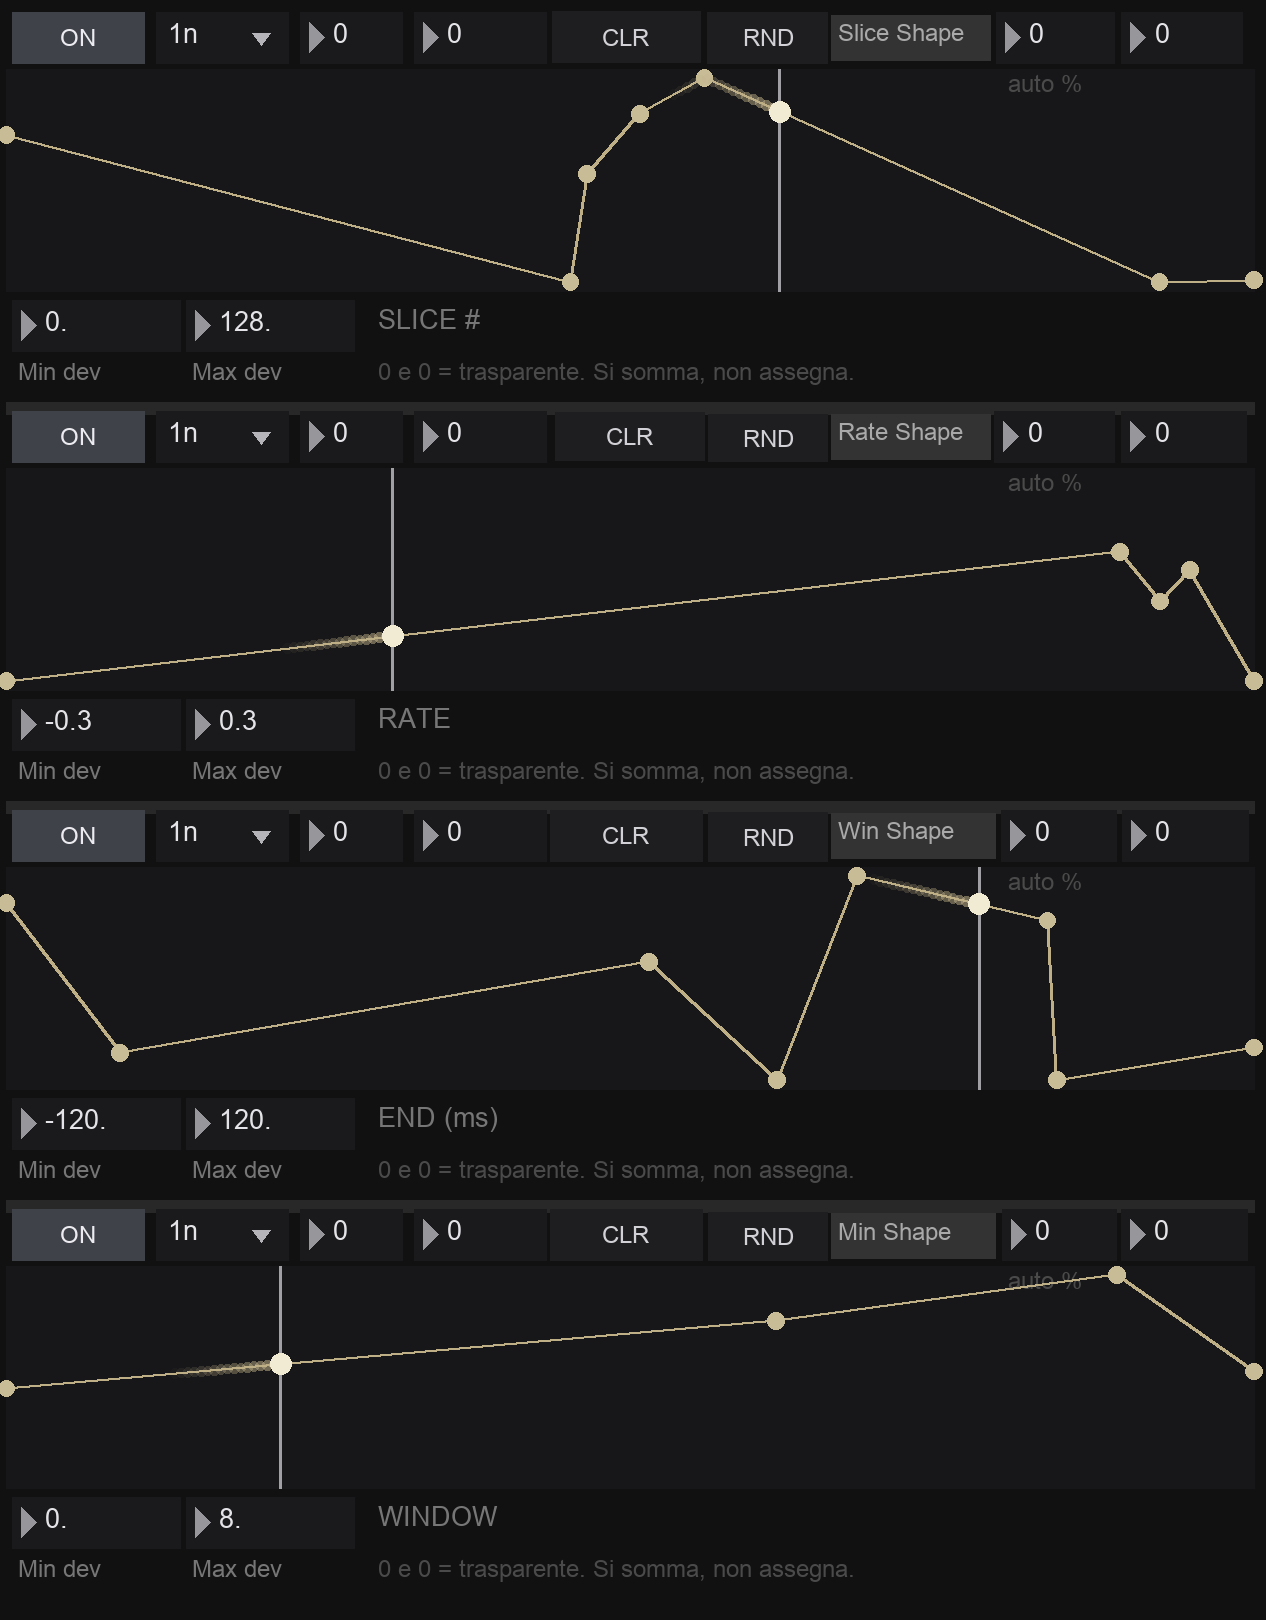
Four lanes. A moving head runs along each curve with a comet trail behind it, so you can see exactly where in the shape the sound is.
| Control | What it does |
|---|---|
| ON | Starts that lane. Off sends zero, which is transparent |
| Note value + multiplier | The loop length, from a whole note to a thirty-second, times 1 to 64 |
| Min / Max | The range the curve maps into. Both at 0 means no effect |
| auto % | Chance the curve redraws itself each cycle |
| RND / CLR | Draw a random curve, or clear it |
| points / jump | How many points a random curve gets, and how contrasty it is |
The rate panel aems_shprate
Above the four lanes sits a small strip called SHAPE · rate × / curve, and it holds the most musical decision of the whole system: how fast each curve is read. The four numbers, slice, rate, end and win, are speed multipliers, one per lane. At 1 the lane's playhead completes one pass per cycle; at 0.5 it takes two cycles; at 1.5 it runs half again as fast.
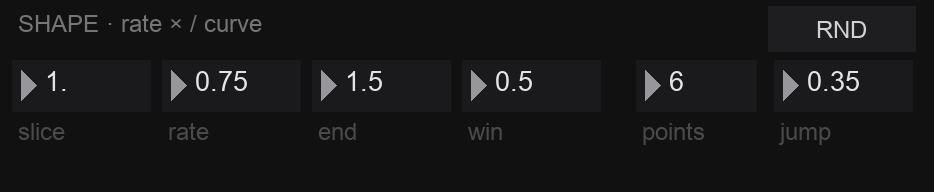
Four clocks for four curves. Here slice runs at 1×, rate at 0.75×, end at 1.5× and win at 0.5×: the four envelopes drift against each other and the combined modulation only repeats when all four meet again.
This is where the system stops being four envelopes and becomes a texture. With all multipliers at 1 the curves stay locked and the modulation loops politely. Set them to different values and the lanes phase against one another: every pass through the pattern, each parameter meets a slightly different combination of the other three, and the full cycle of the whole system can take minutes to come back around. It is the same trick the machine plays everywhere, cycles that never quite line up, applied to its own modulation.
Beside the multipliers, points and jump set the character of every randomly generated curve, few points and low jump gives slow drifts, many points and high jump gives jagged staircases, and the RND button on this strip redraws all four lanes at once: one press, a completely new modulation landscape, ready to be auditioned against the pattern that is playing.
contents28Samplers 2, 3 and 4 voce_2 / voce_3 / voce_4
Three straightforward stereo samplers, one per Trig family, with a micro-loop engine that turns velocity into shape.
Load a file with the replace message box. From then on, the note controls playback speed, with note 48 being the original pitch, and velocity controls level. Shift adds a micro-detune of up to about a semitone and a quarter.
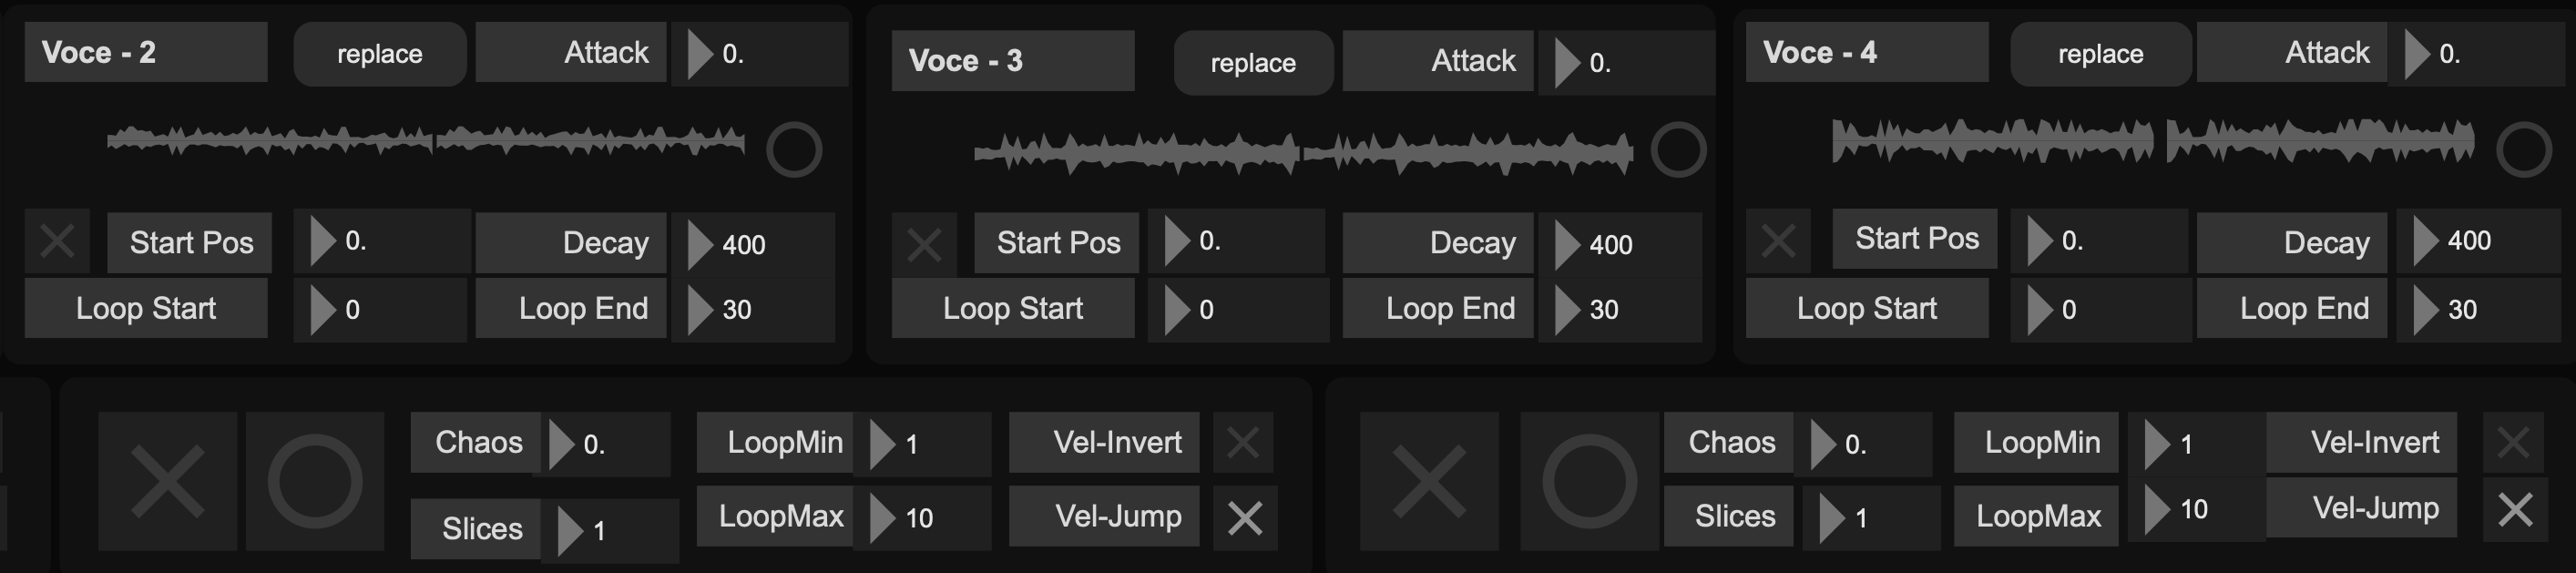
The three samplers. The top strips are the players; the rows below are the micro-loop engine. The large round buttons are the way back to plain playback.
| Parameter | What it does |
|---|---|
| Attack / Decay | Envelope, in milliseconds |
| Start Pos | Where playback begins |
| Loop Start / Loop End | Loop points |
| Loop | Loop or one shot |
The big round button: back to plain playback
Each sampler carries a large round button, and it matters more than its lack of a label suggests: press it and the sampler drops back to canonical playback, reading the file from the start, no relocation, no micro-loop wandering. This is also the fastest way to use these voices as ordinary sample players. For normal one-shot material the whole recipe is: load the file with replace, press the big button, and if needed adjust Start Pos and the loop points. Nothing else required: the sampler reads the file plainly, which is exactly what a one-shot drum sample wants.
Selecting by hand
You do not have to slice at all. Drag across the waveform with the mouse and the selected region becomes the loop, immediately: start and end follow your gesture, and the sampler stays there until you select somewhere else. It is the fastest way to find the two hundred milliseconds of a recording that are worth keeping, and, combined with the routing described above, it is a performance gesture in itself.
The micro-loop engine
Switch MOD ON and each hit relocates itself. Underneath, the machine keeps a position in the file and moves it: usually by one slice, sometimes by a jump.
| Control | What it does |
|---|---|
| Slices | How many parts the file is divided into |
| Chaos | Chance of a jump instead of a step |
| LoopMin / LoopMax | The size range of the micro-loop, in milliseconds |
| Vel-Invert | The interesting one. Off: loud hits get short, tonal loops. On: loud hits get long, textural loops |
| Vel-Jump | Ties the jumping to how hard you play: with it on, louder hits are more likely to jump to a random slice instead of stepping to a neighbouring one, up to roughly forty percent extra chance at full velocity. Chaos sets the floor, velocity adds on top of it |
What you get is not a sample being triggered. It is a recording being read in time with the music, in an order it will never repeat. A two minute file with sixteen slices contains more usable material than most sample packs, and none of it sounds like the original.
Then do it on all three at once, with different material in each, and let the pattern decide which of them speaks at any given moment. Three recordings under one sequence is the closest this machine gets to writing for an ensemble, and it costs you nothing but three files.
Your own samples, and the library that keeps them
Every sampler in the machine, these three and the Slice Sampler alike, remembers its file inside the preset: store a preset and the sample name is saved with it, recall the preset and the file loads itself, slices included on the Slice Sampler. For this to work across sessions the machine keeps its own library: the samples folder inside the project.
You do not have to manage it. Load a file from anywhere, your desktop, a sample pack, a recordings folder, and the machine quietly places a copy in the library and works from that copy: files loaded from outside arrive as .wav, written by the machine itself the moment they finish loading. The original never moves. From that moment the preset will find its sample forever, on any machine the project travels to, because the library travels with it.
The SAMPLE LIBRARY strip is the same idea driven from one place, the way a hardware sampler manages its pool. Its menu lists everything in the library (REFRESH rescans after you add or remove files); pick a file, pick a destination, SLICER or SAMPLER 2, 3, 4, and press ASSIGN: the sample loads there and is already preset-ready. UNLOAD empties the chosen sampler, and that emptiness is saved too: a preset stored with an unloaded sampler recalls silent, as stored.
When the library grows past what you remember putting there, press CHECK. The Max Console prints one line per file: FACTORY, part of the instrument, never to be deleted; USED, with the list of presets that need it; UNUSED, safe to delete; and MISSING if a preset asks for a file the library no longer has. Do the actual deleting in the Finder or Explorer, in the samples folder the report names: everything you remove goes to the Trash and can come back, and nothing marked USED will ever stop a preset from dressing itself, because you know exactly who depends on what before you throw anything away.
contents29Multicluster smp8_analysis
Slice a file, measure the timbre of every slice, sort them into eight families, and give each family its own mixer channel.
This is the deepest sampler in the machine. The idea is simple even if the machinery is not: slices that sound alike should be treated alike.
How to use it
- Load Audio.
- Slice Num. finds the onsets, exactly as in the slice sampler.
- Play Slices in the left column runs the analysis: every slice gets measured, one after another. Watch the console.
- Start / Cluster sorts them into eight groups by timbre.
From then on, when a slice plays it is routed to the channel of its own cluster. Low thuds go to one strip, metallic noise to another, tails to a third. Each of the eight strips has its own level, pan, mute, effect sends and its own playback rate, so you can pitch one whole family of sounds and leave the rest alone.
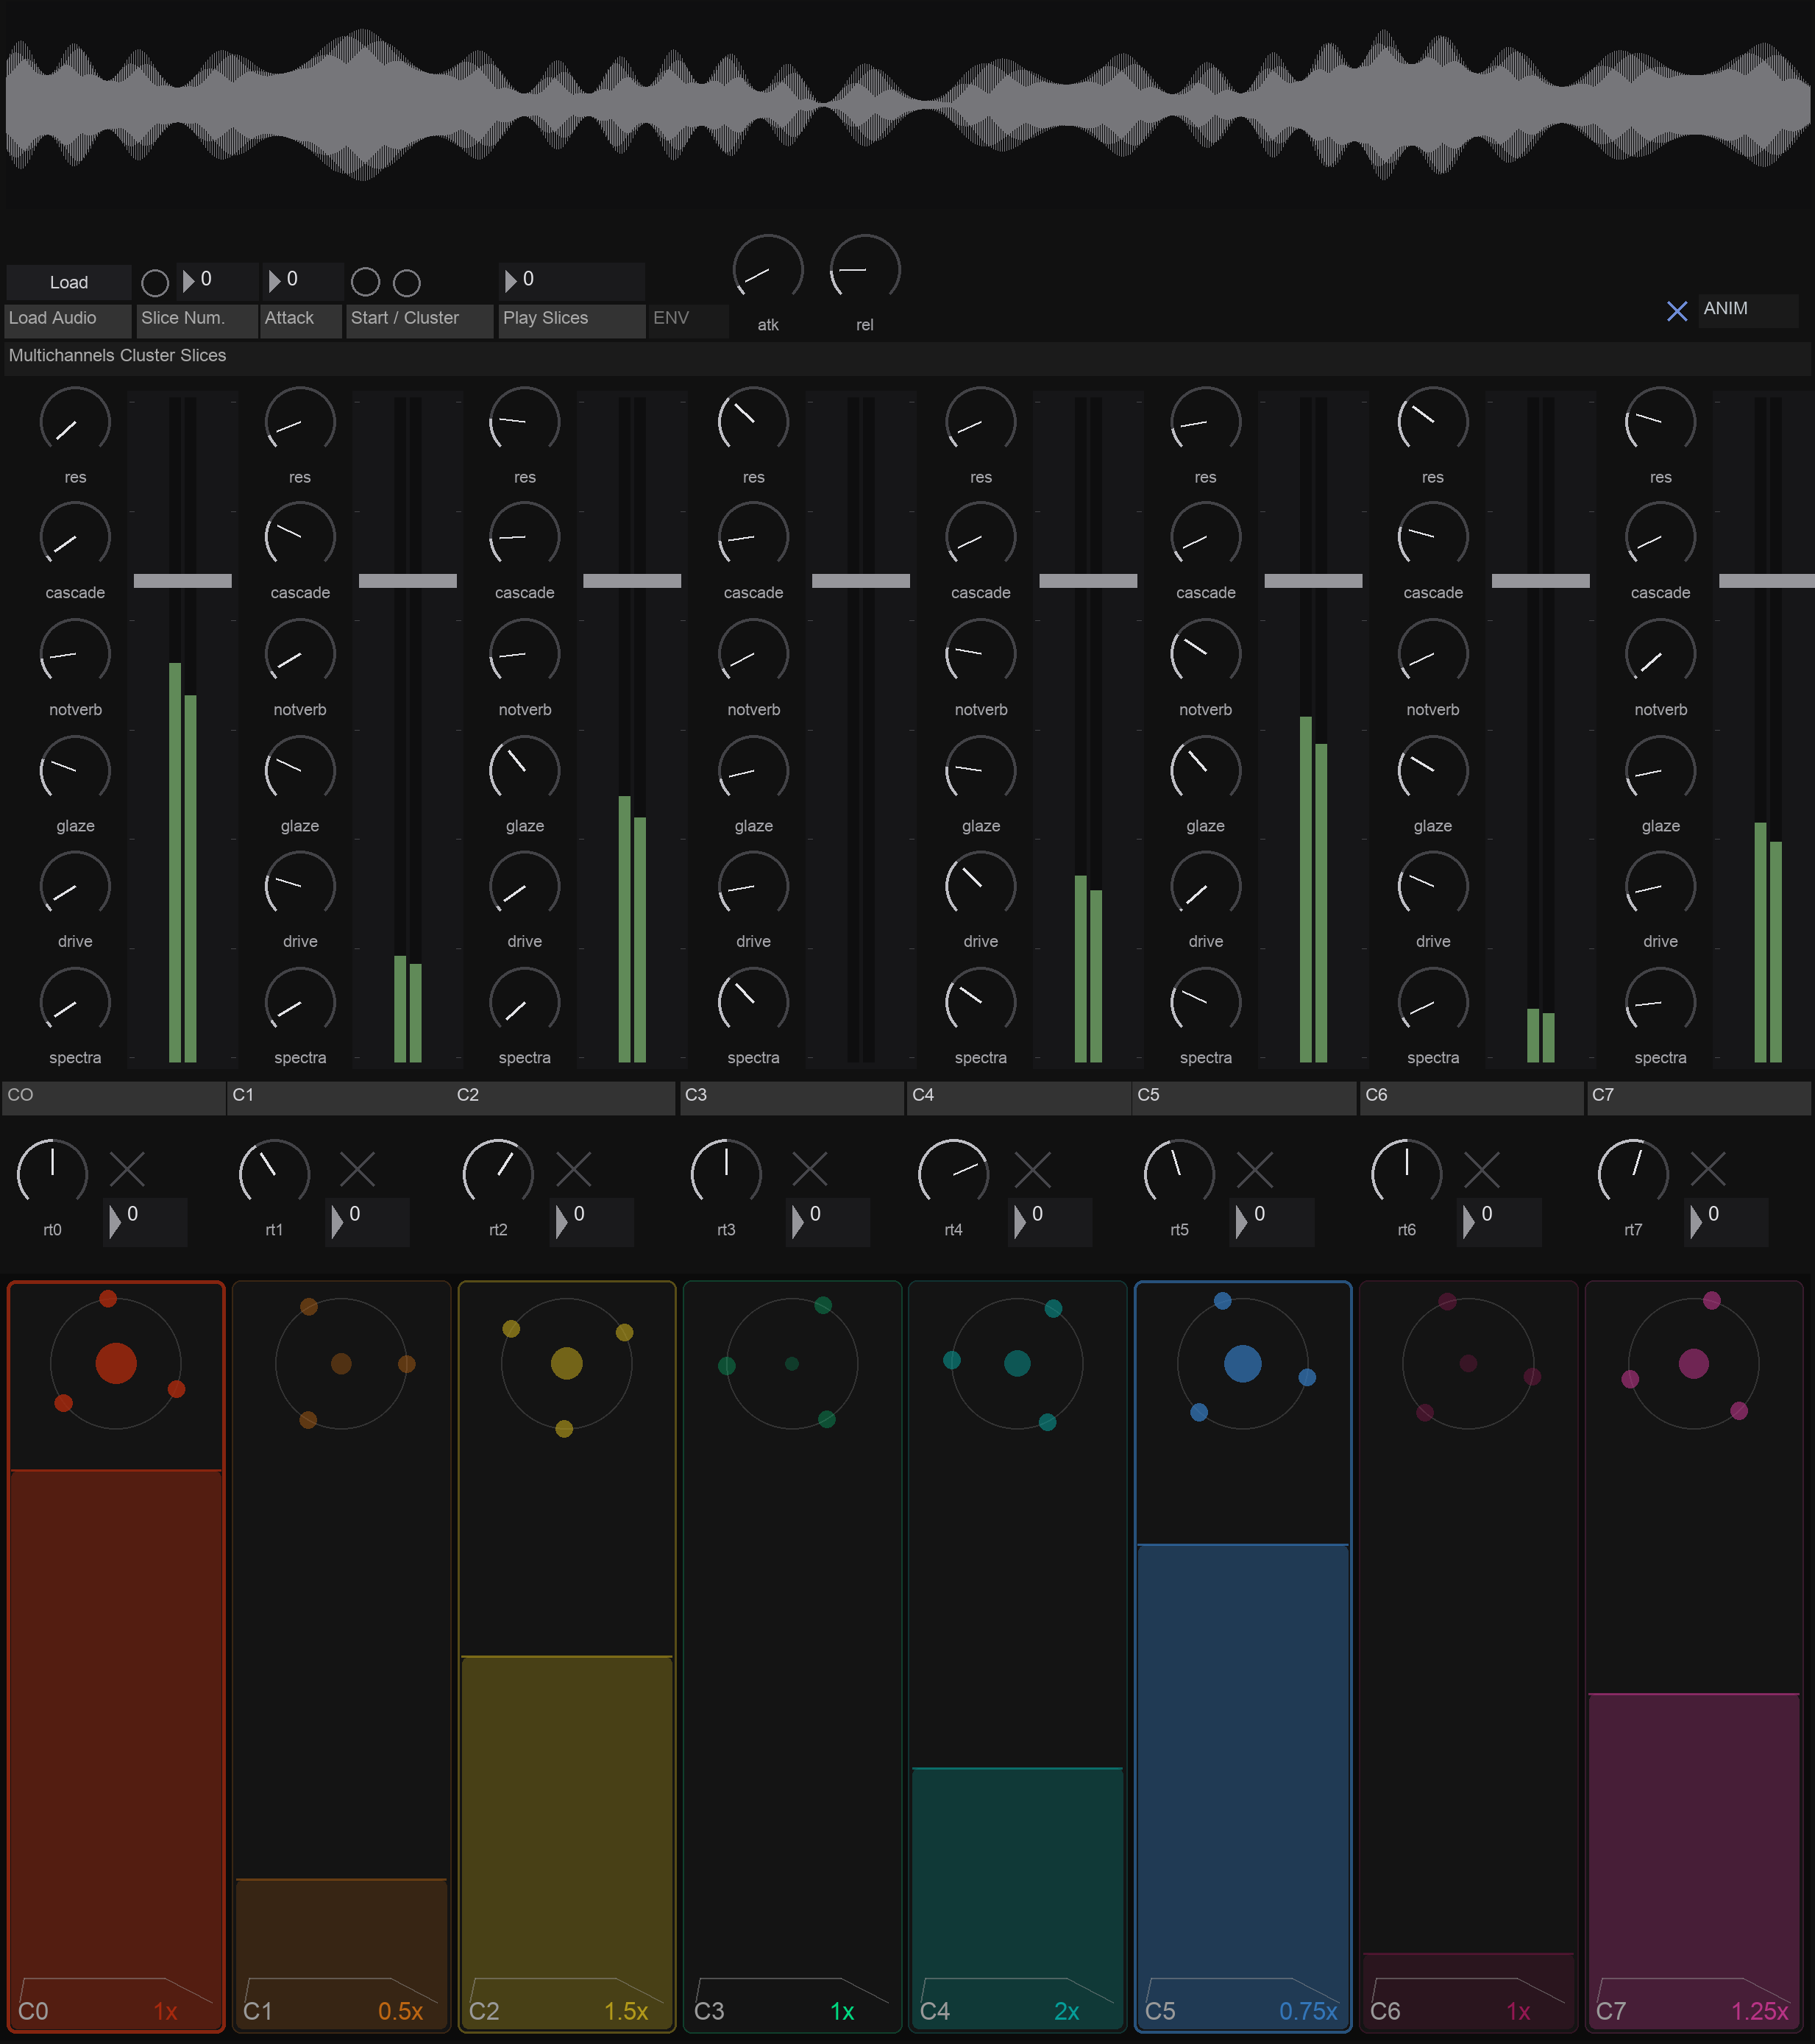
Eight cells. Each shows its level, its rate as a rotating ring, and its envelope shape. The visualiser only runs while the window is open.
contents30Materials / Big Modal aemd_v2
A struck disc, solved rather than tuned. You describe an object, its material, its size, its thickness, how tight it is, and where you hit it, and the machine works out the sixteen partials that object would have.
Every other voice in this machine is built the way synthesis is normally built: someone chose the partials because they sounded right. This one is not. Here you set the physical properties of an object and the sixteen mode frequencies are calculated, from the same equation that describes a real circular plate under tension. Nothing about the result is arbitrary, which is why it sounds like a thing rather than like a patch, and also why it can be pushed into places no real object could survive.
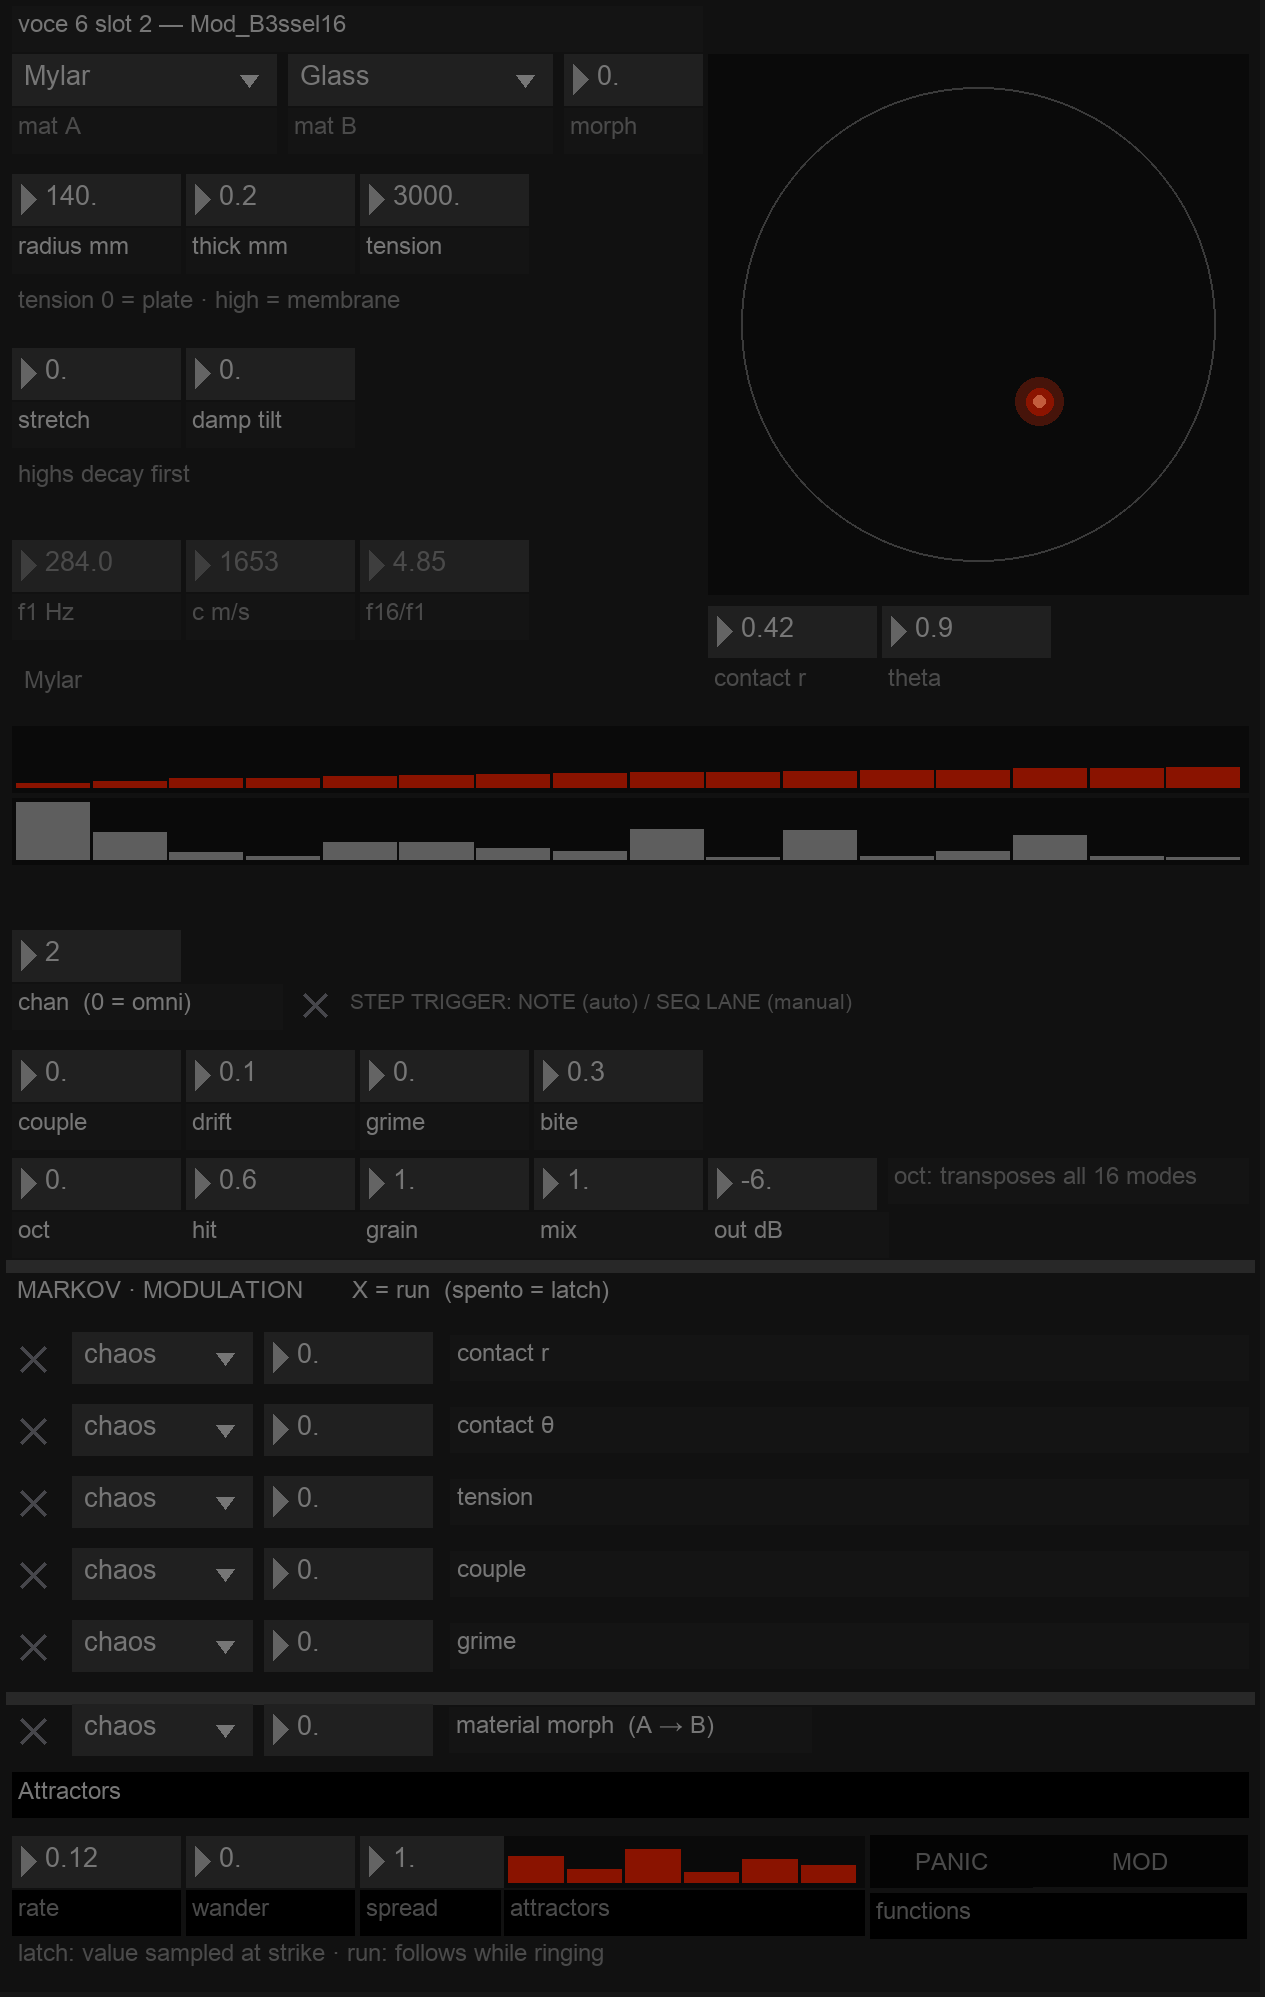
The whole panel. Mylar, 140 mm across and two tenths of a millimetre thick, under 3000 of tension, struck at 42 percent of the radius. The machine answers: fundamental 284 Hz, wave speed 1653 metres per second, and a mode set spread over 4.85 octaves-worth of ratio. The two rows underneath are the sixteen frequencies and the sixteen amplitudes that strike produced.
Getting it to sound
This voice is not on the sieve, so none of the note-division rules in chapter 14 apply to it. It answers on voce 6, the lane it shares with the kick, and the two of them divide that lane between themselves according to whether the note number is even or odd. The chan field is what decides which half is yours:
| chan | The voice plays on |
|---|---|
| 1 | Even-numbered notes on voce 6 |
| 2 | Odd-numbered notes on voce 6. This is how it arrives |
| 0 | Every note on the lane, so it doubles the kick on each one |
Only the parity matters, not the pitch: this voice takes its pitch from its own controls, not from the note. So with chan at 2, as it ships, writing note 37 into a row set to voice 6 will play it, and so will 39, 41 or any other odd number.
The switch beside chan is the other half of the answer. Left off, the voice is played automatically by the notes arriving on that lane, which is what you want most of the time. Turned on, it stops listening to notes and is played from the sequencer lane by hand instead, one step at a time, which is how you place a single enormous object on one beat and nowhere else.
The materials
Twenty-five entries, and the first eighteen are real: Mylar, Kevlar, spruce, ebony, bamboo, bone, ice, glass, quartz, aluminium, titanium, steel, bronze, lead, gold, tungsten, rubber and graphite. Each one carries the three numbers that decide how it sounds: density, stiffness, and internal damping. They are not flavour names attached to presets, they are the actual physical constants, which is why glass rings for a long time and rubber does not.
The last seven do not exist. Lead Aerogel has the density of a whisper and the stiffness of steel, so sound travels through it thirty times faster than through metal. Immortal Glass has damping so close to zero that it decays over minutes rather than seconds. Dark Matter weighs almost nothing. Neutronium is so dense that the frequencies collapse towards zero and the model gives up, which is itself a usable sound. And Anti-Wood has a negative stiffness, so the restoring force works backwards. These are not jokes. They are the reason a physical model is more interesting than a sample library: once the physics is a set of numbers, you can write numbers that nature cannot.
mat A and mat B hold two materials and morph crossfades between them. The crossfade is logarithmic, not linear, and that detail matters: density runs from 0.5 to 4×10¹⁷ across the table, so a straight blend between Mylar and tungsten would spend almost all of its travel in a place that sounds like neither. Interpolated logarithmically, the whole sweep is usable.
The geometry
Three numbers describe the object itself. radius mm from 10 to 600, thick mm from a hundredth of a millimetre to twenty, and tension from 0 to 20000. The line printed under them is the important one: tension 0 = plate, high = membrane.
With tension at zero, the only thing pulling the disc back into shape is its own stiffness. That is a plate, and plates are inharmonic: the partials sit at ratios that no scale contains, which is the sound of a gong, a cymbal, a sheet of metal. Raise the tension and the stretched-skin term takes over, the ratios pull towards the harmonic series, and the object becomes a drum. Everything between those two is available, and the interesting sounds usually live there rather than at either end.
stretch multiplies the object's stiffness, up to forty-one times, without touching the material: it is the difference between a slack skin and one that has been pulled taut over a frame. damp tilt decides which partials die first, and the label says it plainly: highs decay first. At zero every mode damps by the same amount, which is physically clean and slightly artificial. Push it positive and the top of the sound evaporates while the fundamental stays, which is what almost every real struck object does.
Three numbers that tell you what you built
Under the geometry sit three read-outs that you cannot edit, and learning to read them is worth more than any preset.
| Read-out | What it tells you |
|---|---|
| f1 Hz | The fundamental the object will actually produce. Halve the radius and watch it climb |
| c m/s | Speed of sound inside the material. Steel is fast and bright, rubber is slow and dead |
| f16/f1 | The spread of the mode set. Small numbers mean the partials are bunched and the result is pitched; large numbers mean they are scattered and the result is a noise with a centre |
Where you hit it
The dark circle on the right is the object seen from above, and the marker is the strike point. contact r moves it from the centre to the rim, theta rotates it around. This is not a filter and not a tone control: it decides which of the sixteen modes receive any energy at all, exactly as it does on a real drum.
Hit a disc in the middle and only the modes that are symmetric about the centre can move, because the other ones have a stationary line running through the point you struck. Move outwards and those modes come alive one at a time. That is why a drum struck at the centre sounds dull and dead, and struck near the rim sounds bright and complicated. Here it is the same phenomenon, computed rather than recorded, and you can watch it happen: the lower of the two rows under the panel is the amplitude of each mode, and it redraws every time you move the marker. Same object, same tuning, completely different sound, because you hit it somewhere else.
The upper row is the sixteen frequencies. Between the two rows you can see, before playing anything, whether you have built something with a clear fundamental and a couple of strong partials, or something with sixteen equally weighted modes fighting each other.
The voice controls
| Parameter | What it does | Range |
|---|---|---|
| chan | Which MIDI channel this voice answers, 0 for all | 0 to 8 |
| STEP TRIGGER | Off, the voice is played by incoming notes. On, it is played by the sequencer lane by hand | toggle |
| couple | The modes feed each other, in a ring, through a soft saturation: mode 2 is driven by mode 1, and mode 1 by mode 16. Real objects do this and it is what makes a struck sound refuse to be a sum of sine waves | 0 to 1 |
| drift | Three very slow oscillators, at 0.27, 0.18 and 0.11 Hz, detune every mode by a slightly different amount, up to 1.5 percent. Nothing sits perfectly still | 0 to 1 |
| grime | Blends in a second, dirtier version of the same sound, made by four short delays tuned to modes 1, 5, 10 and 16 and folded back on themselves | 0 to 1 |
| bite | How hard that network is driven and how much it feeds back. Low is a metallic halo, high is destruction | 0 to 1 |
| grain | Multiplies the delay times of that network, so the dirt can be tuned above or below the object | 0.1 to 4 |
| oct | Transposes all sixteen modes together, without touching the physics | -4 to 2 |
| hit | How hard the strike drives the modes | 0 to 4 |
| mix / out dB | Wet amount and output level | 0 to 1 / -24 to 12 |
Markov modulation
Six rows, one per destination: contact r, contact θ, tension, couple, grime and material morph. Each row has a switch, a source and an amount from -100 to 100. The sources are chaos, vel, note and curve: the attractors described below, the velocity of the incoming note, its pitch, or a drawn shape.
The switch is not on/off, it is a choice between two behaviours, and the panel prints it: latch: value sampled at strike, run: follows while ringing. With the switch off the modulator is read once, at the moment of the strike, and then held. With it on the modulator keeps moving while the sound rings.
The musical difference is large. Latched, every hit is a slightly different object, struck in a slightly different place, but each hit is internally consistent, the way a drummer moving around a drum head produces a series of stable sounds. Running, the object itself changes while it is still sounding, which no physical object does: the skin tightens mid-decay, the strike point slides, the material turns from bone into glass. Latch for percussion that sounds played, run for objects that sound haunted.
The attractors
The chaos source is six independent chaotic oscillators, one for each destination, so the six things never move together. Each one runs a Coullet attractor, a small system of three equations that is completely deterministic and yet never returns to the same point twice: two orbits started a ten-millionth apart end up in different places. It has an average period of about two seconds, but that period breathes between roughly 1.3 and 2.9, which is why the movement sounds alive rather than looped.
| Control | What it does | Range |
|---|---|---|
| rate | How fast the orbits run | 0.001 to 1 |
| spread | How far apart the six run from each other. Their speed ratios are irrational on purpose, so the six destinations never line up and no pattern emerges | 0.2 to 3 |
| wander | Blends the orbit towards a random walk. At 0 you get chaos, which has gestures and shape; at 1 you get pure drift, which has neither. Small amounts are the useful ones | 0 to 1 |
| PANIC | Stops everything and returns the voice to rest | button |
| MOD | Opens the drawn shapes used by the curve source | button |
That last point is worth more than the rest of the section. When a note arrives, it does not set the chaos value. It pushes the orbit's speed: a hard note makes the attractor accelerate for that strike, so the gesture it draws is wider, and a soft one lets it crawl. The music deflects the chaos instead of replacing it. That is the reason this modulation feels connected to what you are playing while remaining unpredictable, and it is a very different thing from mapping velocity onto a parameter.
The forty material slots
Above the panel sits a bank of forty buttons marked MODAL PRESETS. It stores the state of this voice and nothing else: the forty-one named parameters you see here, not the pattern, not the mixer, not the effects. Click a number in RECALL mode to load a material; switch to STORE mode and a click saves the current object into that slot instead. WRITE and READ save the whole bank to aemd_modal_presets.json and load it back.
So do this once, now, before you save anything: find
aemd_modal_presets.json in the data folder and duplicate it under another name, or copy it somewhere outside the project. From then on you can store and write freely, and if you ever want the factory objects back you rename your copy and press READ. You can also keep several banks this way, one per project, and swap between them with READ.
aemd_modal_presets.json into the main preset grid, and do not expect a stored object to travel with a scene. Chapter 49 explains what gets saved where.
bd·mat lane, the one it shares with the kick. Everything the rest of the machine can do to a voice applies here too: the sends, the pan, the micro delays, and the routing into the Deep Pad's resonator bank described in chapter 24, which is worth trying, because feeding a physical model into another physical model produces objects that neither of the two could produce alone.
Part 5 · Effects
contents31How the sends work
Every mixer strip has six send dials. The effects are shared, not per voice, and everything they produce goes straight to the master.
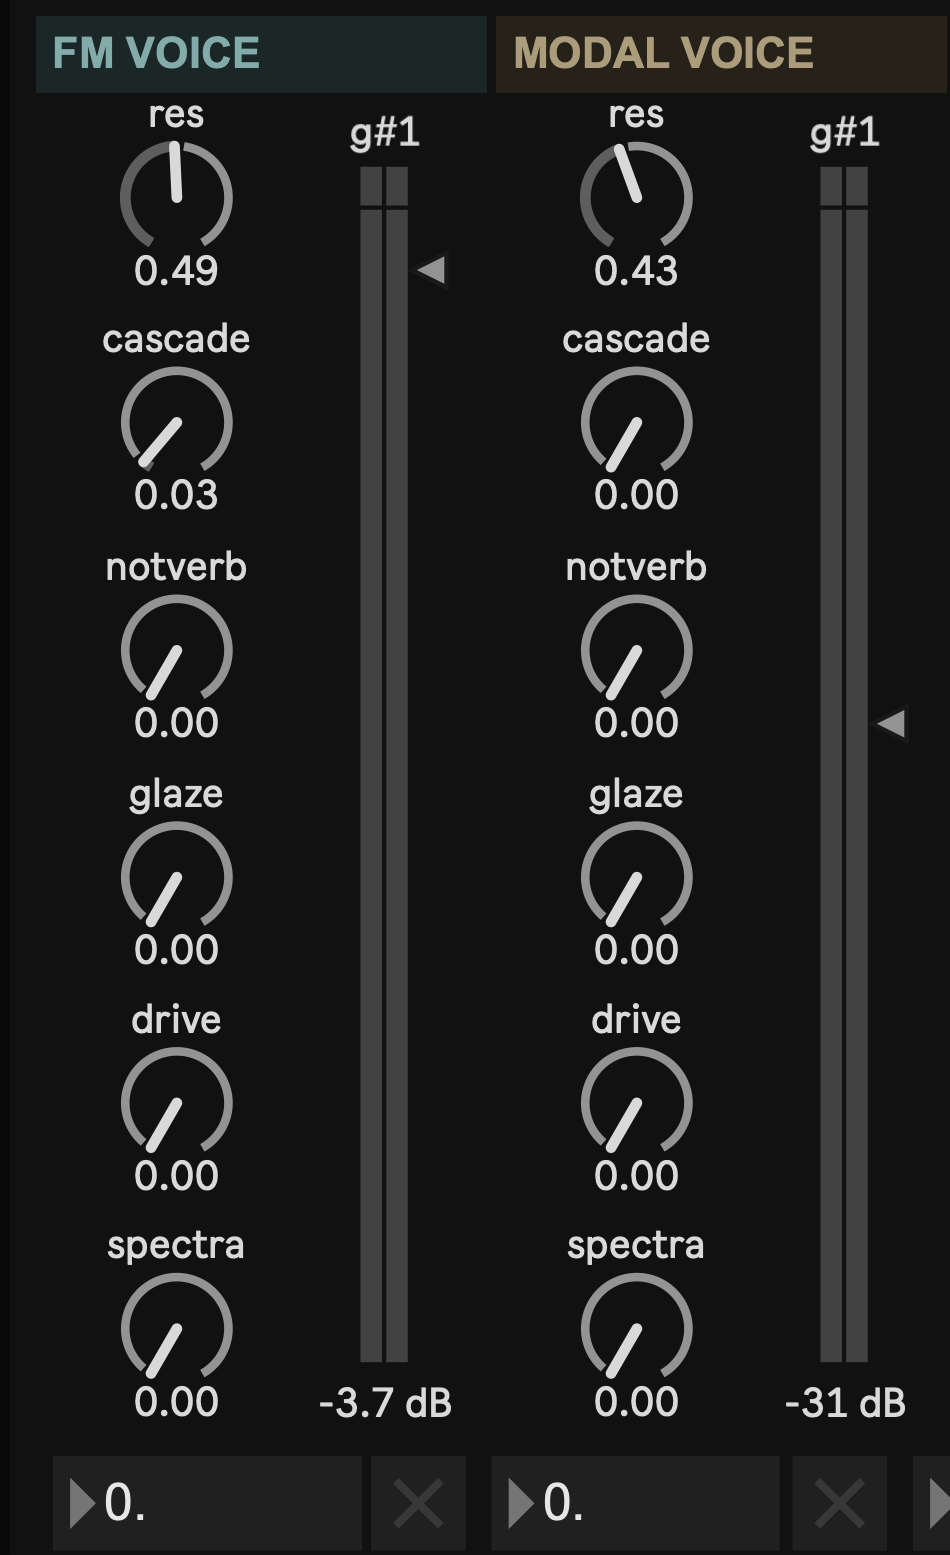
The six sends are RES, CASCADE, NOTVERB, GLAZE, DRIVE and SPECTRA. They are taken after the fader, so pulling a voice down also removes it from the effects.
Two effects work differently. Breathe is an insert on a parallel bus, so a voice reaches it only if its strip is switched to the pads path. The micro delays have their own dedicated feeds from six of the voices and ignore the send dials entirely.
| Effect | Type | What it is for |
|---|---|---|
| Resonators | send | Turning hits into tuned chords |
| Cascade | send | Echoes that change pitch as they repeat |
| Notverb | send | Space, and freezing it |
| Glaze | send | Granular clouds from the recent past |
| Drive | send | A rough, folded delay network |
| Spectra | generator | Photographs the spectrum and rings it back |
| Breathe | insert | Three band compression and ducking |
| Micro delays A / B | send | Tuned resonant stutters on the drums |
contents32Resonators aem_fx_res
Four tuned strings that ring whatever you feed them. Send percussion in, get harmony out.

Resonators. The Resonators strip, with the values of preset 1 loaded.
| Parameter | What it does |
|---|---|
| Decay | How long the strings ring. Near 1 they almost drone |
| Damp | Darkness. Higher means darker, which is the opposite of what the name suggests |
| Inharm | Detunes the four strings against each other. Chorus, then bells |
| Root Note | The root note |
| Scale | Which four notes: pentatonic minor or major, dorian, lydian, whole tone, hirajoshi |
| Prob | Chance the root changes on its own |
| Mix | Dry to wet, default fully wet |
contents33Cascade aem_fx_cascade
A delay with a pitch shifter inside the feedback loop. Every repeat comes back transposed, so echoes fall or climb away into the distance.

Cascade. The Cascade strip: the spectral chain as preset 1 leaves it.
| Parameter | What it does |
|---|---|
| Time | Echo length. Moving it slides the pitch like tape |
| Shift | Semitones per repeat. The default -5 drops a fourth each time |
| Feedback | How many repeats |
| Win | Grain of the pitch shifter. Small is metallic, large is smeared |
| Damp | Each repeat gets darker |
| Xfb | How much the two stereo cascades cross into each other |
| Spread | Pitch offset between left and right. Wide beating |
| RESON / RFREQ | A resonant band in the loop, and where it sits |
| DRIVE | Saturation in the loop |
| MORPH | From clean echo to diffuse reverb-like tail |
| Mix | Dry to wet |
contents34Notverb aem_fx_notverb
A reverb that does not pretend to be a room, and can be frozen solid.

Notverb. The Notverb strip: small panel, and Freeze is the reason it exists.
| Parameter | What it does |
|---|---|
| Size | Space size. Moving it while sound is in there bends the tail |
| Decay | Tail length, up to nearly infinite |
| Damp | Absorption |
| Freeze | Holds the tail forever and closes the input. No click either way |
| Mix | Dry to wet |
Freeze is the reason this module exists. Catch a moment, hold it as a drone, keep playing over it, release. It can be thrown by its jumper, so it happens on its own.
contents35Glaze aem_fx_glaze
A granular cloud built from what the machine played in the last few seconds.

Glaze. The Glaze strip with preset 1 loaded.
Six grains read continuously from a rolling buffer. Each one picks its own position, pitch, pan and length when it restarts, so the result is a shimmer that is related to the music without repeating it.
| Parameter | What it does |
|---|---|
| Size | Grain length. Short crackles, long smears |
| Density | How likely each grain is to sound. Lower thins the cloud out |
| Scatter | How far back it reaches. Low stays on the present, high pulls fragments from the whole buffer |
| Spray | Random stereo placement |
| Motion | Speed the cloud drifts across the stereo field |
| Octave | Transposition upward |
| Feed | Feeds its own output back in. Builds layers into a drone |
| Mix | Dry to wet. Painted red on the panel, and the box below explains why |

The one red box. Mix wears its own colour because Glaze can sound while every fader sits still: when you hear something nobody claims, this is where you look.
contents36Drive aem_fx_drive
Four delay lines at irrational ratios, folded and saturated, feeding each other. Rough rather than warm.

Drive. The Drive strip: the parallel dirt section.
| Parameter | What it does |
|---|---|
| Time ms | Base delay. Under 30 ms it becomes a metallic resonance, over 100 ms a dense echo |
| Feedback | Tail length |
| Damp Hz | Low pass inside the loop |
| Drive | Wavefolding. Adds harsh upper harmonics, not valve warmth |
| Cross | How much the four lines subtract from each other. From four echoes to one diffuse mess |
| Noise | Noise that only appears when signal does. Tape illusion |
| Width | Stereo width of the return |
| Mix / Out | Wet amount and output trim |
contents37Spectra aem_fx_spectra
It listens to the machine, photographs its twelve strongest partials, and answers as a robot: a vocoder whose metal voice is tuned by the photograph, backed by twelve sympathetic strings. You never hear the input, only its machine double.

The whole network. Analysis and photograph on the left half, the LSYX lossy verb on the right, the camera with its Photo trigger and Ears activity lamp beside it. The two readouts are the current photograph: frequencies in hertz above, normalized amplitudes below. The photograph is stored with every preset, so a recalled slot speaks immediately with its own chord.
This is the strangest module in the machine, and it works in two layers that share one tuning source. The photograph, taken by hand with Photo or automatically on the sequencer clock, captures the twelve strongest partials of whatever is playing. Those frequencies tune everything downstream.
The robot. An eight-band vocoder plus a dedicated chest band below 140 Hz. The machine's audio is the modulator: each band's envelope articulates the corresponding band of a metallic carrier, six partials tuned by the photograph and ring-modulated against each other, which is where the metal comes from. The analysis bands sit where drums actually speak, but the carrier bands are shifted downward by SINK, so bright material can drive a deep voice: a kick opens the chest, a hat articulates the consonants, and what comes out is your rhythm pronounced by a machine.
The strings. Twelve feedback combs, each tuned to one partial of the photograph folded down into a low window, with an allpass inside every loop that stretches the partials the way stiffness does in real metal: carillon, not organ. They are excited by the robot's own output, so they ring in sympathy with what the robot says, and they couple to each other in a ring (BLOOM) so chords bloom slowly out of hits.
| Parameter | What it does |
|---|---|
| RATE / SNAP % | How many sequencer steps between photographs, and how often a scheduled photograph actually fires. At SNAP % 0 the current chord holds forever |
| JUMP % | Chance that a photograph reshuffles rather than follows |
| THRESH | Detection threshold of the analysis, in dB. Lower catches more partials |
| DECAY | How long the strings ring, from plinks to drones |
| RING | The depth of the carrier's ring modulation: low is a polite robot, high is alien metal |
| TIGHT | The robot's release, from soft and sung to 12-millisecond surgical |
| SINK | How deep the whole thing speaks: shifts the carrier bands and the string window down together |
| BLOOM | Sympathetic coupling between the strings |
| FEED | Regeneration: stretches the string decay up to fourfold, toward a standing bed |
| GRIME | Drive inside robot and strings |
| DAMP | How dark the strings ring |
| ROBO | The balance: 0 is strings alone, 1 is robot alone |
| OCT | Tunes the whole photograph down, as far as six octaves: at the bottom the metal degrades into slow pulses. Use it when the analysis has caught the bright end of the machine and the image sits too high |
| TILT | Balance of the partials from low to high |
| WIDTH / WASH | Stereo width, and a soft diffusion veil |
| MIX | Level of the whole return |
LSYX, the lossy verb aemd_lsyx
Everything Spectra produces passes through one more machine before it reaches the master: the lilac block on the right of the strip. LSYX is a reverb built like a failing codec, the digital sibling of Oxide (chapter 52): where the tape sheds oxide, this loses data. With ON off it is a bit-exact bypass, and every factory preset ships that way.
| Control | What it does |
|---|---|
| KBPS | The quality of the connection, 320 down to 8. Bandwidth, bit depth and clock stability all collapse together, and below roughly 100 the birdies appear: the watery whistles of a starved codec, derived from your own signal |
| PACK | Lost packets: brief holes and granular repeats, alternating left and right |
| VERB | Amount and length of the tank together, up to nearly twenty seconds. Its defining trait: every recirculation is re-encoded, so the tail does not fade, it grinds away, generation after generation. At low KBPS a long tail dissolves into codec noise rather than dying |
| SPC | The size of the space |
| TONE | How dark the tail is. It can never be brighter than KBPS allows |
| DUCK | The tail bows to the input and rises in the gaps: ambience that breathes |
| WDT / MIX | Stereo width, and the final balance |
| FREEZE | Holds the tank forever. Conceptually the codec stops re-encoding: a stuck RAM that darkens very slowly over minutes. Catch a cloud, pull the sends down, and play over it |
The small pale meter in the block's header answers one question only: is LSYX the thing you are hearing right now. It reads the processed signal scaled by MIX, so at MIX 0 it sits still no matter what the tank holds.
contents38Breathe aem_fx_breathe
A three band compressor with a ducker on each band. It is what makes the low end move out of the way.

Breathe. The Breathe strip: the pads path, three bands and the duck.
| Parameter | What it does |
|---|---|
| X Lo / X Hi | Where the three bands split |
| Thr / Ratio | Threshold and ratio |
| Depth | How much of the compression is applied. This is its dry and wet |
| Attack / Release | Attack and release. Long release is the pumping this is named for |
| Duck Lo / Duck Mid / Duck High | Duck depth per band. Low high, mid medium, high low is the classic setting |
| D Rel | How fast the duck recovers |
| Out dB | Output trim |
contents39Micro Delays aem_fx_mdelay, two instances
Two short tuned delays that burst into resonance when a drum hits them. They live in the voices window and they take their signal directly from six voices.
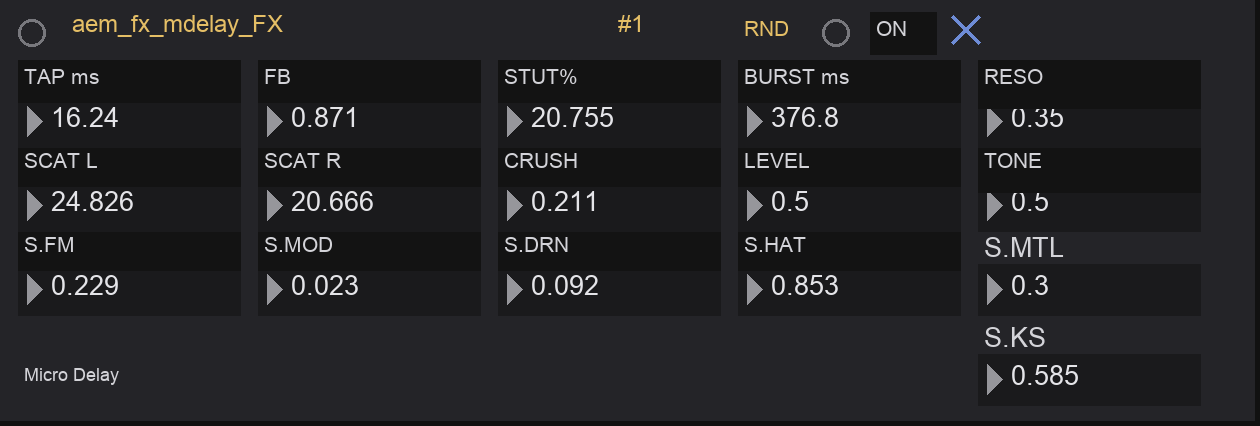
Micro Delays. One of the two micro delay panels; A and B are identical twins with separate sends.
The idea is IDM stutter, but tuned. Inside the feedback loop there is a filter locked to an exact harmonic of the delay itself, so the resonance always sings in tune with the comb rather than fighting it. When a drum hits and the dice allow it, feedback opens for a burst and the delay rings.
| Parameter | What it does |
|---|---|
| TAP ms | Delay time, so the pitch of the comb |
| FB | Feedback during the burst |
| STUT% | Chance a hit triggers a burst |
| BURST ms | How long the burst lasts |
| SCAT L / SCAT R | Stereo scatter, re-rolled on every hit, so the image jumps |
| RESO | How much the internal filter rings |
| TONE | Which harmonic it rings on |
| CRUSH | Sample rate reduction |
| LEVEL | Return level |
| S.FM, S.MD, S.DRN, S.HAT, S.KS, S.MTL | How much each voice feeds this delay |
contents40The feedback matrix aemd_fbmatrix
Six effects, arranged so each one can feed the others. This is the module that turns the effect section into an ecosystem.
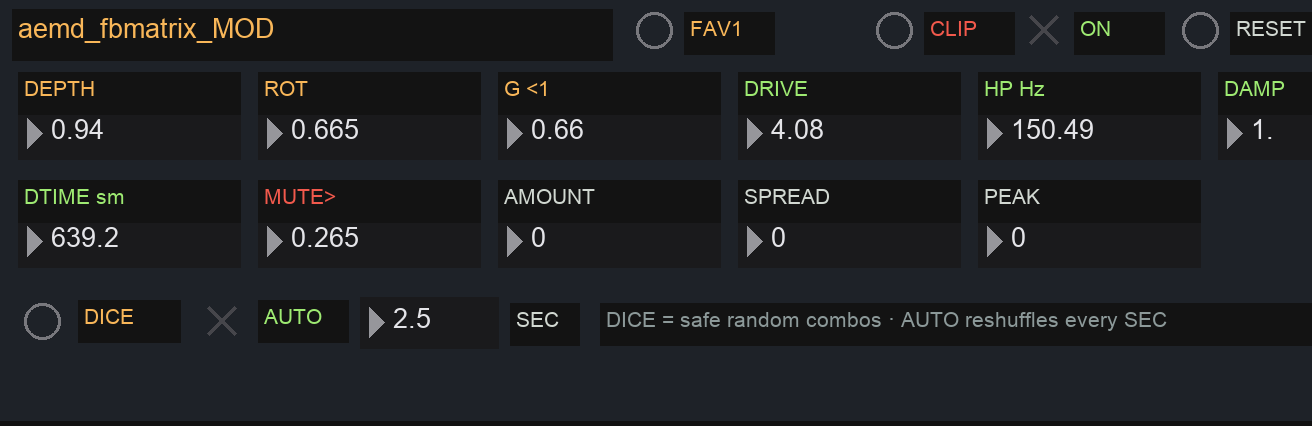
The feedback matrix. The feedback matrix panel: DEPTH is the master dose, DICE deals safe random combinations, AUTO reshuffles on its own clock.
Normally an effect hears only the voices. Here, the returns of six effects are routed back into the inputs of the others through a rotation matrix. The reverb tail can feed the granulator, which feeds the delay, which feeds the resonators.
| Parameter | What it does |
|---|---|
| DEPTH | The master control. 0 is normal behaviour. Up from there the effects begin to eat each other |
| ROT | Changes who feeds whom without changing the total energy. Very different characters |
| G <1 | Safety ceiling on the loop gain |
| DRIVE / HP Hz / DAMP | Shape the circulating signal. High pass stops bass building up, damp darkens and stabilises |
| DTIME sm | Loop latency. Long values give a slow ping-pong between effects |
| MUTE> | Safety cutout if the network gets too loud |
| AUTO / SEC | Re-rolls the configuration on a timer |
contents41The master chain
Everything meets in the same place and passes through three stages before it leaves.
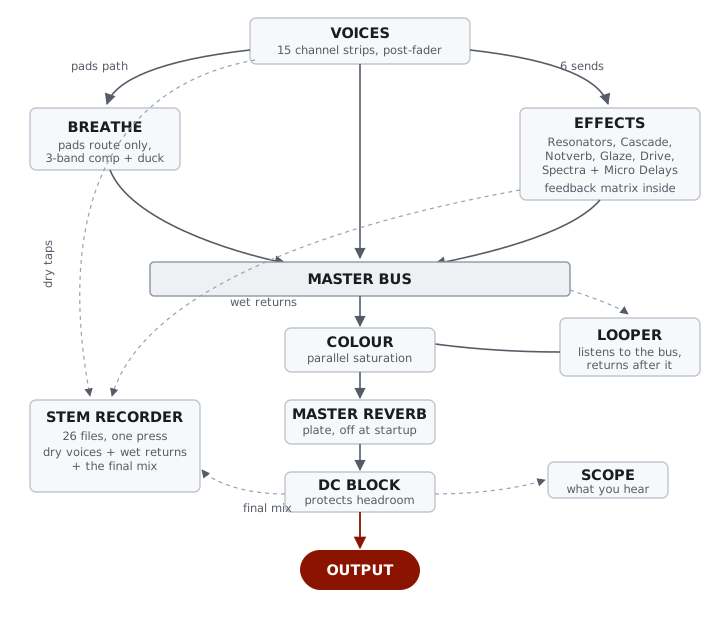
- Colour aemd_colorbus. Parallel soft saturation. Two controls: Drive is how hard it hits, Color Mix is how much of it you get. At the defaults it glues without being audible as distortion.
- Master reverb aem_fx_reverb. A plate. Pre-delay, input filter, damping, decay and level.
- DC block aem_dcblock. Removes the offset that saturation and feedback accumulate. No controls, nothing to hear, it just protects your headroom.
Part 6 · Modulation
contents42Mod panels: one modulator per parameter
Seven voices have a modulation panel. Every parameter of that voice gets its own LFO, with its own shape, speed and depth.
This is not one LFO routed to a destination. It is one modulator per parameter, all running at once, each independent. The panels are in the voices window, directly under the voice they belong to.
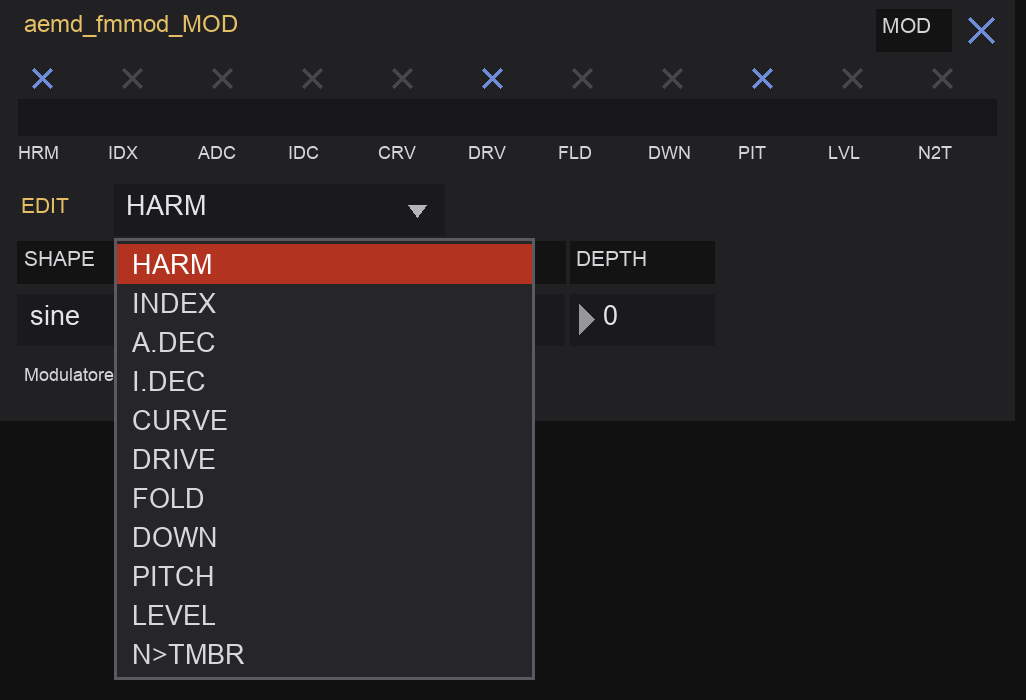
How to use one
- Turn on the MOD master toggle.
- Turn on the small toggle for the parameter you want to move. The labels are three letter abbreviations.
- Choose that parameter in the EDIT menu. Everything below now applies to it.
- Set SHAPE, then DEPTH, then decide between synced and free running.
| Control | Options |
|---|---|
| SHAPE | sine, triangle, saw up, saw down, square, sample and hold, drift |
| SYNCH | On locks to the sequencer, off runs free in Hz |
| DIV | When synced: 4 bars down to 1/16 |
| HZ | When free: 0.01 to 40 Hz |
| DEPTH | How far it moves, as a fraction of the parameter's range |
contents43FX mod banks
Six banks, one per effect, that move the send amounts of twelve channels independently and slowly.
Each bank has twelve channels, one per mixer strip, and each channel drifts on its own between silent and full. The result is that voices enter and leave an effect without anyone touching a dial.
| Control | What it does |
|---|---|
| ON | Enables the bank |
| RATE | Speeds the drift up |
| MODE | 0 is a smooth sweep, 1 is discrete jumps |
| JUMP % | In jump mode, the chance of a jump on each step |
contents44Pan and drift aem_panbank
Twenty-one independent pan positions, each wandering on its own schedule.
The drift generator does not do what a normal auto-pan does. It picks a target near one edge, ramps to it over a random time between 0.1 and 1.5 seconds, waits, then heads for the other edge. It is never parked in the centre, and it never has a period you can hear.
Twenty-one channels cover the eight drum kit voices, the four samplers, the kick, and the eight multicluster strips. The same four controls as the FX banks apply.
contents45Terrarium aemd_terra
A chaotic system with wandering agents that grab parameters anywhere in the machine, modulate them for a while, and put them back. Two hundred and seventy-one destinations. It is the deepest and least predictable module here.
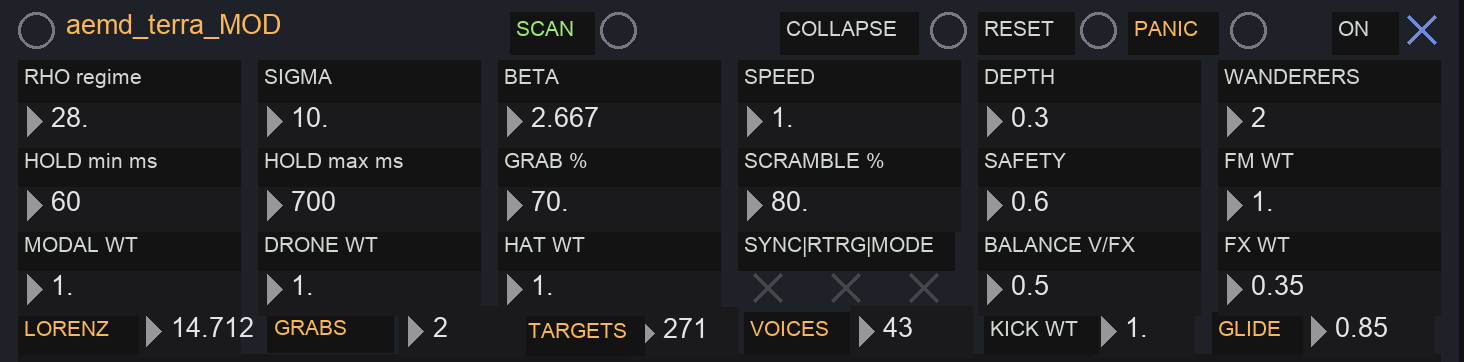
The idea
A Lorenz attractor runs in the background, tracing the well-known double spiral. A number of agents follow that trajectory. Each one grabs a target parameter, moves it according to where the trajectory is, holds it for a random time, and then releases it back to exactly the value it found. When the trajectory crosses from one lobe of the attractor to the other, the map between regions and parameters is reshuffled, so the same movement never controls the same thing twice.
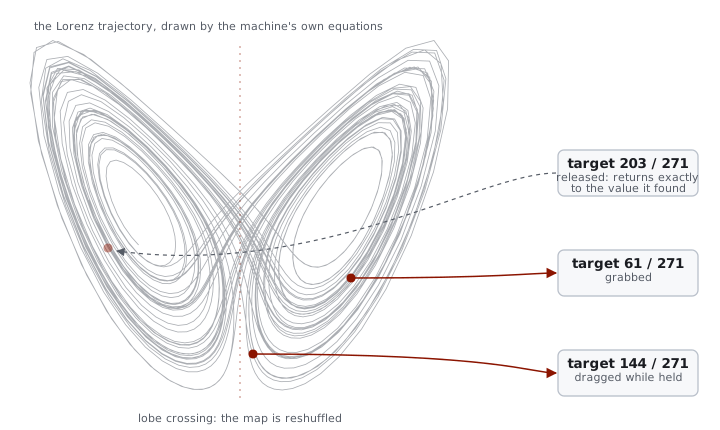
The life of an agent. The spiral is the actual trajectory, computed from the same equations the machine integrates. One agent has just grabbed a parameter, one is dragging the one it holds, one has released, and the value travels back to exactly where it was found. The dotted centre line is the border between the two lobes: every crossing may reshuffle which region controls which parameter.
In plain terms: several independent processes borrow parameters for a while and always give them back. Nothing you set is ever lost, because every borrowed value returns to where it was, and since the map keeps changing, the same gesture never lands on the same control twice.
The controls that matter most
| Parameter | What it does | Range | Default |
|---|---|---|---|
| RHO regime | The regime. See the table below. This is the dramatic control | 0.5 to 60 | 28 |
| WANDERERS | How many parameters are being moved at once | 1 to 16 | 2 |
| DEPTH | How far each one moves | 0 to 1 | 0.3 |
| SPEED | How fast the whole system evolves | 0.05 to 4 | 1 |
| HOLD min / HOLD max | How long an agent keeps a target | 10 to 8000 ms | 60 / 700 |
| GRAB % | How eagerly agents take new targets | 0 to 100 % | 70 |
| SCRAMBLE % | How often the map is reshuffled | 0 to 100 % | 80 |
| SAFETY | Safety. Reduces movement on delicate parameters like pitch and level | 0 to 1 | 0.6 |
| GLIDE | How smoothly values move. Low is glitchy, high is fluid | 0 to 0.98 | 0.85 |
| BALANCE V/FX | 0 targets voices only, 1 targets effects only | 0 to 1 | 0.5 |
| FX WT | Effect weight. At 0 no effect is ever grabbed | 0 to 1 | 0 |
| MODE | PARAM grabs single parameters, MODULO grabs whole modules | toggle | PARAM |
RHO, the regime control
| below 1 | The system dies. Modulation stops |
| 1 to 24.7 | Settles to a fixed point. Terrarium goes quiet and the machine returns to itself |
| around 28 | Full chaos, the classic double spiral. This is the default |
| above 28 | Other regimes, some almost periodic. Unpredictable in a different way |
Before you switch it on
- Press SCAN once. It maps the machine and reports how many targets it found. Without a scan it has nothing to grab.
- Turn off the per-voice mod panels. The two systems write to the same places and fight each other.
- Start with 1 or 2 agents and depth around 0.15.
Three settings to start from
| Controlled evolution | Mutating techno | Full chaos | |
|---|---|---|---|
| RHO | 27 to 28 | 28 | above 28 |
| Agents | 1 to 2 | 3 to 5 | 8 or more |
| Depth | 0.10 to 0.25 | 0.25 to 0.45 | high |
| Hold | 500 to 3000 ms | 100 to 900 ms | short |
| Grab | 30 to 50 % | 60 to 80 % | high |
| Mode | PARAM | PARAM | MODULO |
HOLD, the sculpting switch
Normally a released parameter returns to where it was found. With HOLD on, it stays where the agent left it. Terrarium stops modulating and starts making permanent changes: leave it running for a few minutes with hold on and the machine will have rewritten its own settings. Store the result before you touch anything.
The pattern shuffler terra_control
Next to the Terrarium panel in the voices window sits a small control panel called terra_control / markov chain, and it does something no other control in the machine does: it lets the Terrarium rearrange the pattern itself, not just the sound.
The shuffler. Eleven toggles choose which columns of the grid get rearranged; the bottom row decides when and how.
The eleven toggles, NOTE through TRIG, select which columns of the sequencer grid take part. A shuffle takes the sixteen rows of every selected column and puts them into a new order: the same sixteen values, the same pattern material, in a different arrangement. With no column selected, every column is included.
| Control | What it does |
|---|---|
| SHUFFLE / now | Deals immediately, once, by hand |
| A/B | The coupling mode, and the most musical choice on the panel. In one position, a single reordering is applied to every selected column, so each step moves with all its properties attached: the pattern is rearranged but its events stay whole. In the other, every column gets its own independent reordering: notes, velocities and ratchets lose their original pairings and recombine into new events |
| SH% | The automatic trigger. Every time the Lorenz trajectory crosses from one lobe of the attractor to the other, this is the probability that a shuffle fires on its own. At 0 the panel is manual; raise it and shuffles start firing on their own, at the irregular pace of the attractor |
| HOLD | The same sculpting switch described above, duplicated here so both hands stay in one place |
The reason it says markov chain in the title: the shuffle operates on the same grid the Markov engine reads, so a reordering does not just change one repetition, it changes the material the step order keeps drawing from. Combined with a moderate SH%, the machine generates variations of its own pattern, timed by the attractor instead of by a bar counter, so they arrive at irregular, unpredictable moments rather than every four bars.
Part 7 · Presets
contents46The preset grid
Ninety-six slots, five commands, and one rule: storing overwrites everything without asking.
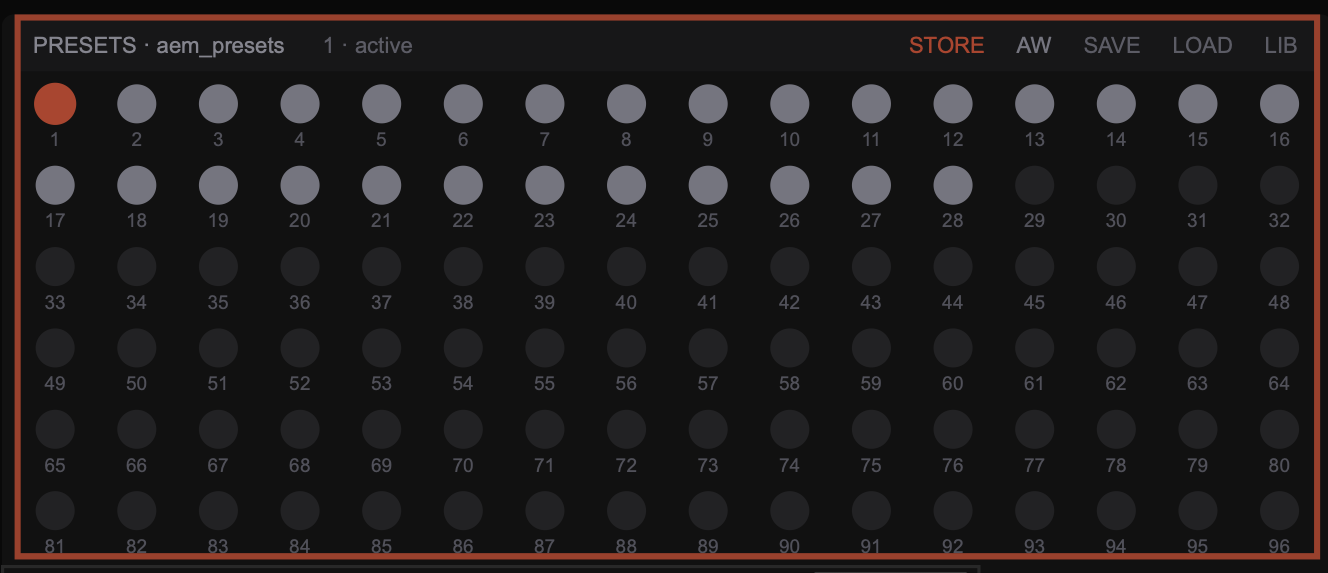
| Command | What it does |
|---|---|
| STORE | Arms the grid. A red border appears. The next slot you click gets saved, then it disarms |
| AW | Autowrite, on by default. Every store is written to disk immediately. With it off, stores live in memory until you press SAVE |
| SAVE | Writes the current bank to disk by hand |
| LOAD | Lists every bank in the data folder and loads the one you pick |
| LIB | Returns to the main library |
Clicking a slot without arming recalls it. The dot turns red. There is no confirmation and no undo.
contents47Preset morphing
The ninety-six slots are points. This panel draws the lines between them: any two presets become the ends of a path, and everywhere along that path is a state of the machine that nobody ever programmed.
Set two slots, drag one slider, and over a thousand parameters travel together. Continuous values, decays, levels, cutoffs, mix amounts, glide linearly from one preset to the other. Switches, menus and the step metrics do not glide: they flip once, halfway through, so the machine never sits in a half-enabled state. The few multi-value blocks, the Markov matrix among them, switch as wholes. All of this is driven by the same engine that recalls your presets, so anything a preset can store, a morph can traverse.
The morph panel. Two slots, one slider. Here the machine is at 0.4 of the way between preset 7 and preset 19, playing a state that exists in neither.
| Control | What it does |
|---|---|
| A | The starting preset, by slot number |
| B | The destination preset |
| slider | Where you are between them, 0 to 1. Drag it and listen: this is the exploration tool |
| TIME s | Length of an automatic transition, in seconds |
| GO | Runs the morph from 0 to 1 over TIME, on its own. The slider follows so you can see where you are |
| RST | Snaps back to A |
What it is for
Two different instruments live in this panel. The first is a search tool: somewhere between preset 7 and preset 19 there may be a point, at 0.4, at 0.7, that is better than either of them. Drag slowly, find it, leave the slider exactly there and STORE the result into an empty slot. You have just written a preset by listening instead of programming. The second is a performance tool: set TIME to thirty or sixty seconds, press GO, and the machine walks from one state to the other without a single cut. Between two distant presets that walk is effectively a composition.
One behaviour deserves its own sentence. The note columns interpolate too, and in this machine the note chooses the voice (chapter 14). So as the notes slide through their intermediate values, the pattern is not transposed: it is re-orchestrated, continuously, crossing every combination of voices between the two presets. No other control in the machine produces that effect.
contents48The Assembler: generating preset banks
The machine ships with a bank factory. The Assembler generates whole preset libraries, twenty-eight slots at a time, born from real presets and pushed as far from them as you choose. It is the fastest way to fill the machine with material that is yours and nobody else's.
The Assembler lives in other/aem_genesis.html and opens in any browser. It is deliberately plain, a white laboratory page: this is a workbench, not a performance surface. Everything it produces is a normal preset bank file, and it never writes the main library.
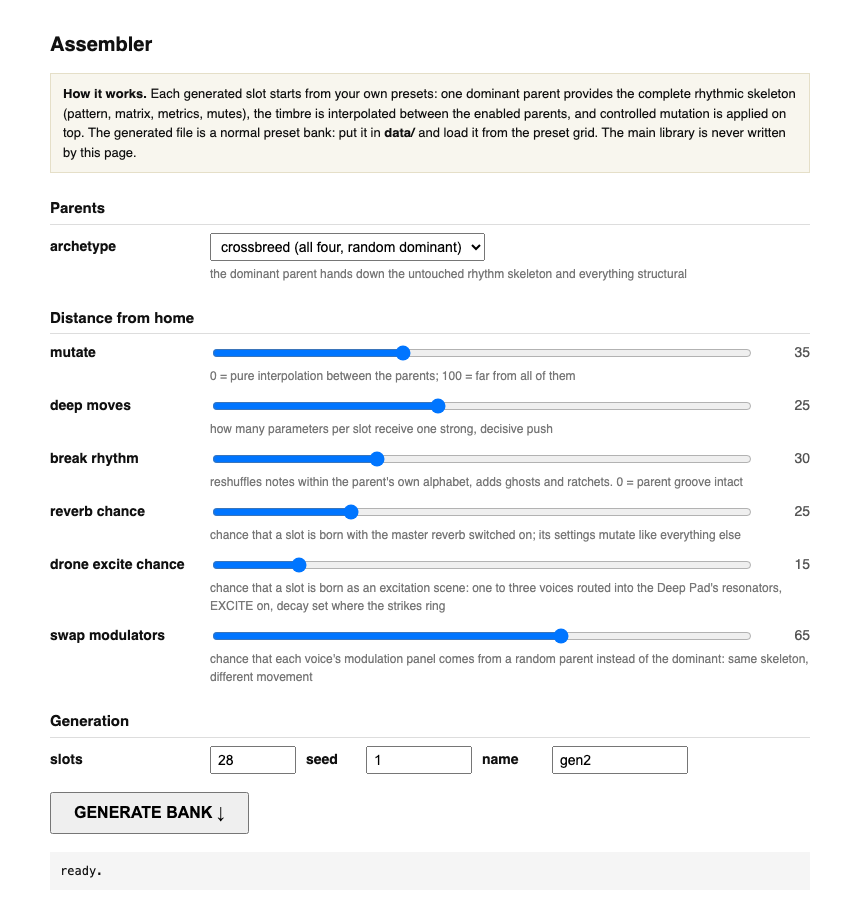
The whole tool. One decision and six sliders. The restraint is the point: the intelligence is in the engine, not in the controls.
How it thinks
Early experiments made one thing very clear: randomizing a thousand parameters produces noise, and always the same noise, no matter how often you roll. Musical states are not made of independent values, they are made of relationships, and pure chance destroys relationships first. So the Assembler works the way the best generative preset systems have always worked, from the Nord Modular's Patch Mutator onward: it starts from presets that already sound like music and moves outward from there.
Every generated slot has one dominant parent, a real preset from the factory library. From that parent it inherits the entire rhythmic skeleton untouched: the pattern, the Markov matrix, the step metrics, the mutes. That inheritance is why nothing the Assembler produces is ever unplayable noise, and why every slot grooves from the first bar. On top of that skeleton, the timbre is interpolated between all the parents of the chosen family, then mutated: most parameters drift a little, a handful get one strong, decisive push, the way a person designs a sound by starting somewhere and moving a few controls with intent. Modulation panels are swapped whole between parents, so two slots with the same skeleton can move in completely different ways.
One guarantee is worth spelling out: every generated slot carries the machine's complete parameter set, exactly like a factory preset. Processors that default to off, Oxide among them (chapter 52), are born explicitly off in every slot. A generated bank can never leave the previous preset's tape running, because it does not inherit your current state: it states its own, in full.
| Control | What it does |
|---|---|
| archetype | Which family of parents to breed from, and therefore what kind of bank you get: a beat-driven family, an atmospheric one, a sparse one, or a crossbreed of all of them with a different dominant parent per slot. Crossbreed is where the surprises live |
| mutate | Distance from home. At 0 every slot is a pure blend of its parents; at 100 the timbres wander far from all of them. The musical range is roughly 25 to 55 |
| deep moves | How many parameters per slot receive one strong push instead of a gentle drift. This is the human gesture in the engine: few moves, made with conviction |
| break rhythm | Works only inside the parent's own note alphabet: reshuffles which note falls on which step, adds ghost notes, accents and ratchets, bends the micro-timing. At 0 the parent's groove arrives intact; step probability is floored, so silence is impossible by construction |
| reverb chance | The probability that a slot is born with the master reverb switched on. Its five settings, pre-delay, cut, damping, decay and level, mutate like every other parameter, so no two wet slots share the same room. Keep it low for beat banks, generous for atmospheric ones |
| drone excite chance | The probability that a slot is born with a Send to Drone scene: one to three voices, drawn with a bias towards the percussive ones, flagged into the Deep Pad's resonator bank with EXCITE on and the pad's decay set where the excitation is clearly audible (chapter 24). Slots that win this dice arrive already playing a pattern through a resonant body; the ones that do not stay completely dry |
| swap modulators | The chance that each voice's modulation panel comes from a random parent instead of the dominant one. Same skeleton, different movement: this is what keeps twenty-eight slots from sharing one personality |
| slots / seed / name | Bank size, random seed and filename. The same seed always produces the same bank, so every experiment is reproducible: note the seed of a good one and you can regenerate it forever |
The scratchpad workflow
The Assembler is designed to be used as a scratchpad, and this is where it earns its place. The preset grid's LOAD menu automatically lists every .json file it finds in the data/ folder: drop a generated bank in there and it appears in the menu, no registration, no configuration. Keep as many working banks as you like, one per mood, one per track, one per experiment.
The full cycle looks like this. Generate a bank and put it in data/. LOAD it from the grid menu and walk through the slots. When one is almost right, finish it by hand: re-roll a single voice from its panel, adjust what your ears ask for. STORE it, then SAVE: the grid writes back to the bank you loaded, never to the main library, and confirms it in the header. With AW on, every STORE writes the file by itself. When a preset has proven itself, promote it: press LIB to return to the main library and STORE it into an empty slot. The generated banks are the quarry face; the main library is where the finished stones go.
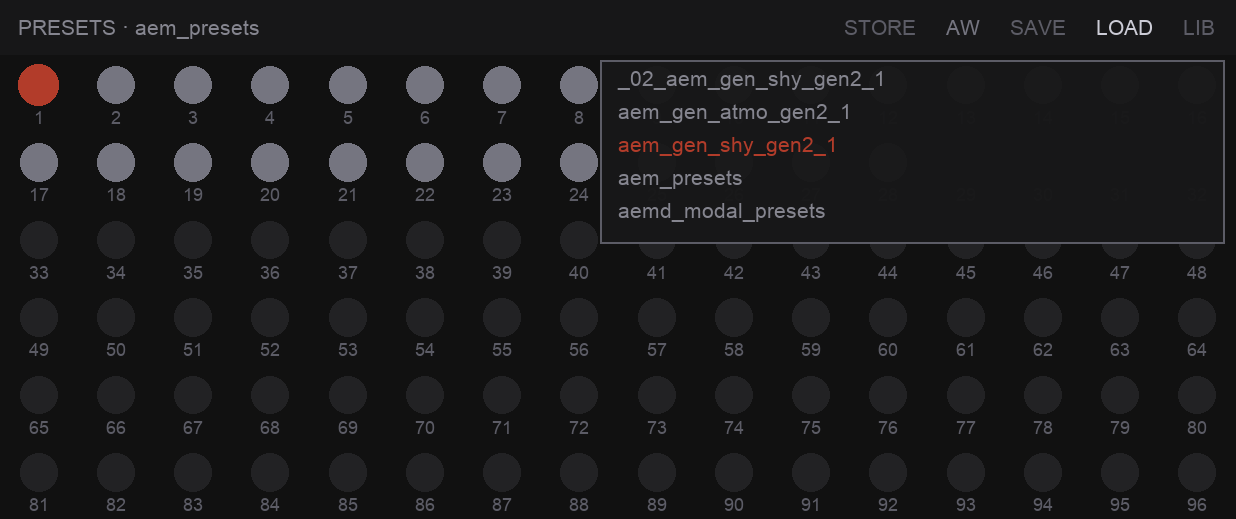
Every bank, one menu. Drop a generated file into data/ and it appears here. The header always tells you which bank you are writing to.
aem_gen_cross_night_433.json reads like a lab notebook: the archetype, the idea, and the exact recipe to reproduce it. Six months from now, that discipline is the difference between an archive and a junk drawer.
contents49What gets saved, and what does not
This chapter exists because it is the single most common source of "why does this preset sound different". Everything here is worth reading once.
What is saved
Essentially every control you can see: all voice parameters, all effect parameters, the whole pattern, the matrix, the mixer, every modulator setting, the Terrarium configuration, the jumper probabilities, the looper parameters. Around a thousand values per slot.
What is not saved
| Not saved | Why it matters |
|---|---|
| Audio in buffers | Loops and samples are gone when you close the patch. Load them again |
| Dice outcomes | The probability is saved, the roll is not. With DICE above 0 a recalled preset gives new effect settings |
| LFO phases | Shape, speed and depth come back. Where in the cycle they were does not |
| Terrarium's position | Which parameters were grabbed at that instant is not stored |
| The morph position | The slider of chapter 47 is performance state, not preset content. Saving it would mean a preset that recalls other presets, and that way lies recursion |
| The drone's held state | See the warning in chapter 17 |
contents50Random All
One button that randomises the machine inside musical limits. It is more careful than it looks.
It does not touch notes, scales, root, BPM, master levels, or loaded files. It clamps the dangerous parameters into safe ranges: feedback, drive, fold, inharmonicity, delay levels. It will not switch on DSP that was off, because toggles and menus are left alone unless explicitly listed. And it guarantees the Markov matrix stays playable by leaving at least one exit in every row.
What it does randomise: voice parameters, matrix density and morph settings, the column animation toggles, the reverb within modest limits, pan drift, sampler loop points, and the shape curves.
Part 8 · Looper and recording
contents51The circular looper aemd_looper
Thirty seconds of memory, always listening to the master. It captures what a preset cannot: the actual sound of a moment.
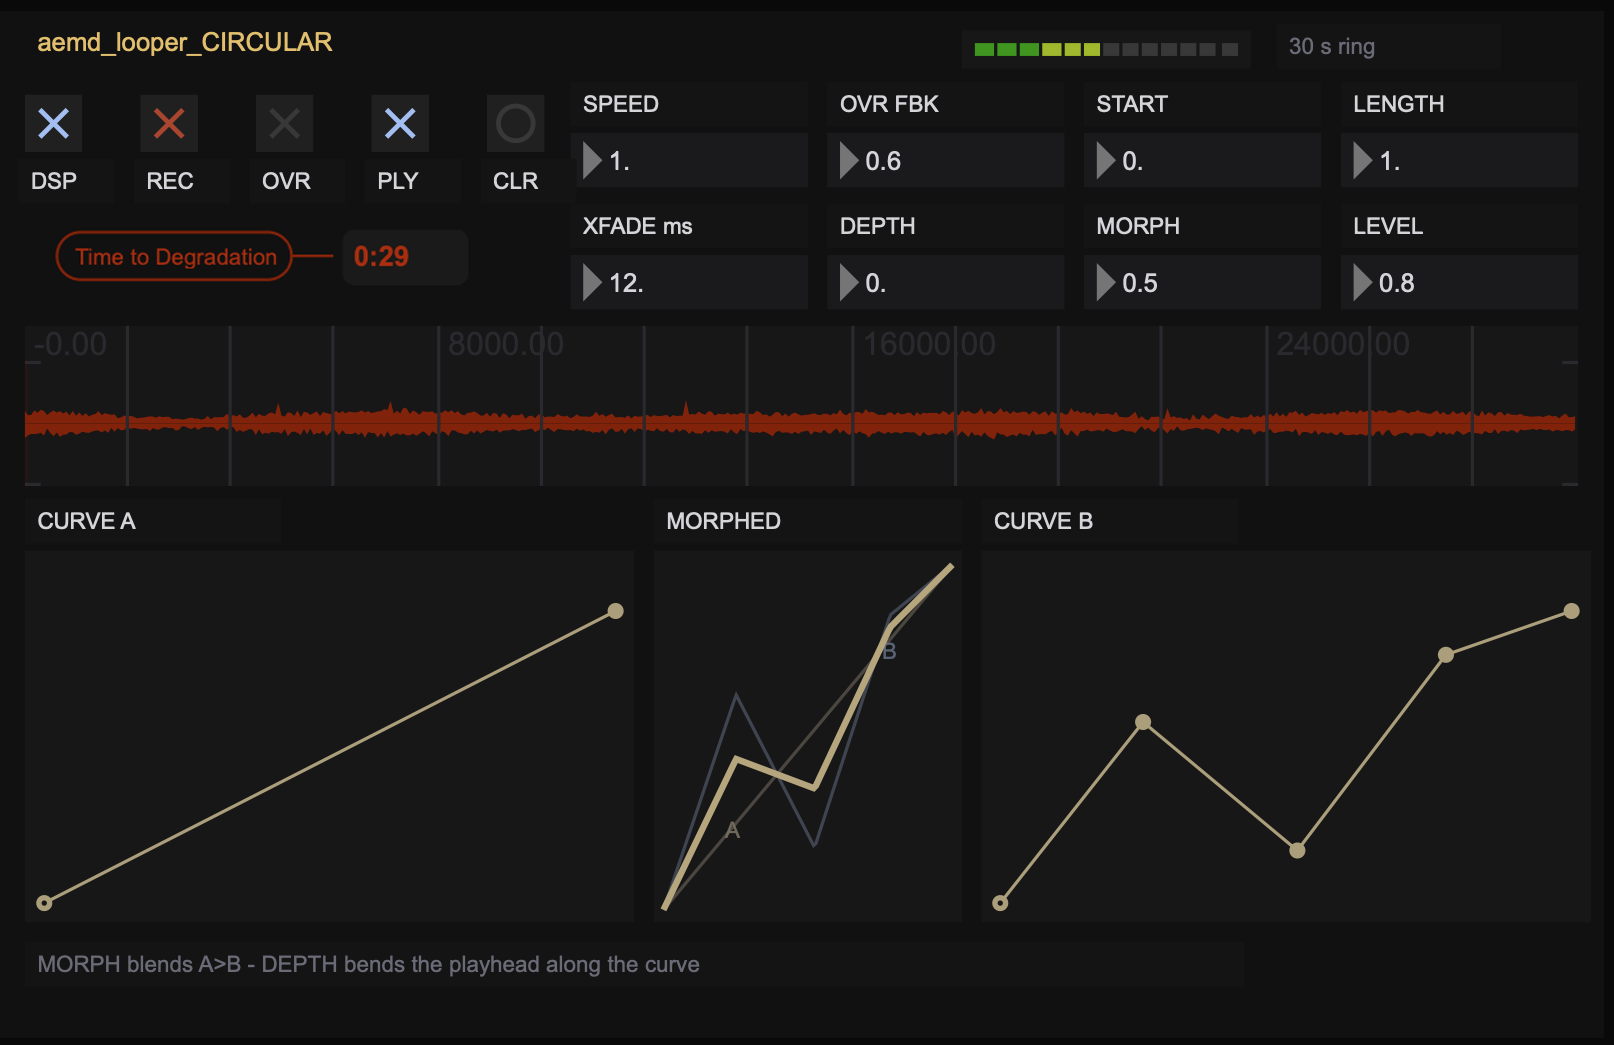
Time to Degradation, under the transport, is the tape's clock: here the loop has twenty-nine seconds left to live. What it counts, and why it sometimes moves on its own, is explained with the rest of the tape processor in chapter 52.
Recording
- Switch DSP on. Until you do, the engine is muted and costs nothing.
- Press REC. The waveform grows as it writes.
- Press REC again to stop. The loop length is set by how long you held it.
- PLY plays it. CLR erases it.
| Parameter | What it does |
|---|---|
| SPEED | Speed, -4 to +4. Negative plays backwards. Reading is interpolated, so off-speeds stay clean |
| START / LENGTH | A window inside the loop. Shrink it to isolate a fragment |
| XFADE ms | Crossfade at the loop seam, so it does not click |
| OVR FBK | Overdub feedback. Below 1 the older layers fade as you add new ones |
| LEVEL | Output level |
The morph curves
This is what makes the looper more than a looper. Instead of the playhead moving evenly, it can follow a curve you draw. Two curves, A and B, and a MORPH control that blends between them.
The middle display shows all three at once: the two source curves as ghosts, the blended curve solid, and a red dot travelling along it. That dot is the playhead. Where the curve rises, the loop runs forward; where it falls, it runs backwards; where it is flat, it holds.
| DEPTH | DEPTH. How much the playhead obeys the curve. At 0 the curve is drawn but ignored |
| MORPH | MORPH. Blends curve A into curve B |
contents52Oxide: tape and spring aemd_tape
A magnetic transport and a spring tank, sitting on the return of the circular looper. It can slow the tape almost to a standstill, and it can let the recording wear out and never come back.
Everything the looper captures passes through this before it reaches the master. With both switches off it is not there at all: the signal goes through untouched, which is how it arrives and how every factory preset leaves it. Switch TAPE on and the loop stops being a digital buffer and becomes a length of magnetic tape, with all the consequences that implies.
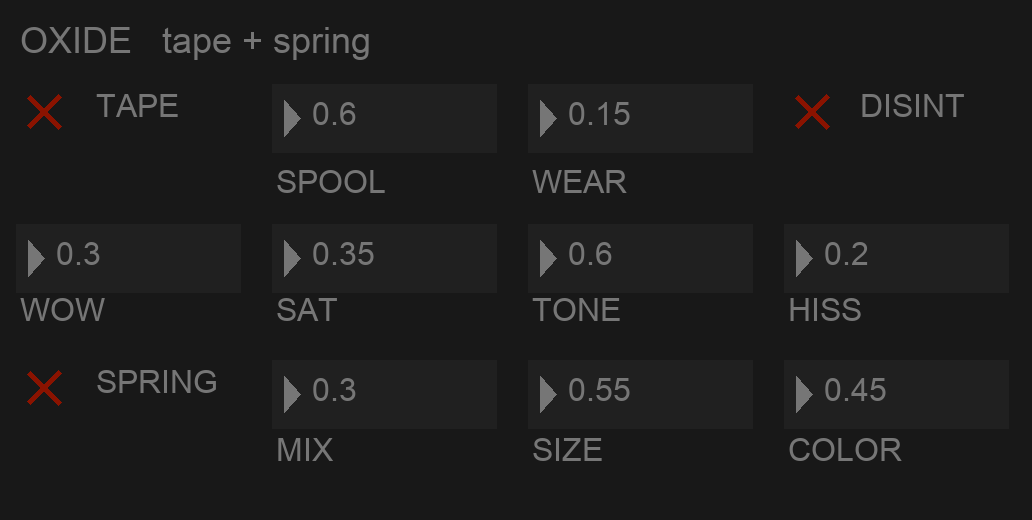
A disintegration in progress. Tape running at six tenths of speed, wear set low so the process takes about a minute, and the spring tank open underneath.
Where it sits, and why that matters
Oxide is an insert, not a send. It sits between the looper's output and the machine's final glue stage, so it treats only what the looper is playing back, never the live machine. Two consequences follow, and both are useful. Nothing it does can feed back into the machine, because its output does not return to the master bus. And every one of its controls acts on a recording rather than on a performance, which is exactly the relationship a tape machine has with the world.
It also means the obvious: if the looper is not playing, Oxide has nothing to work on and you will hear no difference at all. Record something into the loop first.
SPOOL: the speed of the transport
The tape has its own motor, and SPOOL is how fast it turns. At 1 it runs at nominal speed and passes the signal through in time, with no delay and no colour beyond what the other controls add. Below that it slows, and three things happen at once, which is why it does not sound like a pitch control.
The pitch drops, as it must. The top end goes, because on a real machine the high frequency response depends on how fast the tape crosses the head: slow it down and the shortest wavelengths stop being resolved. And the wow and flutter increase, because a transport running slowly is a transport running unevenly. You do not have to dial any of that: it is a consequence of the speed, computed from it, the same way it would be a consequence on a Revox.
This control does not replace the looper's own SPEED. The two are in series, one reading the buffer and one re-reading what comes out, so their effects multiply: a loop playing at double speed through a tape running at half arrives at normal pitch, having been degraded twice on the way.
WEAR and DISINT: the loop consuming itself
These two belong together and they are the reason this section exists.
WEAR is how worn the tape is. On its own it is an ordinary control: raise it and the recording sounds older, lower it and it recovers. Turn DISINT on and it stops being a setting and becomes a process. From that moment the tape loses oxide continuously, pass after pass, and it does not come back. The only way to restore it is to switch DISINT off, which is the equivalent of threading a fresh reel.
What is actually lost is two things at once, and the pairing is what makes it read as material rather than as an equaliser. The high frequencies go first, because they are the ones that need intimate contact with the coating, and the level falls with them. The sound does not get darker, it retreats.
| Oxide left | Top end | Level | What you hear |
|---|---|---|---|
| 0.72 | 9.7 kHz | 77% | Everything is still there, but the air is thinning |
| 0.50 | 6.2 kHz | 59% | The brightness goes, the body remains |
| 0.30 | 3.4 kHz | 43% | It sounds like a copy of a copy |
| 0.15 | 1.6 kHz | 30% | Only the body is left, the consonants have gone |
| 0.05 | 580 Hz | 22% | A muffled ghost |
| 0.02 | 350 Hz | 20% | It stops here. A dark residue, not silence |
Three other things happen along the way, and they happen together because they have the same cause. A coating that is shedding is a coating that no longer touches the head cleanly, so dropouts appear, brief losses of level at irregular intervals, and they get deeper and more frequent as the tape thins. The bare substrate underneath is noisier than the oxide that used to cover it, so the hiss rises as well, by around nine decibels between a fresh reel and the end. And the transport itself grows less steady, so the wow deepens by about half again, enough to hear the machine losing its grip without turning the pitch into a wobble.
Put those together with a level that is falling anyway and you get the inversion that the whole idea rests on: the music sinks while the noise climbs to meet it, and by the end you are listening to tape noise with a memory of music inside it rather than to music with noise underneath.
A worn tape, seen. Both channels of a loop under DISINT, viewed as a spectrogram. The vertical stripes are the dropouts: brief instants where the coating no longer meets the head and the whole spectrum blinks out at once, deeper and more frequent as the tape thins. They arrive on their own schedule, never on the grid, and they are not a flaw to dial away: they are the material speaking. If you want the recording clean, the cure is simple and total: leave DISINT off, and the tape stays whole.
How long it takes
WEAR does two jobs at once: it sets how worn the tape is to begin with, and how fast it keeps wearing. That is why high settings are not a faster disintegration but a tape that is already finished. Every factory preset arrives with WEAR at 0.05, the slow end, so the first time you switch DISINT on you get the four minute version rather than something that has already collapsed by the time you look up. The times below are measured, not estimated.
| WEAR | You notice it | Clearly old | Finished |
|---|---|---|---|
| 0.02 | 4.5 min | 7.5 min | 10.6 min |
| 0.05 | 1.8 min | 3 min | 4.1 min |
| 0.1 | 47 s | 84 s | 1.9 min |
| 0.15 | 27 s | 52 s | 73 s |
| 0.2 | 17 s | 36 s | 52 s |
| 0.3 | 8 s | 20 s | 31 s |
| 0.5 | immediately | 7 s | 14 s |
You do not have to memorise any of this, because the tape carries its own clock: the readout marked Time to Degradation on the looper panel. It is not a timer started when you flip the switch; it reads the actual state of the tape from inside the engine, twice a second, and shows how far it is from the residue. That distinction matters in three ways. With DISINT on, it counts down to zero, and zero is the residue. Change WEAR in the middle of a run and the clock recalculates on the spot, because the tape is now wearing at a different rate from a position it has already reached. And with DISINT off, it quotes how long a full run would take at the current WEAR setting: turn the knob and watch the price change, before you commit to anything. When a disintegration ends, switching DISINT off threads the fresh reel and the clock climbs back up.
- Record something into the looper that you would be happy to listen to for two minutes. A chord, a texture, a slow figure. Percussive material disintegrates less gracefully, because there is less to lose.
- Set WEAR to 0.15 and leave everything else where it is. Switch TAPE on, then DISINT.
- Now do nothing for a minute. This is the difficult part and it is the whole exercise: the process is slow on purpose, and if you keep adjusting things you will never hear it happen.
- Around thirty seconds you will notice something has gone. Around a minute it is unmistakably an old recording. Around eighty seconds it settles into its residue.
- Switch DISINT off to thread a fresh reel, and try it again at 0.05 when you have four minutes to spare.
The rest of the transport
| Control | What it does |
|---|---|
| WOW | Speed instability, in two layers: a slow sway at around 0.6 Hz from the reel and a faster tremble at 6 Hz from the capstan, plus a very slow drift underneath. Its depth grows automatically as SPOOL falls, so a slow tape is always a less steady one |
| SAT | Magnetic saturation, asymmetric as it is on tape, with the level compensated so raising it does not simply make things louder. It thickens rather than distorts until you push it past halfway |
| TONE | How bright the machine is at nominal speed. It sets the ceiling that SPOOL then pulls down, so think of it as the state of the heads rather than as an equaliser |
| HISS | Tape noise. Part of it follows the signal, the way bias noise does, and part of it sits there regardless. That second part is what surfaces during a disintegration |
| Trim | Output gain of the whole processor, after the tape and the spring, up to six times unity. This is the attendant's control: it recovers the level a disintegration takes away. Up to 1 it is clean gain; past 1 it leans progressively into a soft saturation of its own, so the harder you pull the ruin back up, the thicker and steadier it comes back, with a ceiling that never hard-clips. Inactive while TAPE is off |
The spring tank
SPRING switches in a pair of spring reverbs, and they are modelled rather than approximated. What makes a spring recognisable is not the length of its tail but its dispersion: high frequencies travel along the coil faster than low ones, which is why a transient arrives as that sliding metallic chirp rather than as a wash. Here that comes from a chain of allpass stages per channel, with the bandwidth deliberately limited the way a real tank is, roughly from 140 Hz upwards.
The two channels are not the same tank. Their delays differ by a few percent and each one feeds the other, which is how two-spring units behave and why the image comes out wide and slightly unstable instead of symmetrical.
| Control | What it does |
|---|---|
| MIX | How much tank you hear against the dry tape |
| SIZE | The length of the springs, and with it the decay. Short is a guitar amp, long is a room made of wire |
| COLOR | Brightness and the density of the dispersion together. Low is dark and boingy, high is bright and metallic |
Why this is here
The reference is explicit and worth stating. In The Disintegration Loops, William Basinski transferred old tape loops to digital and discovered, while they played, that the tape was shedding its coating against the head: every pass came back a little less than the one before, and the recording documented its own disappearance. What makes those records what they are is not decay as an effect but decay as an event, happening at a speed slow enough that you notice it has happened rather than watching it happen.
That is what DISINT reproduces, and it is why the process is deliberately slow and strictly one way. A filter closing is a gesture and the ear reads it as such. Something that does not come back is read as loss, and it is a completely different experience.
More broadly, this section is where the machine is most openly a musique concrète instrument. Everything else in it synthesises; this takes a recording, treats it as a physical object with a surface that can be worn away, and gives you the tools to age it, slow it, and ruin it on purpose. Fed with the samplers described in chapter 28, which are at their best with long recorded material rather than one-shots, the pair covers the whole distance from field recording to something that no longer remembers being one.
contents53Stem recording aemd_multirec
One button, twenty-seven files, a full post-production session ready for your DAW.
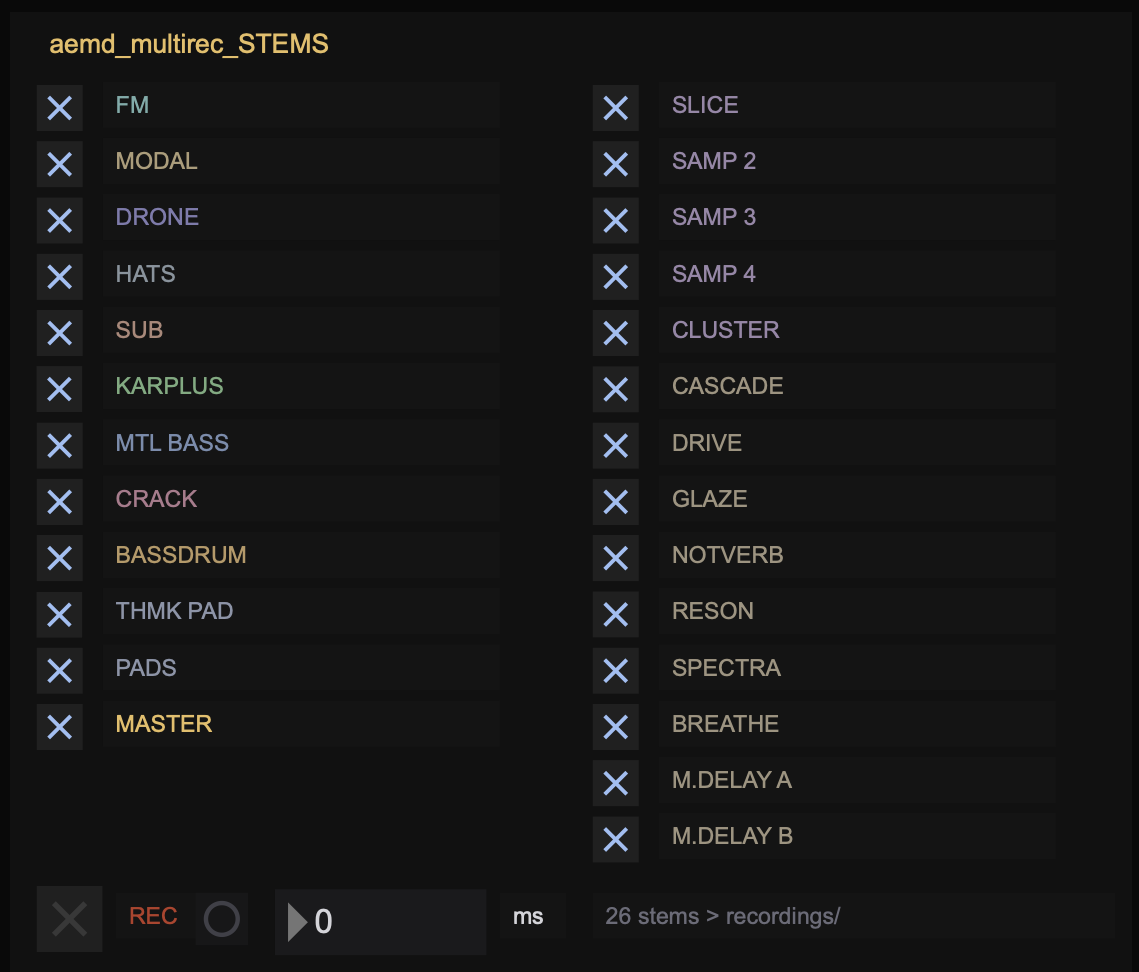
Arm what you want, press REC, and every armed stem is written to its own file. All files share the same timestamp, so they line up on import.
| Column | Contents |
|---|---|
| Left | The bass drum on voce 1, the eight synthesis voices, the kick, both pads, and MASTER |
| Right | The five samplers, then the nine effect returns, one file each |
What is in each file
- Voice stems are dry. They carry pan, level and mute, exactly as you balanced them, but no effects.
- Effect stems carry only the returns. One file per effect, so you can rebalance the character in your DAW.
- MASTER is the real thing: the final mix after colour and reverb, identical to what left your speakers.
Files are written to recordings/ as 32 bit float WAV. The counter next to REC shows elapsed milliseconds and the lamp beside it blinks while recording.
The stems, used against the grain
The obvious use of twenty-seven stems is to rebuild the mix: voices dry, effects dosed to taste, master as reference. Do that, it works. But the files do not care what they were recorded for, and nothing obliges you to reassemble them the way the machine saved them.
Listen to the nine effect stems on their own. They are the wet halves of sounds you will never hear isolated anywhere else: the Cascade tail without the drum that caused it, echoes falling in fourths out of silence. The Notverb wash, a room with nobody in it. The Spectra file, your percussion pronounced by a robot and rung out on sympathetic strings, already passed through the LSYX verb. Solo one of those in your DAW and you are not listening to an effect return anymore. You are listening to a finished ambience, a texture, a ghost of the track it came from, and it is already musical because everything that shaped it was.
I would never presume to tell you how to use your own instrument. But allow me this one piece of advice: every time you record, the machine hands you nine of these for free. Pitch them, stretch them, layer two of them from different takes, put the Glaze file under a song that has nothing to do with this machine. Some of the best material it produces is the material it never meant to give you.
Part 9 · Performance
contents54Windows, CPU, and staying alive on stage
The machine is heavy. Most of the weight is graphics, not sound, and that is good news because graphics are easy to switch off.
Where the CPU goes
Measured, not guessed: graphics account for roughly forty percent of the load. Closing panel windows is the single most effective thing you can do. Muting a voice you are not using is the second.
| Action | Effect |
|---|---|
| Close the voices and samplers windows | Large. Do this first |
| Switch off unused voices with their ON toggles | Large. Their DSP stops entirely |
| Switch off the looper DSP when not looping | Moderate |
| Lower the dice, or Terrarium's agent count | Moderate, and unpredictable rolls are what cause spikes |
| Raise the audio buffer to 512 | Free headroom, slightly more latency |
Playing live
- Turn FLOAT WINDOWS on so panels stay in front.
- Prepare your presets in order. Recall is instant and there is no crossfade, so a jump between presets is a cut, not a blend.
- Leave the dice low and raise it as a gesture during the set.
- Run the stem recorder for the whole performance. It costs almost nothing and it means you can mix the show afterwards.
contents55Ways to work
Sound design session
One voice on, everything else muted, effects off. Find a sound, store it, move to the next voice. Build your own library slot by slot. Come back later and combine.
Long generative session
Load a preset you trust. Elastic tempo on with modest amounts. Matrix in mutate mode, density 1. Terrarium on with two agents and depth 0.2. Dice around 10. Start the stem recorder and leave it running for an hour. Come back, listen, and take the four best minutes.
Working from a sample
Load one file into the multicluster and cluster it. Load the same file into the slice sampler. Turn the drum kit voices down. Now you have the same source material treated two completely different ways, one by timbre and one by position, both driven by the same pattern.
Sculpting with Terrarium
Turn HOLD on, two agents, depth 0.3, and leave it for five minutes without touching anything. It will have rewritten the machine. Store the result immediately, because there is no way back to it.
Soundscapes and textures
This machine is presented as a percussion instrument, but take the drums out of it and what remains is a serious landscape generator. The ingredients were all built for exactly this: two pads that run free of the sequencer, a drone voice, six effects wired into a feedback matrix that can sustain itself, a spectral freeze, and a looper that folds the whole output back into the stream. None of it needs a pattern to exist.
A walkthrough, from silence:
- Take the rhythm out. Push the
restweight most of the way up, or simply turn the drum kit strips down. A soundscape survives a few sparse hits; it does not survive a beat. - Start the Deep Pad with ATT above 20 seconds. Nothing will appear for half a minute: that is the material forming, not a fault. Add the Tape Pad underneath, wash up, and let the two drift against each other. They share the Breathe path, so they compress and duck as one body.
- Wake the drone. The drone voice and Atmo Drone B hold the middle of the spectrum, where the pads leave room. A single held note is enough.
- Raise the feedback matrix. This is the move that makes the result organic rather than layered: bring DEPTH up slowly and the six effects begin feeding each other, resonators leaking into the cascade, delays returning through the reverb. Turn ROT, or let AUTO / SEC turn it for you, and the whole texture slowly changes shape without any parameter moving on a panel. Chapter 39 explains why it cannot run away.
- Freeze on top. Notverb's Freeze catches one moment and holds it as a drone under everything. Let its jumper throw it so the freezes arrive on their own.
- Set Terrarium to walking pace. One or two agents, depth around 0.15, long holds: the controlled evolution setting from chapter 45. At that dose it does not sound like modulation. It sounds like weather.
- Close the loop. Record the master into the circular looper, set OVR FBK below 100 so old layers fade as new ones arrive, give DEPTH some curve. The machine now listens to itself, and the last minute of its life keeps re-entering the mix at a speed drawn by hand.
Everything above moves on its own timescale: the pads in tens of seconds, the matrix rotation in whole minutes, Terrarium at the irregular pace of the attractor, the looper on its thirty-second memory. Since these cycles never line up, the result never repeats, and there is no moment where the texture is standing still. That is what makes it read as organic rather than looped.
Two more things worth knowing. RANDOM ALL (chapter 50) works remarkably well in this mode: with the drums silent, a full randomization is not a jump cut, it is a slow scene change arriving through thirty-second attacks and a feedback network that absorbs the transition. And record stems while you are at it (chapter 53): the wet returns of a session like this, taken alone, are finished ambient material, and the dry pads underneath are the stems a mixing engineer dreams about.
Appendices
contentsAThe note map
Which voices answer which notes, across the working range. Rings in the graphic version mean the voice is alone on that note.
| Note | Voices | Note | Voices |
|---|---|---|---|
| 36 | FM alone | 55 | Modal, Drone, Metal |
| 37 | Modal alone | 56 | FM alone |
| 38 | Drone, Crack | 57 | String alone |
| 39 | Hats, Sub | 58 | Modal, Drone |
| 40 | FM, Modal | 59 | Hats, Sub, String, Crack |
| 41 | String, Metal | 60 | FM alone |
| 42 | Drone alone | 61 | Modal alone |
| 43 | Modal, Hats | 62 | Drone alone |
| 44 | FM, Sub | 63 | Hats alone |
| 45 | Crack alone | 64 | FM, Modal, Sub |
| 46 | Modal, Drone | 65 | Metal, String |
| 47 | Hats, String | 66 | Drone, Crack |
| 48 | FM alone | 67 | Modal, Hats |
| 49 | Modal, Metal | 68 | FM alone |
| 50 | Drone alone | 69 | Sub alone |
| 51 | Hats alone | 70 | Modal, Drone |
| 52 | FM, Modal, String | 71 | Hats, String |
| 53 | Crack alone | 72 | FM alone |
| 54 | Drone, Sub |
Seventeen notes are solos, and the densest note is 59 with four voices. No note in the range is silent.
contentsBInternal buses
For anyone who wants to open the patch and connect something new. These are the names to search for.
| Bus | Carries |
|---|---|
| voice1 … voice6 | The note events from the sequencer, one per family |
| mstep | The current step number, once per step |
| v8clock | One bang per step |
| aem.bpm | The tempo |
| aem.warp.factor / .bpm / .state | Elastic tempo: stretch factor, effective tempo, phase name |
| aem.q.scale / .root / .period | Shared tuning for the quantised voices |
| aem.fx.<name>.L/R | The six effect sends |
| aem.master.L/R | The main sum |
| aem.pads.L/R | The parallel path through Breathe |
| aem.mdps.<voice>.L/R | Post-fader taps used by the recorder and the micro delays |
| aem.recfx.<name>.L/R | Effect return taps for the recorder |
| aem.recmst.L/R | The final master tap, after the whole chain |
| aem.win.top | The floating windows switch |
| <param>.mod | Modulation offsets from the mod panels |
contentsCFiles and folders
| Folder | Contents |
|---|---|
patchers/ | Ninety-four patch files. Machine.maxpat is the main one |
code/ | Twenty-five JavaScript files: sequencer logic, Terrarium, the preset grid, the visualisers |
data/ | Preset banks. aem_presets.json is the main library |
samples/ | The sample library: audio for the samplers, factory and yours. Shipped as a separate download |
media/ | Images and other assets used by the project |
externals/ | The FluCoMa analysis externals |
recordings/ | Where the stem recorder writes. Starts empty |
other/ | Documentation, changelog, utility scripts |
contentsDWhen something goes wrong
| Symptom | Cause and fix |
|---|---|
| No sound at all | Audio off in Max, or master gain down. Check the meters: if they move, it is the output, not the machine |
| Sound but no drums | The Trig column may be all rests, or voice weights may be heavily on rest. Check that the sequencer's position indicator is moving |
| A preset sounds thinner than you remember | Almost always a sampler with no file loaded, or the master reverb being off after opening. Both are expected |
| The drone is silent | Toggle its HOLD off and on. See chapter 17 |
| A preset drifts each time you save it | Modulators were running when you stored. See chapter 49 |
| Crackles and dropouts | Raise the audio buffer, close panel windows, lower the dice. If it started right after a Random All, press it again or recall a preset |
| Effects went quiet | Check the send dials on the strips, and check whether an FX mod bank has drifted them down |
| Recording produced no files | Check the Max console. The recorder prints its destination folder every time you press REC |
| Everything sounds wrong after a while | Terrarium with HOLD on rewrites parameters permanently. PANIC, then recall a preset |
| A sound keeps playing and nothing on the mixer moves | An effect is sustaining itself: Glaze's granular residues (chapter 35) or a frozen Notverb (chapter 34). The strips carry voices, not effect returns. Look for the red Mix boxes and their pale meters: whichever meter dances is the one sounding |
| A shimmer follows everything you play | Glaze with Feed up, doing its job. Mix is the red box on its strip |
contentsEGlossary
| Bus | A named connection inside the patch. Signals travel by name rather than by cable |
| Dispatch, or sieve | The rule that decides which voice answers a note, based on dividing the note number |
| Gen~ | The sample-level part of Max where most of the synthesis here is written |
| Markov matrix | A map of permitted moves between steps |
| Modal synthesis | Building a sound from tuned resonances, the way physical objects ring |
| Plateau | A tempo the elastic clock is allowed to settle on. Always a simple ratio of the original |
| Ratchet | Retriggering a step several times inside its own duration |
| Stem | One part of a mix, recorded to its own file |
| Wavefolding | Distortion that folds peaks back on themselves rather than clipping them, producing harsh upper harmonics |
contentsFExternal drum synths (optional)
Everything you have read in this manual, every voice, every behaviour, every sound, depends on no plugin. That independence was the founding decision of the project, and nothing in this appendix changes it.
But a machine that generates language this rich raises a natural question: what happens if you let it speak through someone else's instrument? I wanted to know, so during development I wired in an external drum synthesizer, Sonic Charge Microtonic. The result is solid: the sequencer, the elastic clock, the dice and the animated columns drive the plugin exactly as they drive the internal voices. The plugin contributes its own timbres; timing, pitch and dynamics remain under the machine's control.
The routing is fixed and deliberate: the plugin has no separate mixer. Its eight drum channels enter the same eight strips as the eight synthesis voices, channel for channel, and therefore share faders, sends, effect routing and recording taps with them. With no plugin loaded, those inputs simply receive silence.
If you own Microtonic
The machine is already wired for it. Load the plugin and its eight channels join the mixer. Without the plugin installed, the input stays silent and Max may print a harmless message in the console at startup. No other configuration is required.
I also built a set of dedicated tools for this integration, so the plugin can be controlled entirely from inside the machine:
- Slot sequencer. Steps through the eight drum channels independently of the Markov engine, with four modes (up, down, up-down, random), an adjustable range and its own rate.
- Preset harvester. Scans the Microtonic preset library on disk, selects programs from it and loads them onto two endpoints. A morph control blends between the two full programs, with an adjustable glide time, while the machine plays.
- Mod-kit. Applies probabilistic mutations to the loaded kit. The probability is a parameter.
- Per-channel mutes and activity indicators for all eight channels.
All of these settings, sequencer mode and rate, morph position, glide, mutation probability, are stored in the machine's presets like every other parameter. The result is that the plugin does not need to be programmed from its own interface: pattern, kit selection, program morphing and sound mutation are all handled by the machine.
The integration also reaches beyond note messages, on both sides. On the machine's side, I mapped Microtonic's complete parameter set, 215 named parameters covering the oscillators, noise filters, envelopes, mixing, per-channel chokes and the program morph of all eight channels, which allows entire programs to be serialized as value lists and modulated at parameter level from the sequencing engine, within the machine's own rules. On the plugin's side, I wrote a set of scripts in Microtonic's native scripting system: in a single pass they fill all sixteen program slots, assigning two presets to each slot, one on either end of its morph range, so that the machine's morph control always sweeps between two complete kits. The presets are drawn from pools, either the full archive, over seven hundred entries, or one of four curated character pools built around presets I designed specifically for this machine. Those character pools were built semantically: each family starts from a described aesthetic, dense low end, degraded metallic material, clinical minimal precision, and the description is translated into parameter recipes and generated as a coherent, named series. The same process can produce new families: describe the character you need, and a matching preset series can be designed for it. The scripts and the preset library are development material and are not included in the package; the parameter map ships with the machine, and the mod-kit and the harvester remain the supported surface of the same mechanism. If the scripts interest you, get in touch: I am happy to provide them, with support and assistance in setting them up.
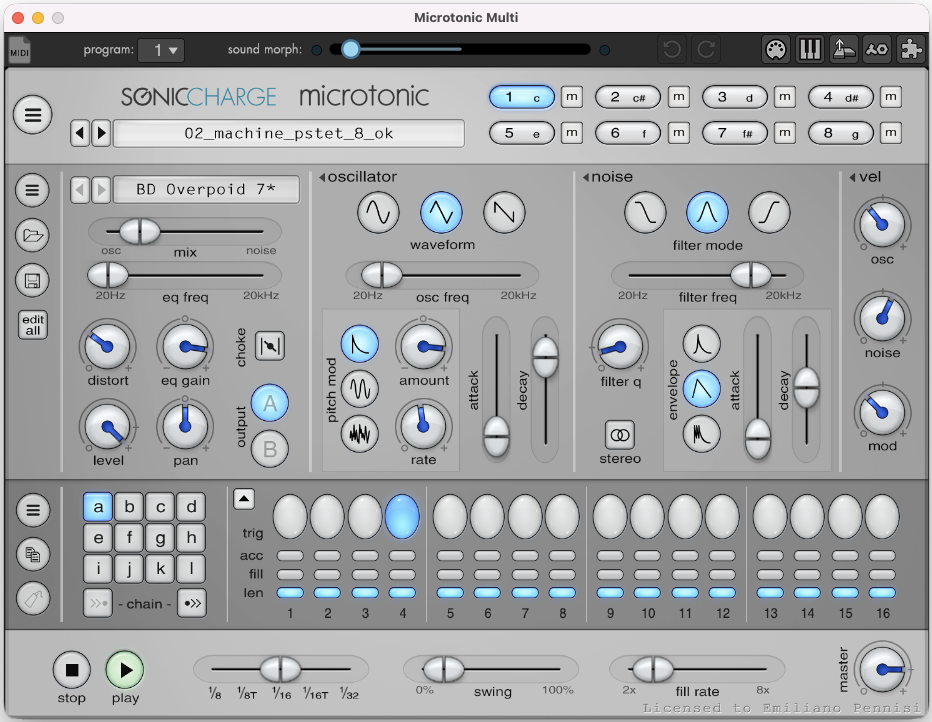
A scripted bank, loaded. The bank on screen was filled by the scripts described above: the channel shown is playing a preset from one of the generated series, and the sound morph slider at the top sweeps between the two complete kits assigned to the program.
This layer of the project belongs to my wider research. I try to deliver my instruments in the most plug and play form I can, but the work behind them goes further: alongside systems like this one I also work with machine learning techniques for sound generation, encoder and decoder architectures such as IRCAM's RAVE among them. That is a much broader subject than this appendix can hold, and one I am always happy to explain. I write about these techniques in the community I run: r/musiconcrete, IRCAM RAVE model training, how and why.
Using a different drum synthesizer
The same integration point can host other drum synthesizers: Battery, a Reaktor ensemble, or any instrument you prefer. Two options:
- Ask me. Integrating a specific instrument correctly, with proper routing, note mapping and parameter handling, is custom work. Get in touch and we can discuss your instrument.
- Do it yourself. If you are fluent in Max, the Microtonic voice patch documents the integration: note and velocity input, eight stereo channels out into the voice strips, timing and pitch handled by the machine. Be aware that modifying a patch of this size is delicate work and falls outside the scope of this manual and of support. The wiring itself is compact and readable for an experienced Max user.
To restate the essential point: the machine requires none of this. External instruments are an optional extension, not a dependency.
contentsGTechnical specifications
The complete specification sheet. Every number on this page is counted from the patch itself, not estimated: where the machine has a readout, the readout agrees.
Synthesis
| Note-driven voices | Eleven: FM Voice, Modal Voice, Drone Voice, Hats Voice, Sub Voice, String Voice (Karplus-Strong), Metal Bass Voice, Crack Voice, Kick Voice, plus the two free-running pads (Deep Pad, Tape Pad) |
| Material engine | Big Modal: two morphable material slots drawn from 25 physical materials, with damping tilt, decay stretch and a 40-slot preset bank |
| Dispatch | Modulo note sieve over divisors 3 to 8, working range notes 36 to 72; the answering pattern repeats only after 840 notes. Seventeen notes are single-voice solos |
| DSP cores | 32 gen~ instances, sample-accurate, compiled per voice and effect |
Sampling
| Slice sampler | FFT onset segmentation with adjustable threshold, metric and minimum hop; four drawable shape lanes (slice, rate, end, window) with per-lane Markov deviations |
| Pitch samplers | Three stereo samplers with keyboard-style transposition (note 48 = original pitch) and a micro-loop engine that turns velocity into loop shape |
| Multicluster | One file analyzed, segmented and grouped into eight clusters by spectral similarity (FluCoMa); eight independent channels, each with its own rate, envelope and sends |
Sequencing and generation
| Grid | 16 steps, eleven independent per-step properties, every one of them animatable |
| Step order | First-order Markov chain over a 16 × 16 editable probability matrix |
| Orchestration | Voice Weights probabilistic selector (four families) plus the hand-drawable Voice Dispatch lane |
| Chance | Seven probability jumpers with a global dice control |
| Tempo | Elastic tempo engine (metric modulation) on top of the master clock |
Modulation
| Mod panels | One dedicated modulator per parameter on every voice panel, with per-modulator shape, sync division, rate and depth |
| FX banks | Seven probabilistic modulation banks over the shared effects |
| Terrarium | Indeterminate modulation matrix driven by a Lorenz attractor; 271 parameter targets, grab-and-release behaviour, live readout of picks, targets and voices |
| Buses | 111 internal modulation buses |
Effects and mixing
| Shared effects | Resonators, Cascade, Notverb, Glaze, Drive, Spectra, reached by post-fader sends from every strip; Breathe on the pads path |
| Feedback matrix | 6 × 6 cross-feedback between the effects, zero diagonal, row-normalized for stability |
| Micro delays | Two independent delay lines (A/B) with per-voice sends |
| Mixer | 15 channel strips with six sends, pan, mute and compressor per strip |
| Master chain | Parallel saturation, plate reverb (off at startup), DC block |
Recording and presets
| Looper | Thirty-second circular buffer listening to the master bus; playhead follows hand-drawn curves with A/B morphing and overdub feedback |
| Stem recorder | 26 simultaneous files in one press: dry voices, wet effect returns and the final mix, ready for the DAW |
| Presets | 96 scene slots (whole machine) plus the 40-slot Big Modal material bank, two-level recall |
Under the hood
| Codebase | 94 patcher files, roughly 10,500 Max objects, 24 JavaScript modules, 32 gen~ DSP cores |
| Dependency | One: FluCoMa, installed from the Max Package Manager, identical on both platforms |
| Platform | Max/MSP 9.1 or later, macOS or Windows |
| CPU | Roughly 40 to 55 percent of one process with everything running; graphics load drops sharply with the panel windows closed |
contentsLicense
This instrument is sold open: every patcher, cable and line of code is yours to read and to modify. Openness is a gift to the musician, not a transfer of ownership. Here are the terms, in the same plain language as the rest of this book.
You may: use AE Machine on any computer you own, as one person; open, study and modify the patch for your own use; make, perform, record, publish and sell any music made with it, commercially and without royalties, factory samples included when they are part of your music; and share the presets you create, freely. An ecosystem of preset banks is something I actively hope for.
You may not: redistribute, resell, rent, gift or publish the patch or any part of it, original or modified, including its gen~ engines, its scripts, and the factory samples sold as samples rather than as music; extract engines or code for use in other products; or share your license key. The license is personal and non-transferable.
The code, the sound and the design remain the intellectual property of Emiliano Pennisi. The instrument is provided as is, without warranty of any kind: modifications are made at your own risk and are yours to maintain. If you are ever unsure whether something is allowed, write to me through emilianopennisi.net and ask; the honest question is always welcome. The rest of my instruments live at emilianopennisi.gumroad.com.
AE Machine · user manual · working draft, August 2026
The system, the sound and this book are the work of Emiliano Pennisi.
www.emilianopennisi.net ·
emilianopennisi.gumroad.com ·
r/musiconcrete