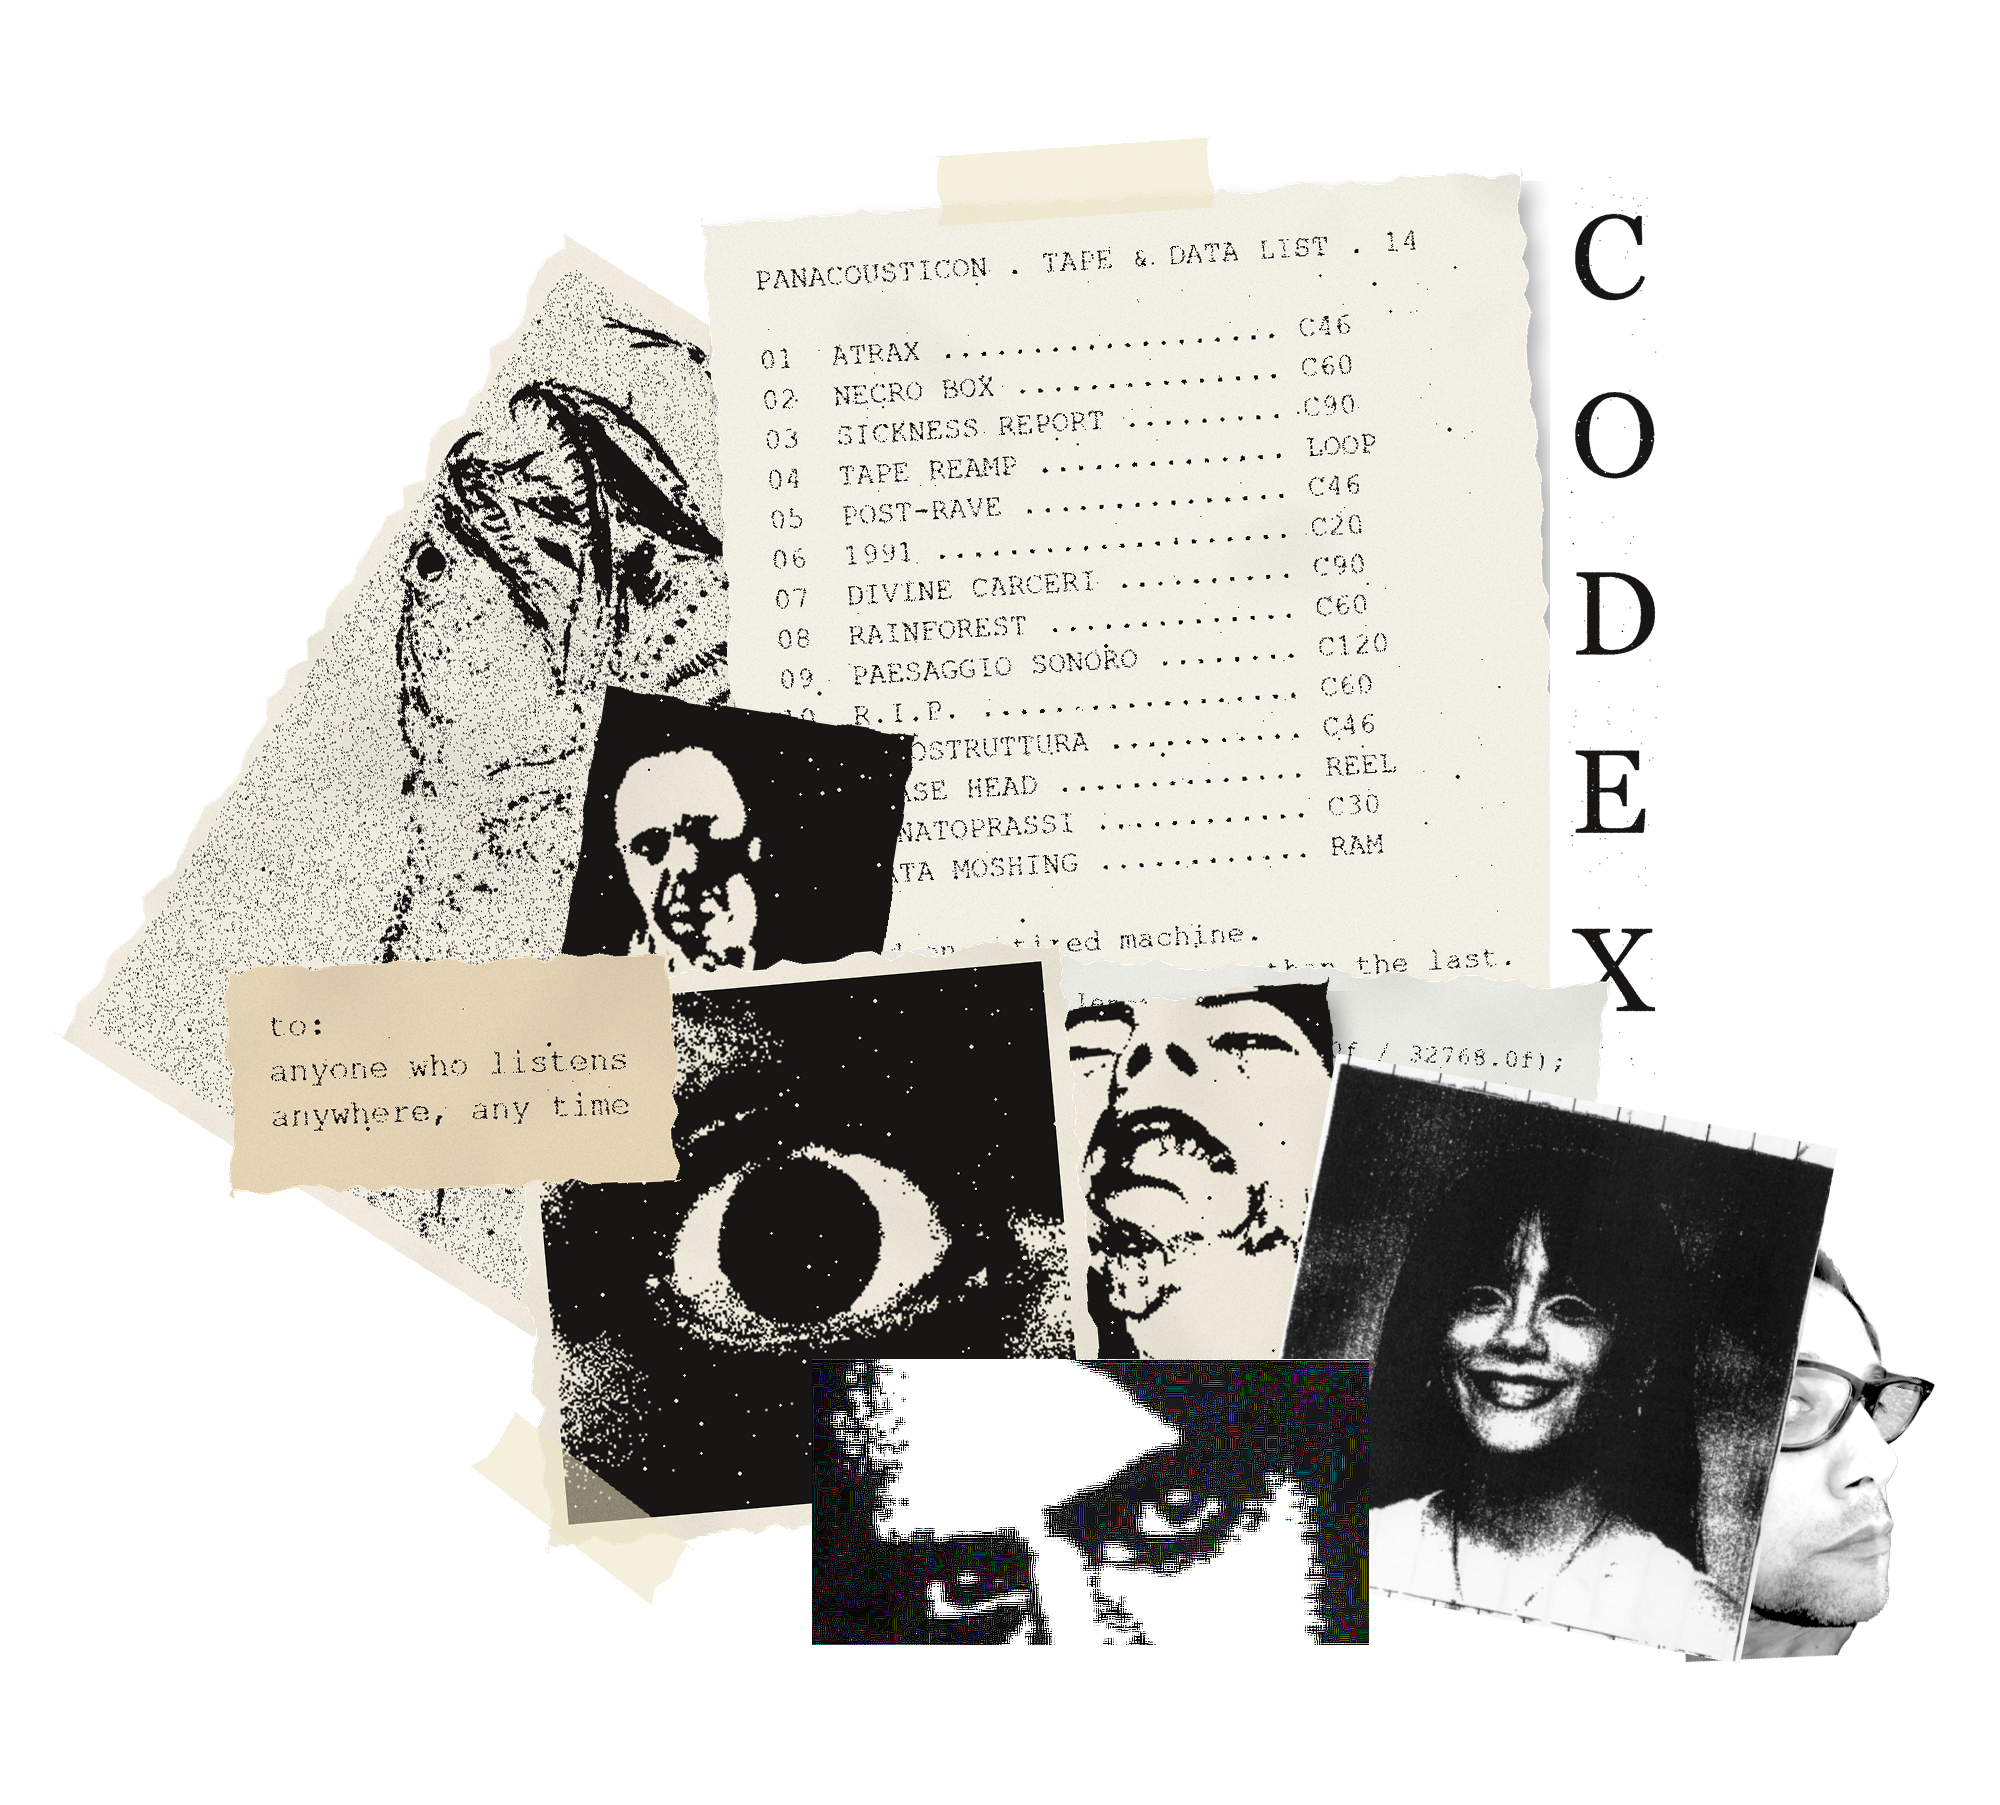
Before the internet there was the post. From the 1960s artists sent each other work by mail: collages, stamps, photocopies, things made to be passed on rather than sold. They called it mail art, and it was a network more than a movement.
In the late 1970s and the 1980s the same network carried sound. Cassettes were cheap to copy and light to post, so music travelled the same way: tapes in small editions, home-made covers, catalogues photocopied on a single sheet, compilations put together by people who had never met. Zines did the rest: reviews, addresses, interviews, all typed, cut and xeroxed. In Italy, Vittore Baroni was one of the people who held the network together, with Arte Postale! from 1979 and the TRAX project in the 1980s.
The noise scene pushed the idea to its limit. There is a story I know from those years: some noise labels did not send only the tape. Other things went into the package too, a dead chicken's foot among them. The parcel itself was part of the work.
Marco Corbelli came out of that world. Before Atrax Morgue he made A5 fanzines as Marco Rotula, The Pleasure Agony, then Sick and Murders. In 1993 he started Slaughter Productions, a label and a mail-order catalogue. The sound of Panacousticon comes from there, and so does the look of the collage above: photocopies, grain, things cut out and glued, nothing polished.
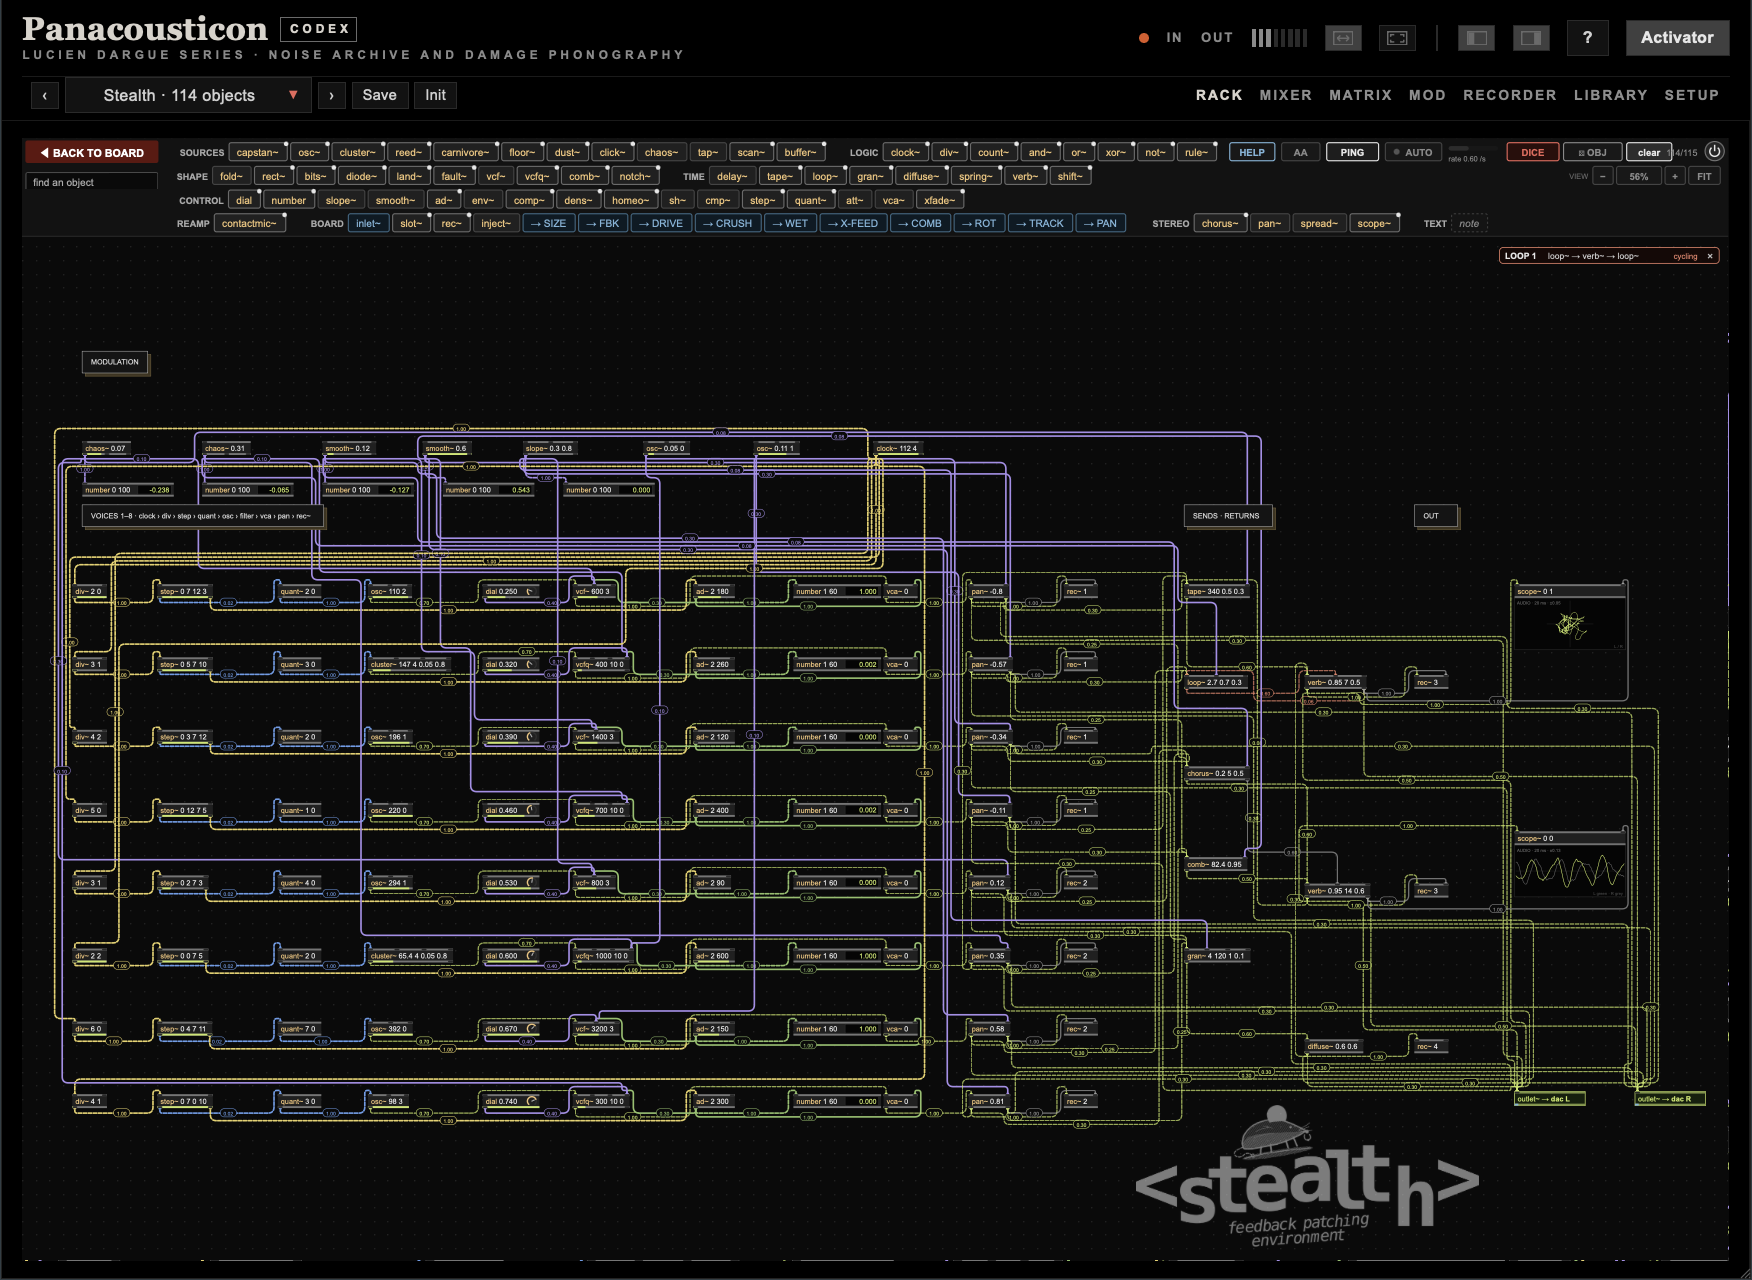
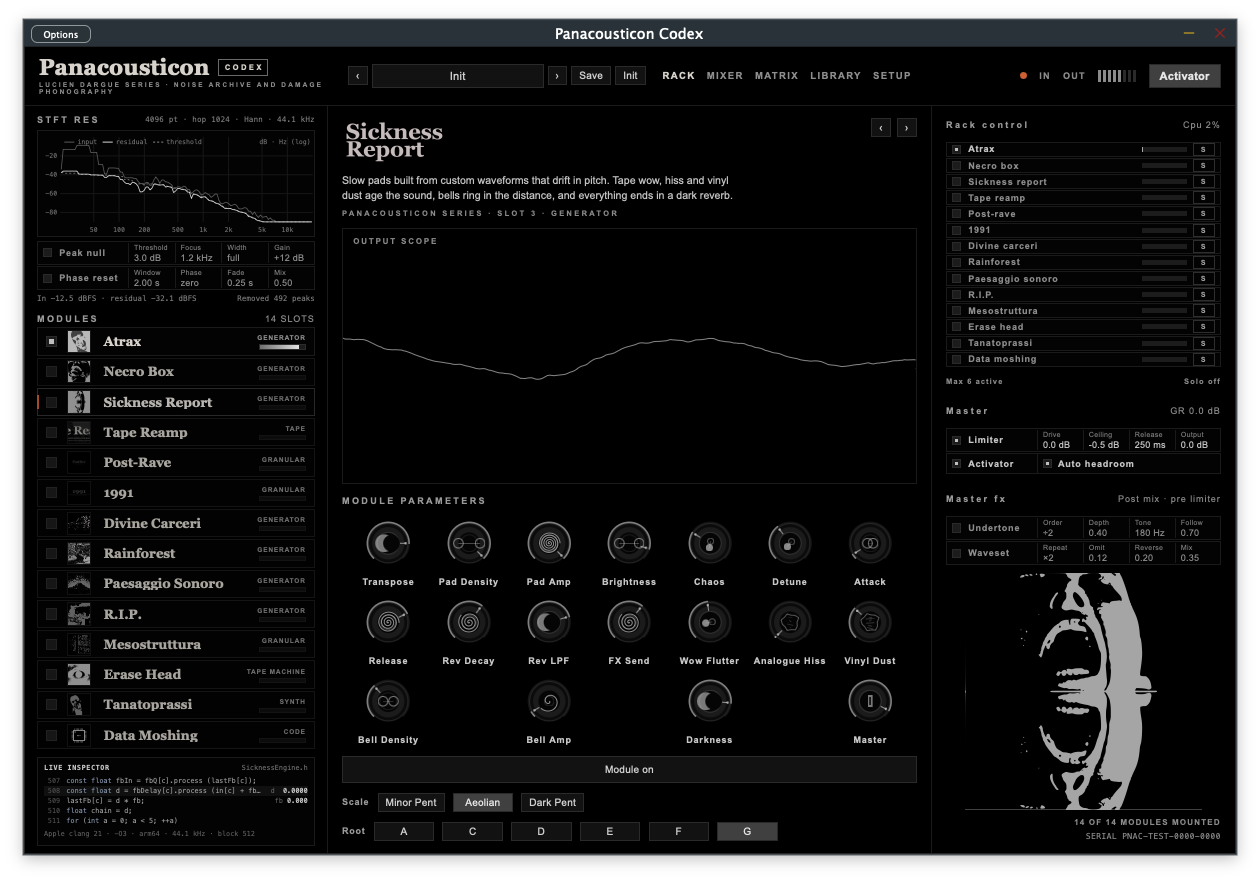
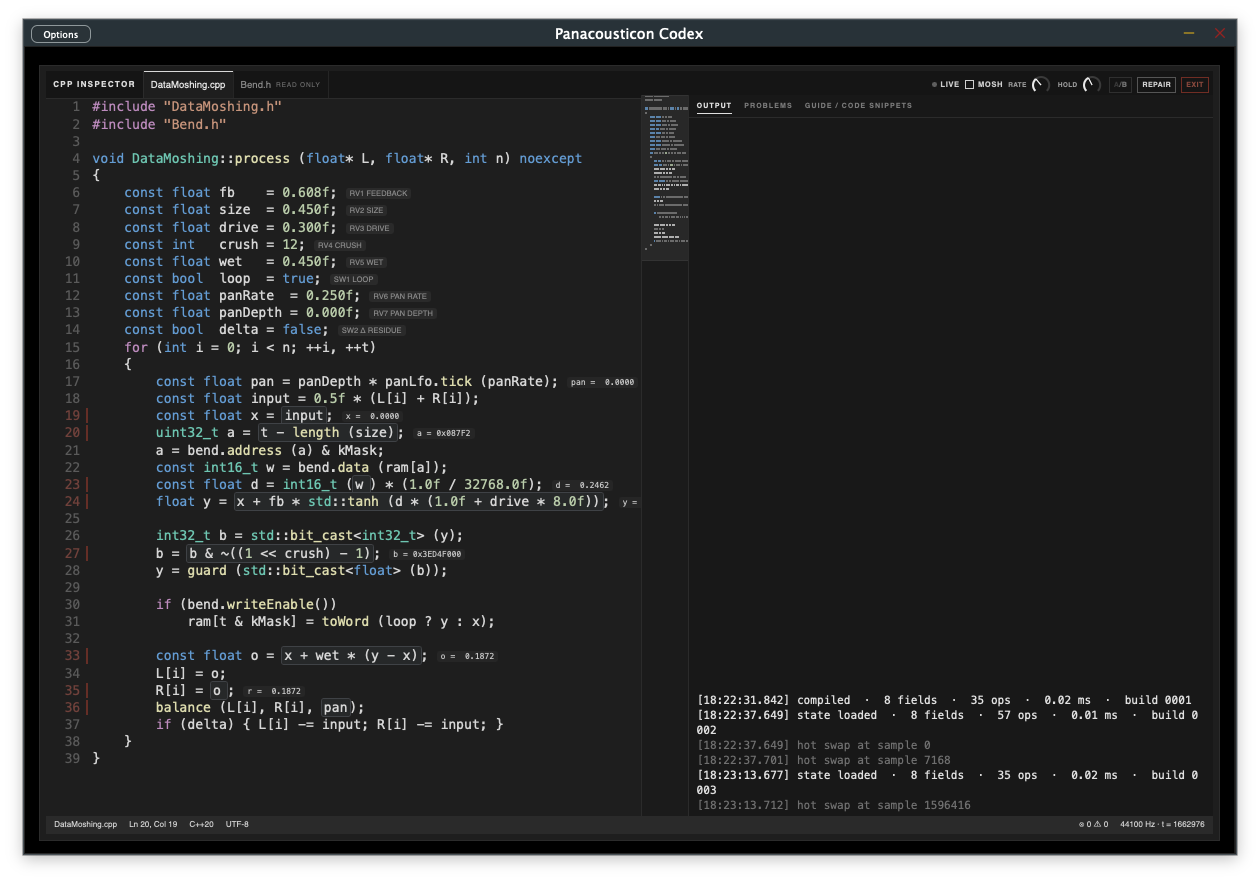
Codex is a dense environment: fourteen modules, a matrix, modulation, a code editor and a patching sheet, with hundreds of controls. While I was building it I also studied how to use it without getting lost, and this is the method I arrived at.
Every control in the plugin is linked to its place in this manual. Press F1 in Codex, point at a dial, a button or an area, and you get its name, what it does and the keys that work on it. Press Enter and this manual opens in your browser at that exact row, highlighted.
On the technical side it is two small scripts that talk to each other. Smart Help in the plugin sends the name printed on the panel, and the manual finds the row with that name in the right section. It works because the manual uses only the names printed on the panels. For me this is part of the research behind Codex: how a dense instrument can be learned while you play it, without leaving the sound. Smart Help.
The audio examples play in the online version of this manual. In the printed version each example keeps its number, so you can find it there.
Panacousticon began as thirteen sound generators. In Codex they are the starting point, not the whole instrument. Every module can play on its own, feed any other module through the matrix, pass through the spectral and tape stages, and be moved by the modulation system. Fourteen voices, each one both a source and a destination, connected in loops that are measured and kept stable: every module you add gives the others more to work with.
Codex is the part I will keep developing in the years to come. It is an environment for live coding and patching. Data Moshing runs C++ code that compiles while it plays. Stealth is a patching environment of its own, 71 objects built for feedback: oscillators, filters, delays, tape loops, comparators, envelope followers. With them you do not pick sounds from a list. You build new timbral palettes, and they are yours.
The cybernetic side goes to the second level. The Cybernetic presets are feedback networks that listen to themselves, after Jaap Vink and Agostino Di Scipio. The Ultrastable presets add a second loop above the first, as in W. Ross Ashby's homeostat: when the sound cannot stay in balance, the patch changes its own rules and searches for a new one. The instrument does not only play. It regulates itself.
Around all this: a modulation system with 24 sources in seven families, chaos and wanderers included, eight macros and 32 slots; the Spectral Dispatcher, which shares the spectrum between the modules; STFT Res; Smart mix; and 186 factory presets to start from.
Panacousticon started as a bundle of thirteen Max for Live devices for Ableton Live and Push. Many of the people who bought it found an instrument that does not behave like the others: slow, damaged, heavy sounds that do not try to be pleasant.
In August 2026 Tristan Kneschke, a YouTuber who makes videos on synths and sound design as Metamyther, published a long video that went through every device, one by one, and MatrixSynth shared it. In the comments one request came back more than any other: a VST version. People working in Logic, Cubase or Bitwig wanted these sounds in their own DAW; some had upgraded Live to Suite only to run Max for Live. Buyers also told me two things I took seriously: the device windows were hard to read on small screens, and the bundle was not easy for someone new to Live.
Any DAW. Codex is a VST3 and AU instrument, and a standalone application. Ableton is no longer required.
One window. The fourteen modules live in one window that you can resize, from 720 × 480 to 4000 × 2600.
Stealth. New in Codex: a patching sheet of 73 objects built for feedback. interfera~ brings field recordings from anywhere in the world, internetarchive~ brings old audio from the Internet Archive, contactmic~ and capstan~ put any sound through a contact microphone or a tape transport, reamp~ plays it back into a room, and DICE writes a new patch at every press. It is simple to patch and the sound that comes out is very complex.
Data Moshing. A fourteenth module: C++ code that compiles while it plays.
Shards. Divine Carceri has a new granulator: any material, injected into its fourteen voices, comes out as binaural shards that fall with the cluster.
Reamp. Tape Reamp can now play its sound through six microphones and cabinets, six stereo setups and nine rooms, from a closet to a hall, with or without the tape.
The Matrix. The modules feed each other, feedback loops included, and every loop is measured and kept under control.
Modulation. 24 sources in seven families, eight macros and 32 slots, on any control of any module.
Spectral Dispatcher. It shares the spectrum between the modules, so they stop covering each other.
Recorder. Every module and every Stealth track on its own stem, ready for any DAW, and RETRO 60 S to keep what has already played.
209 presets. Soundscapes, feedback networks, rhythms and drones to start from; DICE and Random make new ones.
A manual. This one. Every control is described with the name printed on the panel, and every module has a sound example.

Envion ~ Toward an Epistemic Ecology of Sonic Emergence
Panacousticon, interfera~ and internetarchive~ come out of a long research path. From 2023 to 2025 I developed Envion, a method based on delegation, anonymisation and procedural sonic matter, published on the Research Catalogue.
That is where I built the fetching this plugin uses: Python queries that search the Internet Archive and Freesound, pick the files at random, cut them and take their author away. The scripts are public on GitHub. Interfera, my Max patch for field recordings, grew out of that work, and the network objects of Codex grew out of Interfera.
Read the research on the Research CatalogueThe Python queries on GitHubInterfera
The sound comes from a precise place: the cold tape-and-synthesizer culture of early-1980s European industrial and death ambient. The early tape work of Marco Corbelli as Atrax Morgue, and the records he put out on his label Slaughter Productions, sit close to the centre of it. So do Cold Meat Industry and, today, Hospital Productions.
Nothing here copies a record. What I kept is the language: oscillator pairs that never quite agree, low-pass filters pushed until the sound almost disappears, tape wear used as a parameter, long reverb tails, a slow mechanical pulse instead of a grid. The same material works in a club, too: hypnotic repetition, heavy sub, worn textures.
Panacousticon Codex brings the thirteen devices into one instrument and adds a fourteenth, Data Moshing. I called it Codex for two reasons. A codex is a bound volume that collects separate writings, and this is the whole series in one place. And it is the first version of Panacousticon whose code you can see: in the large code boxes of five modules, and in the Codex area, where you write code while it plays in Data Moshing and patch by hand in Stealth. I worked on it for a long time. Every engine was rebuilt from scratch in C++ and checked against the original device, module by module, before it went in: same controls, same ranges, the same sound measured side by side. A module here sounds the way it did in Live.
Four parts make it more than a collection of modules:
Press F1, or the ? button next to Activator, and point at anything in the window. It lights up, with its name, what it does, the keys that work on it and a link to the page of this manual that explains it. Clicks change nothing while it is on, so you can explore without moving a dial. Enter or a click on the card opens the manual, ← → give a short tour of the window, Esc leaves. More in Smart Help.
Atrax on its own, nothing touched. This is what you hear when you switch on Atrax and press Activator.
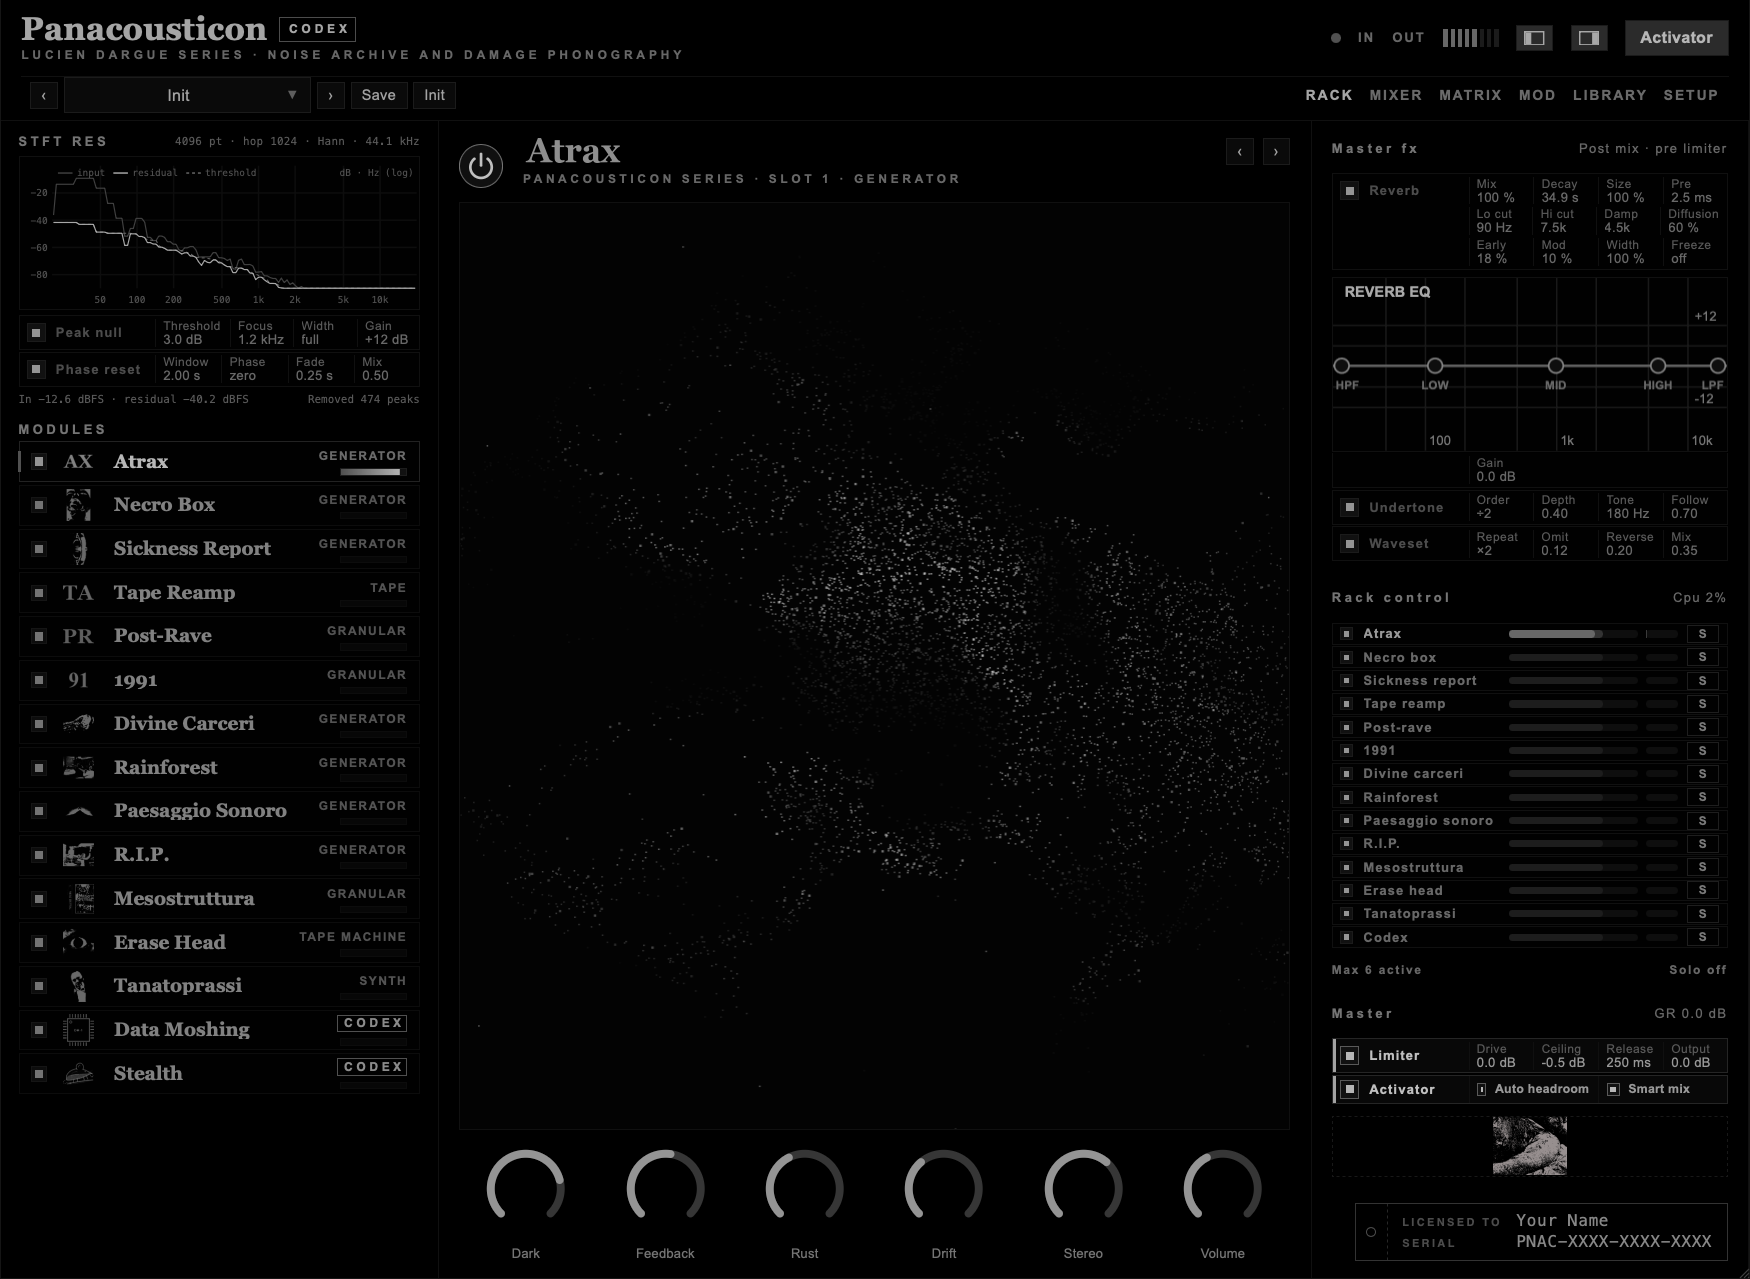
Apart from the Tanatoprassi sequencer, nothing in Codex follows the tempo of your DAW. Every module runs on its own clock: random timers, slow cycles that drift. I kept it that way on purpose. Tie these LFOs to a grid and the modules start to sound mechanical. Let them drift.
The modules are not normalised to each other. Some build up over minutes: Paesaggio Sonoro can be quiet for the first half minute and loud after five. The limiter on the master stops clipping, it does not stop loudness. Set the volume of your monitors with the sound already going, and come back to it after a few minutes.
Move one control at a time, slowly, and wait a few seconds before you move the next one. Most modules react on a long timescale; one second tells you very little. When you hear something you like, record it. These modules rarely go back to the same place twice.
The window has a top bar and three columns. On a big screen you see all three. In a smaller window, as in most DAWs, Codex switches to the compact layout: the modules become a column of icons on the left, and Rack control and Master go into a drawer that opens from the tab on the right edge. When a master effect is on, its tag lights up on the tab even with the drawer closed: REV for Reverb, UND for Undertone, WAV for Waveset, NUL for Peak Null, PHS for Phase Reset. The two buttons next to Activator hide or show the left and right columns by hand. The tabs in the top bar only change what the middle column shows.
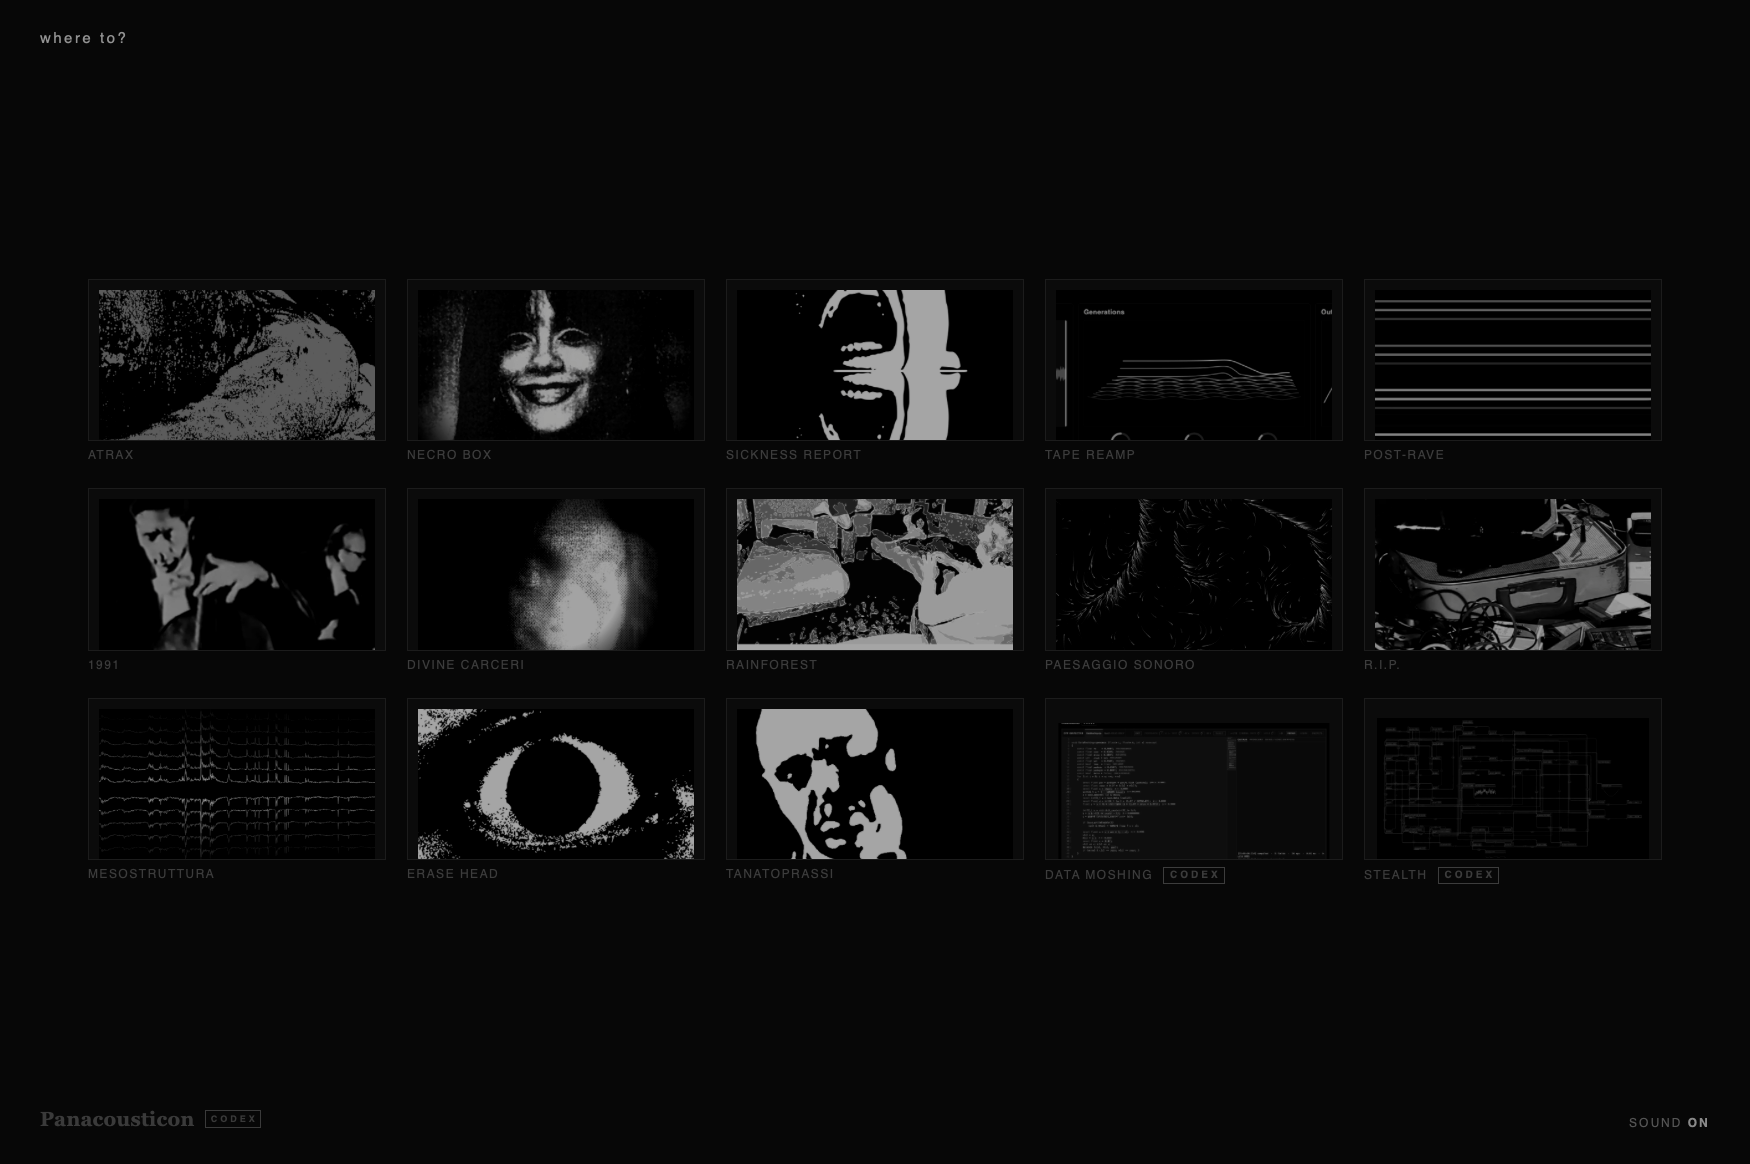
Codex opens on a black screen with the name of the licence holder and the serial, then on a grid of the modules. Hover a module and it lights up; Stealth, 1991, Sickness Report, Rainforest and Tanatoprassi start to move; the Tanatoprassi film is Walter Ruttmann, Lichtspiel Opus III (1924), in the public domain. Click it to go there. At the top right, library opens the Library and random loads a factory preset chosen at random, then shows its modules. In the standalone a patch plays under the grid, chosen at random at every launch, at a quiet level: half the time one of the six Overture patches, built around interfera~, so a field recording from somewhere in the world arrives and keeps changing while you look at the grid; the rest of the time a Deep Field, Drone Voice or Autogenic Training preset. It plays under the Discover cards too. If a recording strikes you, Like it? Keep it beside the preset name keeps it, in the INTERFERA library; otherwise what an Overture patch downloads is deleted when you leave it. When you switch on your first module the drone fades out and the rack starts clean, from Init. SOUND ON · OFF, at the bottom right, and Splash sound in SETUP turn the drone off.
| Gesture | Result |
|---|---|
| Click the Panacousticon name, the CODEX badge or the Data Moshing title | Back to the opening screen. |
| Cmd + Shift + H | The same, from anywhere. On the Mac only. |
| Control | What it does |
|---|---|
| ‹ name › | The current preset. Click the name to open the preset menu; the arrows step through the Library. A long name is cut; hover it to read it all. |
| Save | Saves the current state as a user preset. |
| Init | Back to the default state: every module off. |
| RACK | The open module in the middle column. This is where you spend most of the time. |
| MIXER | Level, pan, width and EQ for every module (chapter 6). |
| MATRIX | Routing between modules, Random, Scenes, feedback loops (chapter 5). |
| RECORDER | Every source on its own track, mute, solo, level and pan for listening and recording (chapter 13). |
| LIBRARY | Factory and user presets (chapter 12). |
| SETUP | Animation, active modules, fade, Eco mode, Interfera (chapter 14). |
| IN · OUT | The output meter. |
| Activator | The main gate. Off, the plugin is silent but keeps running. |
STFT Res sits at the top: a spectrum plot and two processors that work on the whole mix (chapter 9). Below it, MODULES lists the fourteen modules, plus Stealth: fifteen rows. Each row has a square, a picture, the name, the family and a thin activity bar. Click the square to switch the module on or off. Click anywhere else on the row to open it in the middle: opening a module never switches it on. In the compact layout each row is only the icon: a module that is off has a dim icon, a module that is playing has a thin meter under it, and hovering an icon shows its name. The last two rows, Data Moshing and Stealth, are the two entries of Codex: the same module, opened on the code or on the patching sheet (chapter 10).
The open module. At the top: its name, a short description, its slot number, and ‹ › to step to the previous or next module. Below, a visual that follows the sound, then the controls. A module never scrolls: when the window is small, the spaces between the controls tighten and the visual gets lower, while the text keeps its size. Under the controls there is a row of buttons:
| Button | What it does |
|---|---|
| Module on | The same as the square in the list. While the module is off this button is framed in light grey, so you see at once what to press. |
| Load Audio | Only on modules that play a file. Opens a file dialog. The name of the file appears on the right of MODULE PARAMETERS. |
| Source File · Matrix | Only on modules that take an input. File plays the loaded file; Matrix listens to what the matrix sends in. |
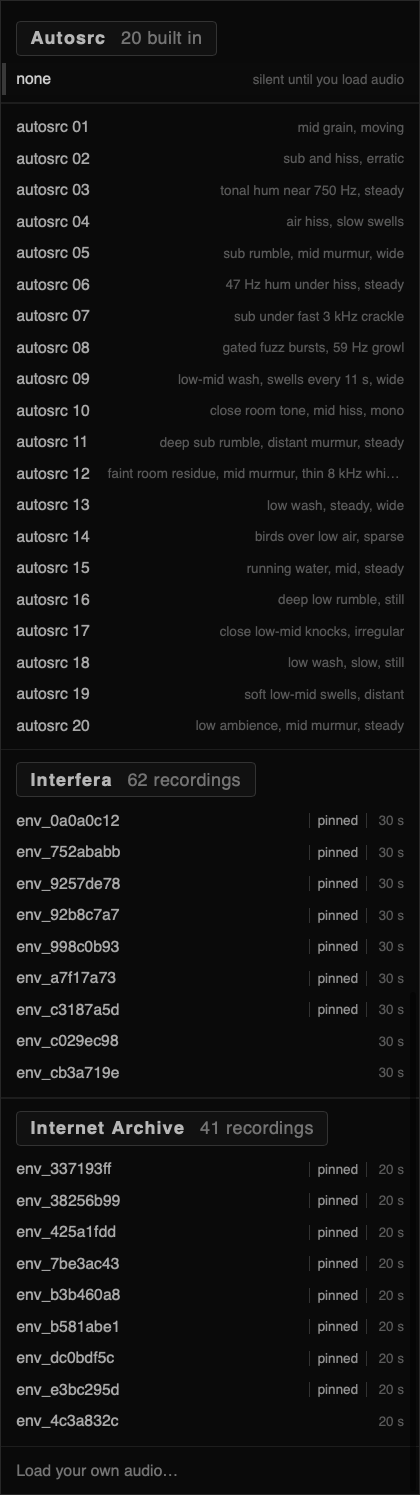
| autosrc | Only on modules that take audio. A menu of the twenty sounds built into the plugin, each with a short description of what it sounds like. Below them, in their own sections, come the recordings that interfera~ and internetarchive~ have found. Pick one and the module plays it without a file. Audio you load yourself wins over it. |
| Other buttons | Some modules have their own: Internal, Auto Play, Mutate, Descent. They are described with each module. |
Rack control lists every module again, with a load bar and an S for solo. The line below shows the active-module limit and which module is soloed. Master holds the limiter, the Activator, Auto headroom and Smart mix; Master fx holds Reverb with its EQ, Undertone and Waveset (chapter 8). At the bottom, a small tag with the name of the licence holder and the serial number.
| Gesture | Result |
|---|---|
| Drag up or down | Changes a dial or a value. The dials show only their name; while you hover or turn one, the name turns into its value. |
| Shift + drag | Fine adjustment. On a modulated dial it changes the depth of the modulation instead (On the dials). |
| Double-click | Back to the default value. |
| Right-click a dial, or Ctrl-click | Opens LFO MATRIX on that dial: DICE, its modulations, every source (Right-click on a dial). |
| Click a square | Switches a module or a processor on and off. On rows like Limiter and Undertone, clicking the name does the same. |
| Hover | After a moment a short description of the control appears. The words are the same as in this manual. |
Pan dials start from a notch at the top: the arc grows to the left or to the right of the centre, so you see at once where a sound sits. Every control is a plugin parameter, so your DAW can automate it.
The ? button in the top bar, next to Activator, turns on Smart Help. F1 or ? do the same. The window goes dark and only what is under the pointer stays lit, with a small card next to it: the name printed on the panel, a line on what it does, the keys that work on it, and Manual →, which opens this manual at the right page.
| Gesture | Result |
|---|---|
| Move the pointer | A control lights up with its card. Over an empty part, the whole area lights up: Modules, the open module, Master fx, Rack control, Master. |
| ← → | A short tour of the window, one area at a time. |
| Click the card · Enter | Opens the manual in your browser, at the page of what is lit. The card stays where it is while you move onto it. |
| Esc · F1 · ? | Leaves Smart Help. |
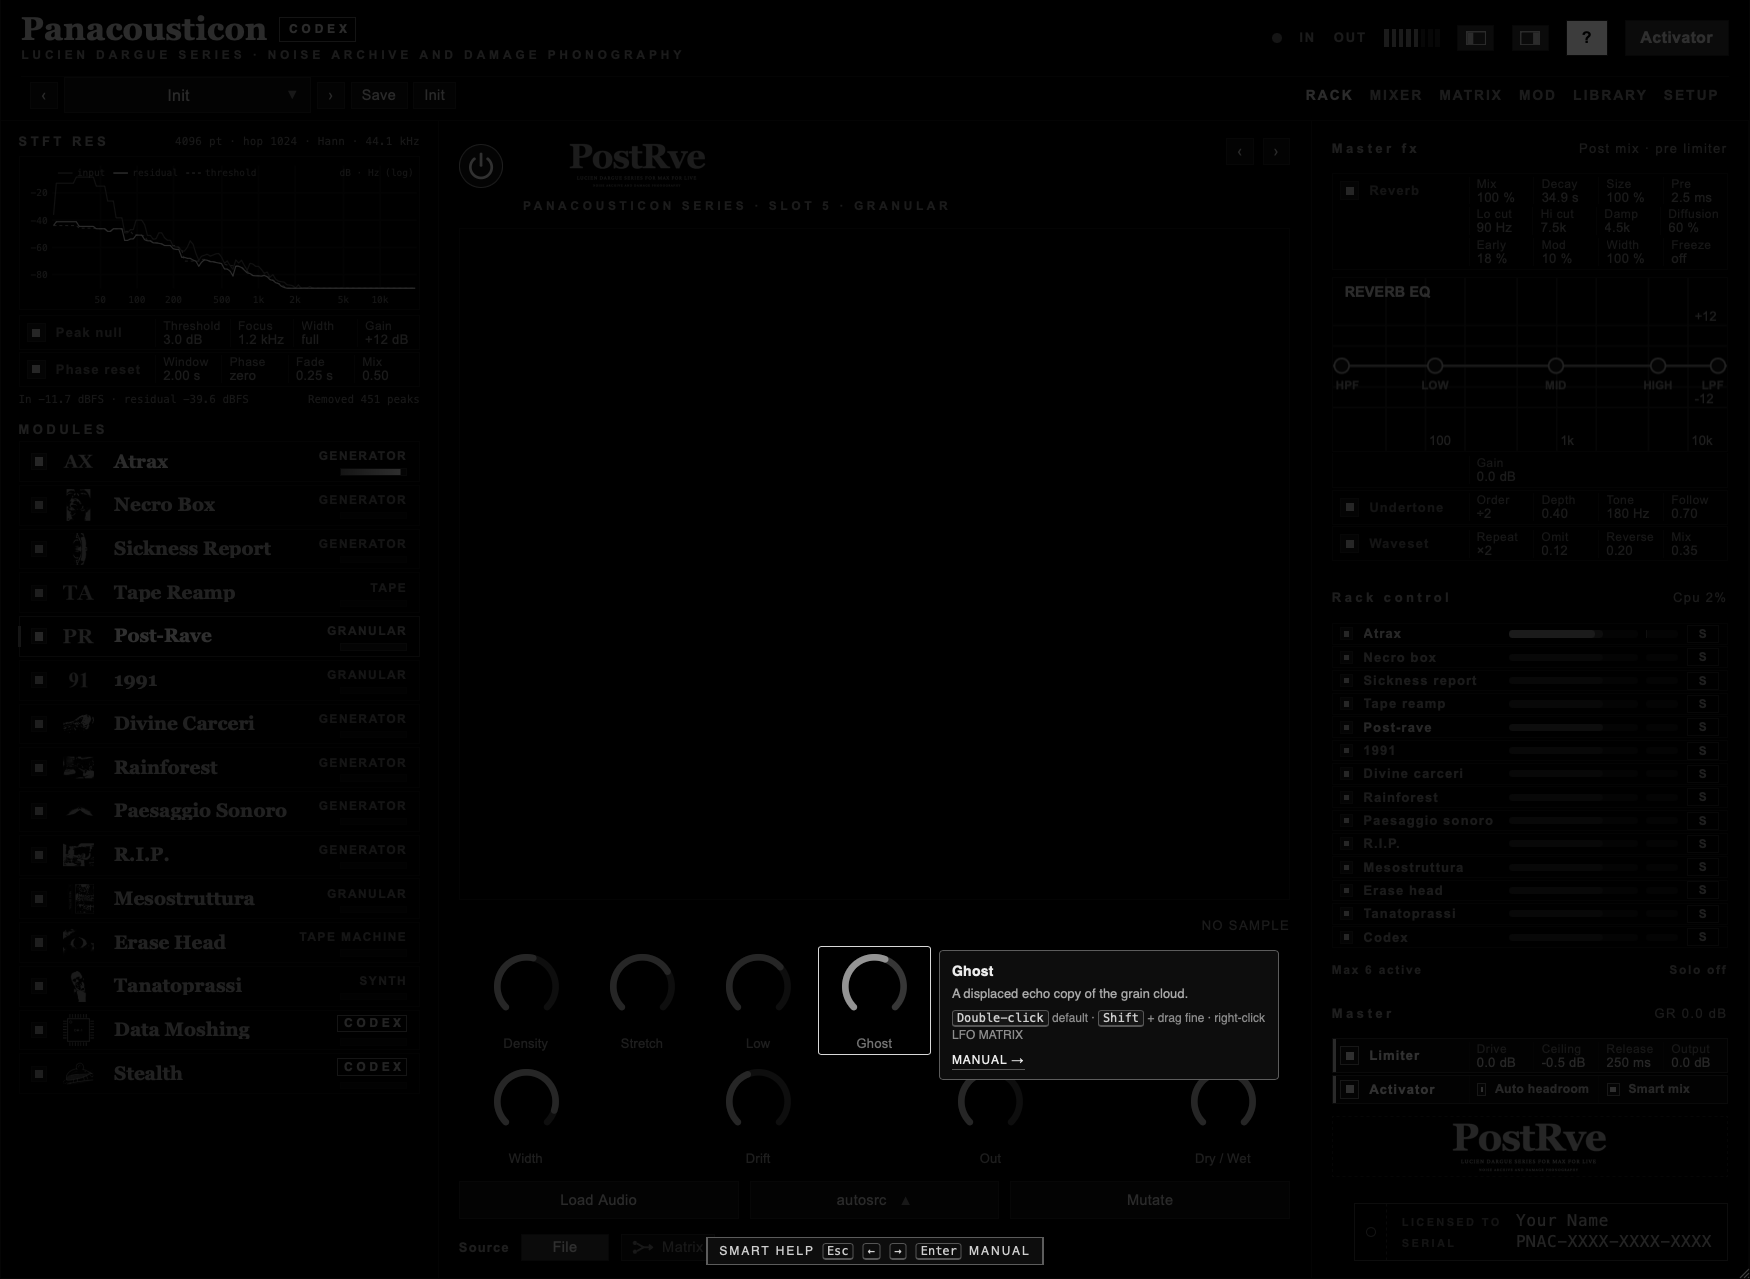
While Smart Help is on, clicks change nothing: you can go over every dial without moving it. The sound keeps playing. On the Stealth sheet the card points to HELP in the header of Stealth, which has a card for every object.
Each module is a complete instrument. Nine make sound on their own. Six take an input: a file you load, or another module sent to them through the matrix. 1991 is in both groups: it has its own internal source. Divine Carceri makes sound on its own and takes a file only for its shards. Data Moshing is the only one that did not exist as a Max for Live device.
| Slot | Module | Family | Input | In one line |
|---|---|---|---|---|
| 1 | Atrax | generator | — | Feedback drone from comb filters. |
| 2 | Necro Box | generator | — | Bass drone, detuned oscillators, rhythmic pulse, tape echo. |
| 3 | Sickness Report | generator | — | Slow pads and distant bells in a dark reverb. |
| 4 | Tape Reamp | tape | file · matrix | A tape loop that degrades on every pass. |
| 5 | Post-Rave | granular | file · matrix | Dense grains, stretched, blurred, biased low. |
| 6 | 1991 | granular | file · matrix | One tiny fragment, repeated until it changes. |
| 7 | Divine Carceri | generator | file (shards) | Voices in canon over a sub, an endless descent, binaural shards of any material. |
| 8 | Rainforest | generator | — | A synthesized noise environment. |
| 9 | Paesaggio Sonoro | generator | — | Up to 44 slow voices that pile up over minutes. |
| 10 | R.I.P. | generator | — | A slow melody from worn tape. |
| 11 | Mesostruttura | granular | file · matrix | A sound microscope played with the mouse. |
| 12 | Erase Head | tape machine | internal · matrix | Two tape decks that record their own generators. |
| 13 | Tanatoprassi | synth | MIDI | Monophonic synth with sequencer. |
| 14 | Data Moshing | code | file · matrix | Sound through RAM, with live C++ code. |
Three modules use grains, each in a different way. Mesostruttura works at the highest density: it treats a recording as something to magnify and brings out the small events hidden in it. Post-Rave uses longer grains at medium density and suspends the material until it loses its origin. 1991 goes to the other extreme: it locks onto one fragment of a few milliseconds and repeats it until the repetition becomes the sound, and with Peaks and Tips it can read only the tips of the transients. Tape Reamp completes the set without grains: it treats a recording as a physical object that is slowly failing. Try all four on the same source.
The smallest instrument in the plugin: six controls. Comb filters feed each other until they oscillate, and the result is a slow, heavy low-end mass. There is nothing to play. You shape it.
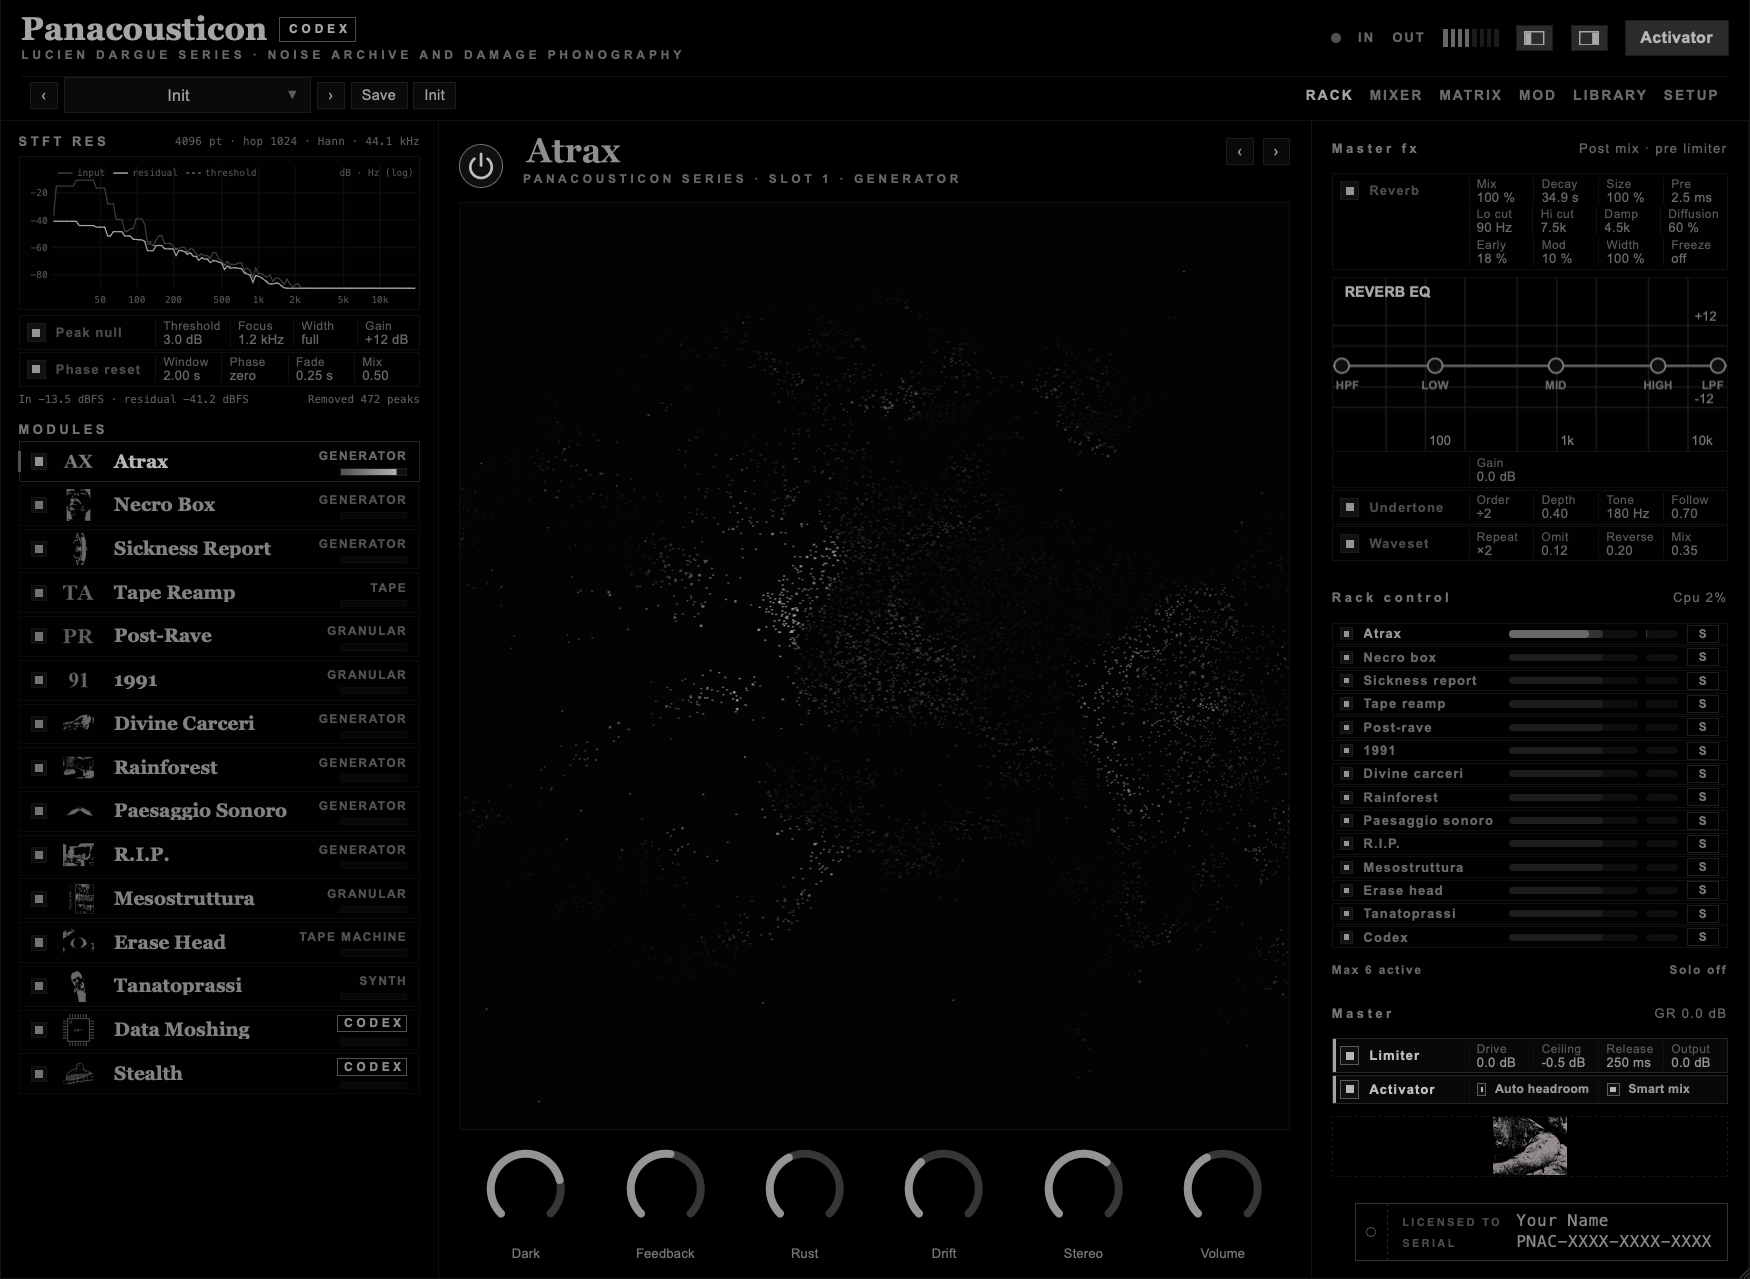
| Control | What it does |
|---|---|
| Dark | Closes the tone. Higher is darker. |
| Feedback | How close the comb filters are to running away. This is the engine. |
| Rust | Corrosion and electrical instability on top of the drone. |
| Drift | Slow movement, so the sound never settles on one tone. |
| Stereo | Width of the image. |
| Volume | Output level of the module. |
Try this. Start with Feedback near zero and bring it up in very small steps. The interesting zone is just before the sound collapses into one unstable note. Stay under that edge for a while.
The default patch. The same sound as Example 2.1.
A bass drone from two detuned oscillators and a noise layer, through drive. A filter sweeps with its own LFO, a second LFO cuts the sound into a pulse, and a dark tape echo closes the chain.
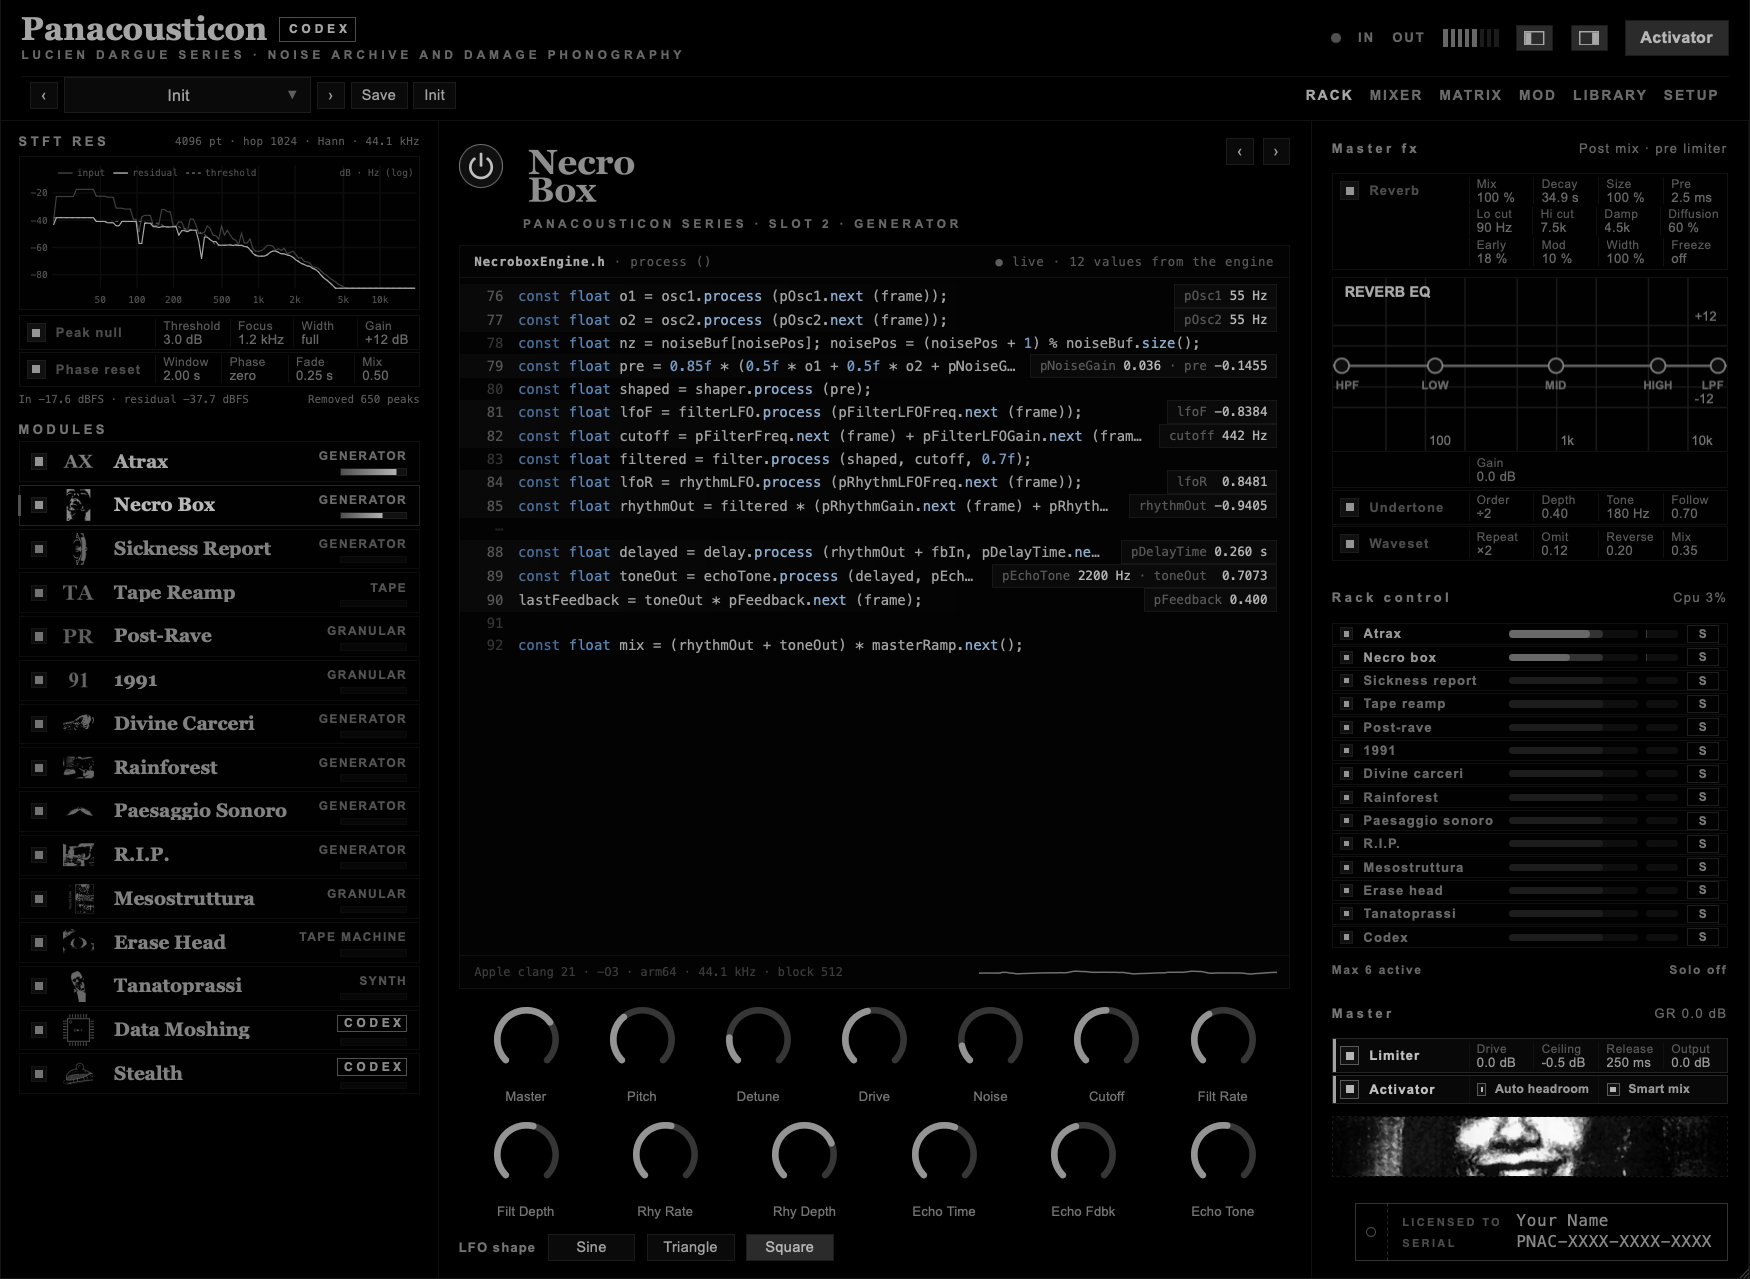
| Control | What it does |
|---|---|
| Master | Output level. |
| Pitch | Pitch of the two oscillators. |
| Detune | Distance between the two oscillators. More detune, more beating. |
| Drive | Saturation. |
| Noise | Level of the noise layer. |
| Cutoff | Filter frequency. |
| Filt Rate · Filt Depth | Speed and amount of the filter LFO. |
| Rhy Rate · Rhy Depth | Speed and depth of the pulse. |
| LFO shape | Shape of the pulse: Sine, Triangle or Square. |
| Echo Time · Echo Fdbk · Echo Tone | Delay time, repeats and brightness of the tape echo. |
Try this. Bring Rhy Depth most of the way up before you touch Rhy Rate. The pulse is only heard as a pulse once the depth cuts deep enough; before that it is a wobble. The pulse runs on its own clock, so tune it by ear against the rest of the track.
Necro Box with its default settings.
Slow pads built from custom waveforms that drift in pitch. Tape wow, hiss and vinyl dust age the sound, bells ring in the distance, and everything ends in a dark, long reverb.
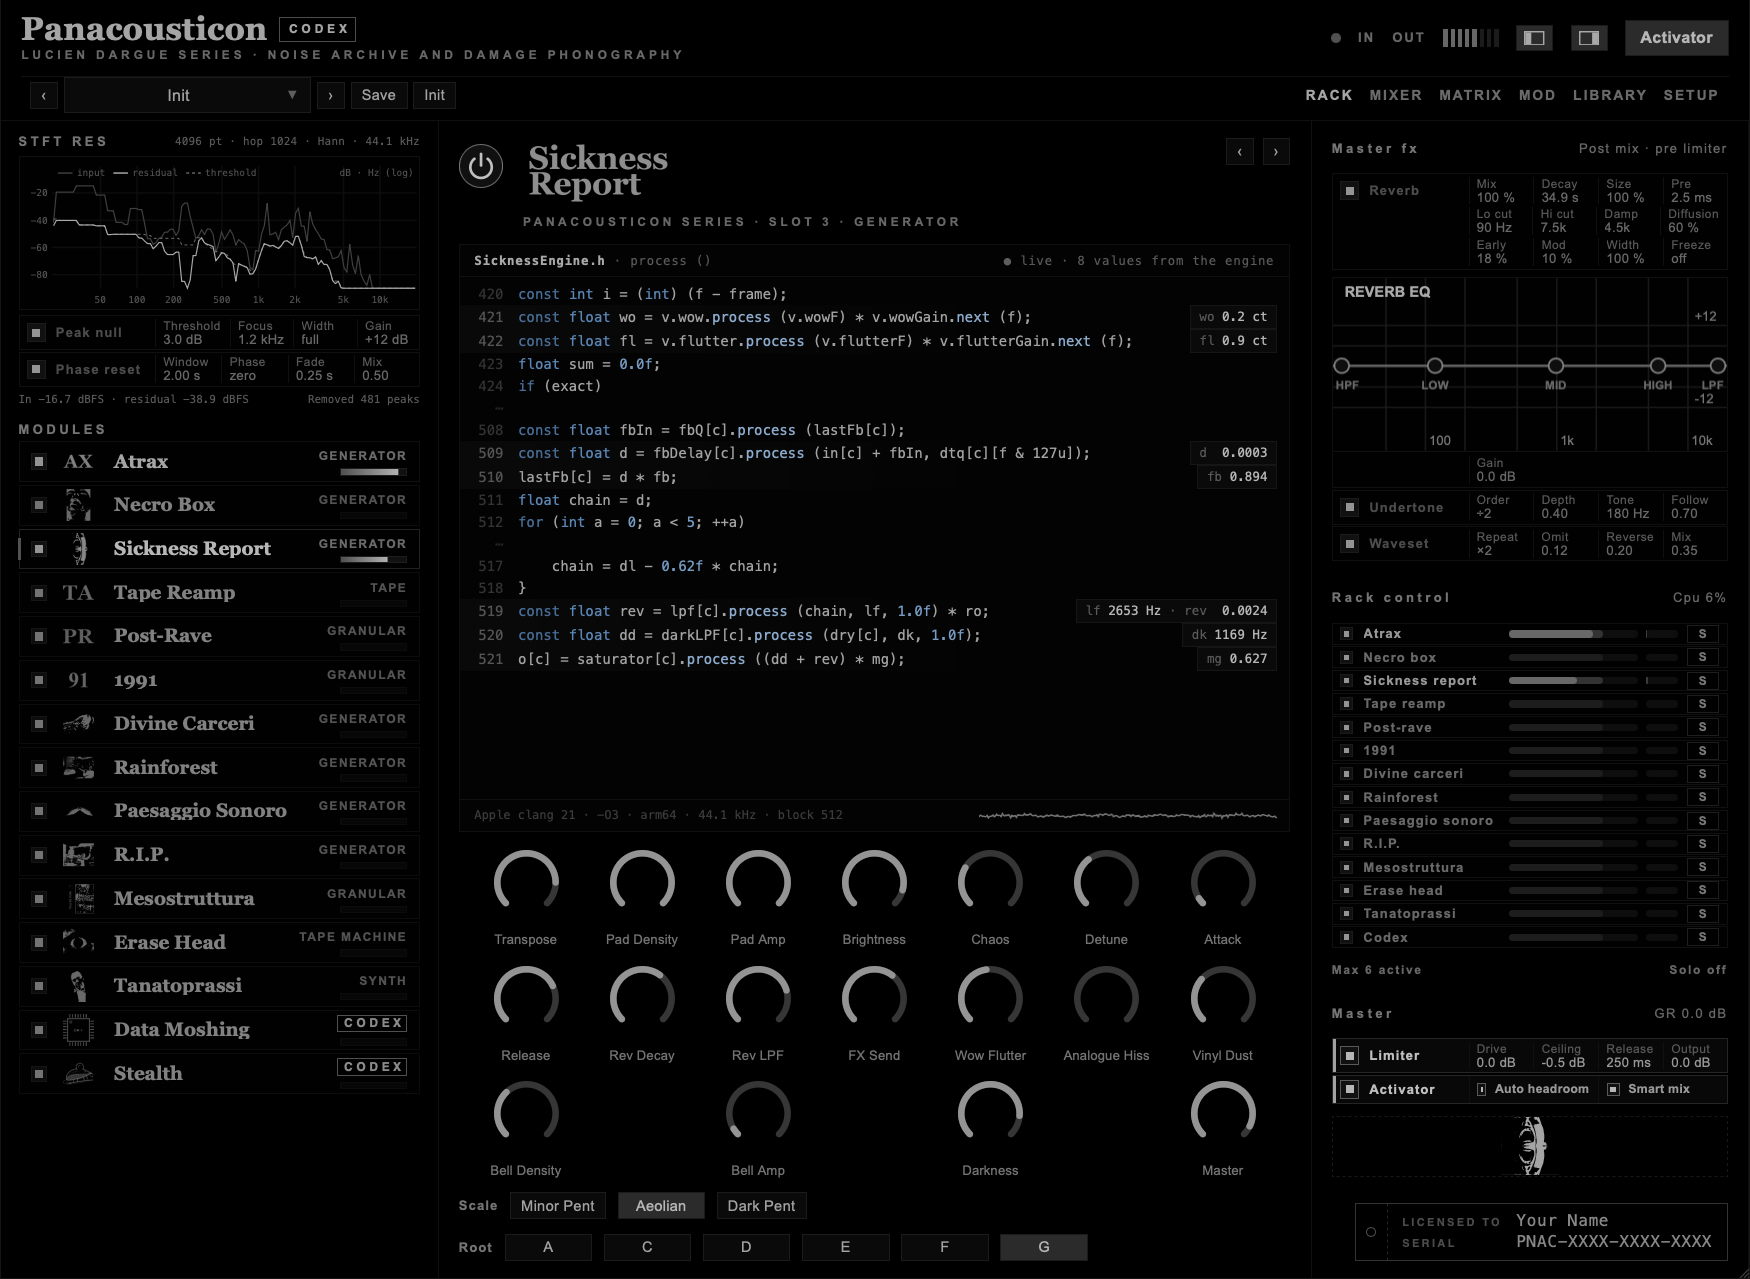
| Control | What it does |
|---|---|
| Scale | Minor Pent, Aeolian or Dark Pent. |
| Root | A, C, D, E, F or G. |
| Transpose | Moves everything up or down. |
| Pad Density · Pad Amp | How many pad notes play, and how loud. |
| Brightness | Tone of the pads. |
| Chaos | Instability: from solemn and clear to grainy and unsteady. |
| Detune | Spread between the voices of a pad. |
| Attack · Release | How slowly pad notes come in and go out. |
| Rev Decay · Rev LPF · FX Send | Length and darkness of the reverb, and how much goes into it. |
| Wow Flutter | Tape pitch instability. |
| Analogue Hiss · Vinyl Dust | Hiss and crackle. |
| Bell Density · Bell Amp | How often the bells ring, and how loud. |
| Darkness | Overall darkness of the module. |
| Master | Output level. |
Try this. Of all these controls, live longer with Chaos and Darkness. Between them they cover most of what this module can say. Turn them slowly, over a minute or two each: the character is in the transitions.
Sickness Report with its default settings.
Tape Reamp runs a sound through a tape loop that degrades a little on every pass. The source is not processed so much as mishandled: slowed down, looped on an unstable memory, coloured by a cabinet, covered in hiss, bent by wow that piles up over the repetitions.
It comes with built-in sources, the autosrc, numbered autosrc 01, 02, 03 and so on. The autosrc button opens the list, each one with a few words on its sound; autosrc 01 is a recording made with contact microphones, a VLF receiver and hydrophones. Load your own file and it takes its place; choose an autosrc again to go back. The same button is in every module that takes audio: Post-Rave, 1991, Mesostruttura and Data Moshing.
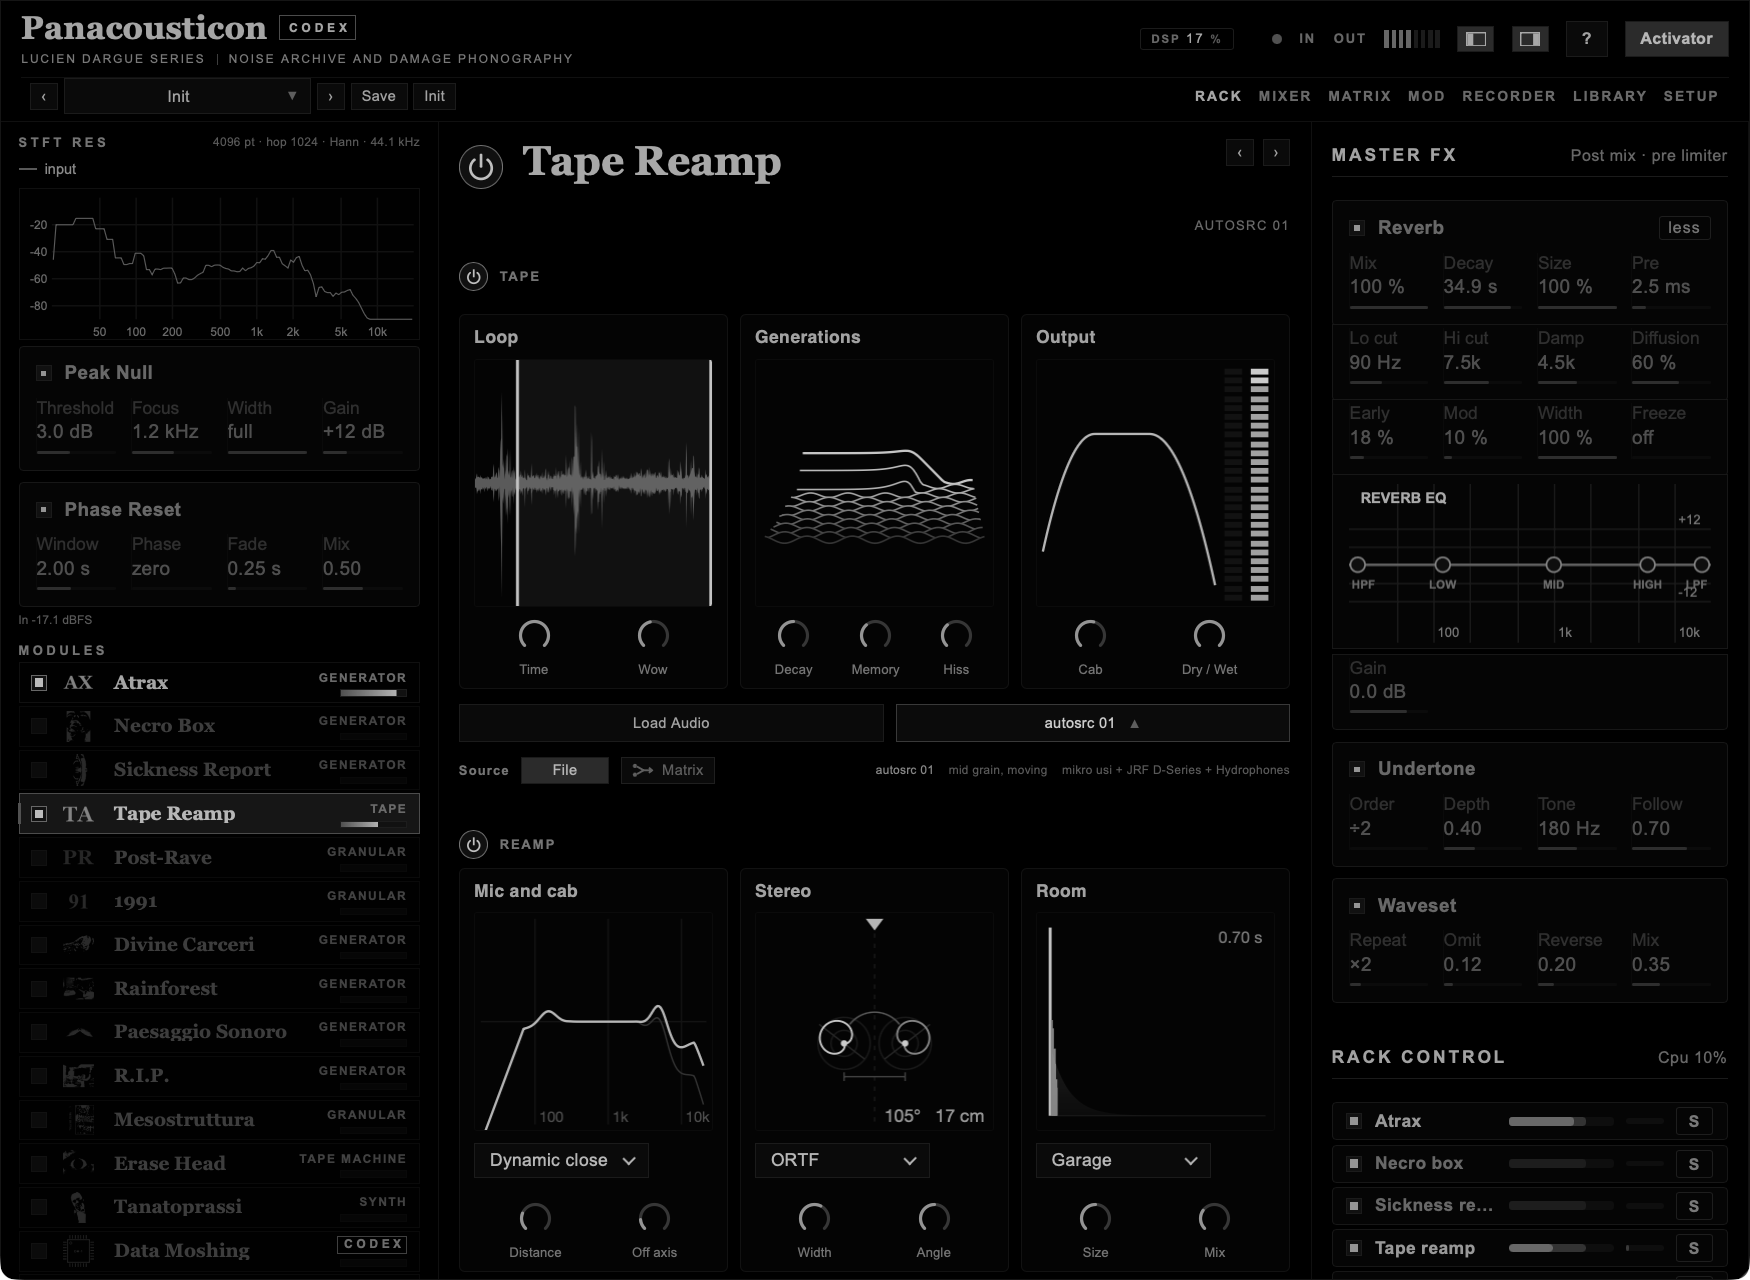
The TAPE block has three cards, each with a display and the dials that move it. Loop: the tape, with a line where it is read and one where it is written; the space between them is the loop, and Wow makes the reading line waver. Generations: one line for each pass of the tape, the first at the back, the later ones forward, lower and darker. Decay sets how fast the lines fall, Memory how much of the top end each pass loses, and when a pass sinks under the hiss it turns to grain. Output: the curve of the cabinet and two meters, dry and wet.
| Control | What it does |
|---|---|
| Time | Tape speed. Lower is slower and lower in pitch. |
| Decay | How long the repeats last. |
| Memory | How much the tape remembers. Higher gives a longer loop (from 0.08 to 3.3 s), more feedback, and a darker tone on each pass. |
| Cab | Colour of the cabinet the tape seems to be played through. |
| Hiss | Tape hiss. |
| Wow | Slow pitch drift, separate from Time. |
| Dry / Wet | Balance between the source and the tape. |
| autosrc | Picks a built-in source, or none. Lit when one is playing. |
The two plots are drawn from the real state of the loop. LOOP BUFFER shows what is on the tape now, with the write head W and the read head R. GENERATION LOSS shows the response of the loop after one pass (light) up to eight passes (dark): this is why the sound gets darker the longer it stays on the tape.
Try this. Field recordings and voices work better here than pitched material. The processing suggests physical wear, not a musical change. Send Erase Head or Post-Rave into it from the matrix and set Memory high.
Tape Reamp playing autosrc 01 with the default settings.
Under the tape there is a second block: REAMP. It plays the sound back through a microphone or a cabinet, records it in stereo and puts it in a room. Each block has its own power button, TAPE and REAMP, so you can use the tape alone, the reamp alone, or both. With both on, the tape goes into the reamp. REAMP is off when you open the module.
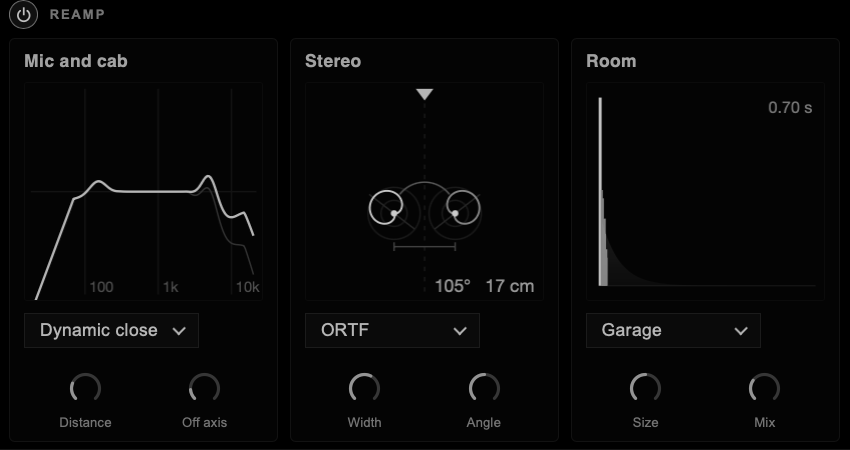
The block has three cards, in the order the sound goes through them. Each one has a display, a menu and two dials.
Mic and cab. The display shows the frequency response of the choice; the darker curve is the same choice further off axis.
| Choice | Sound |
|---|---|
| Dynamic close | Close and present, with a lift around 5 kHz. |
| Ribbon | Round and dark, the top rolls off early. |
| Condenser far | Open and airy, a little thin at the bottom. |
| Small cab | Narrow and boxy, a small speaker. |
| Big cab | A large cabinet, heavy low end, no top. |
| Contact | A contact microphone: no deep low end, a bump around 400 Hz, almost no top. It is quieter than the others. |
| Distance | How far the microphone is. Further loses low end and some top. |
| Off axis | How far the microphone is turned away. The top above 2.5 kHz falls, up to 10 dB. |
Stereo. The display shows the microphones from above, with the source at the top and the polar pattern of each microphone. The angle between them and the spacing are written next to them. When you change the setup or turn a dial the microphones move to their new place.
| Choice | Sound |
|---|---|
| Mono | One cardioid. No stereo. |
| XY | Two cardioids in the same point, at an angle. Stereo from level only, safe in mono. |
| ORTF | Two cardioids 17 cm apart, at an angle. Level and a small delay between the sides. |
| Spaced | Two omnis, from 30 to 120 cm apart. The widest image, made of delay. |
| Off-axis | Two cardioids splayed away from the source. Wide and darker in the middle. |
| M/S | A cardioid facing the source and a figure-8 facing the sides. |
| Width | How wide the image is. In Spaced it also moves the microphones apart; in M/S it sets the level of the sides. Dark in Mono. |
| Angle | The angle between the two microphones, from 60° to 150°. It works in XY, ORTF and Off-axis, and is dark in the others. |
Room. The display shows the direct sound, the first reflections and the tail; the decay time is written top right. There are nine rooms, from the smallest to the largest: Closet, Car, Booth, Bathroom, Garage, Live room, Basement, Stairwell, Hall. The small ones do not sound like reverb: they change the colour and the body of the sound. Bathroom is small but bright; Basement is larger and dull; Stairwell and Hall have long tails.
| Control | What it does |
|---|---|
| Size | Makes the chosen room smaller or larger, from half to one and a half times its decay. |
| Mix | How much room you hear. |
Try this. Turn TAPE off and REAMP on, choose Contact and Car, and play a field recording through it: it becomes small, close and boxed in. Then turn TAPE on again and try Big cab with Stairwell and Spaced.
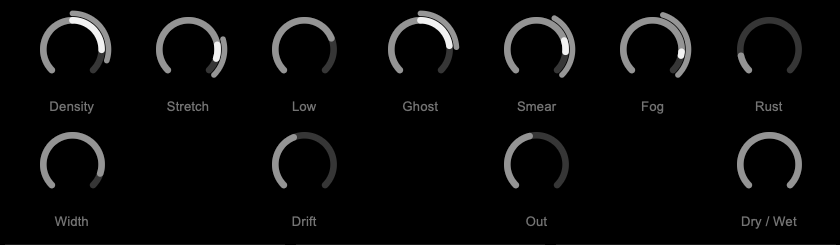
A granular engine. The input is cut into dense, overlapping grains, scattered in time and pitch and pushed low, then blurred by a long reverb and a saturating shaper. The name describes the register: not a club sound, but what is left after one.
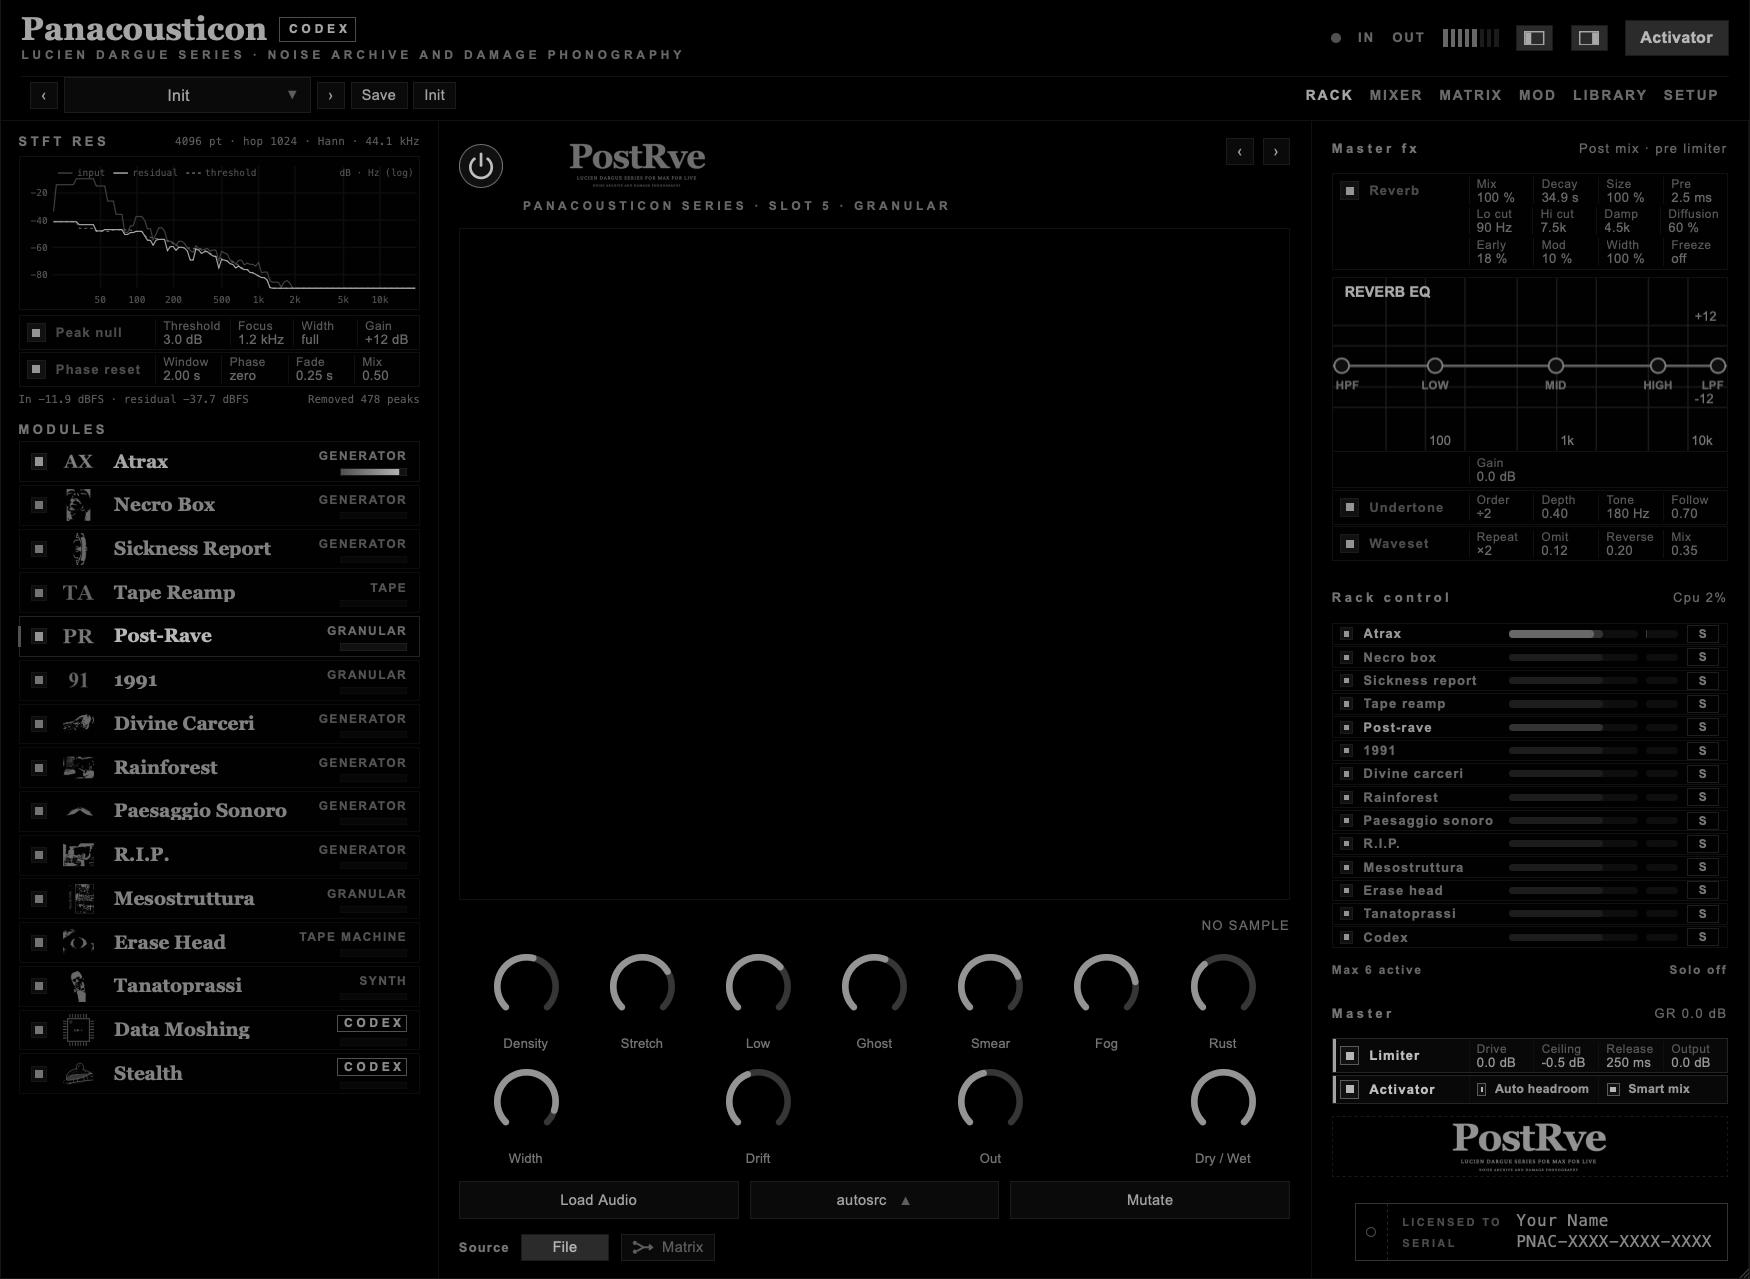
| Control | What it does |
|---|---|
| Density | How many grains are active. |
| Stretch | How long each grain lasts. |
| Low | Pushes the grain pitch down. |
| Ghost | A displaced echo copy of the grain cloud. |
| Smear | Moves the bands sideways in time. |
| Fog | Reverb depth. |
| Rust | Drives the shaper and the high-pass filter together. |
| Width · Drift | Stereo spread and pitch instability. |
| Out | Output level. |
| Dry / Wet | Balance between the input and the grains. |
| Mutate | Sets the first ten controls to random values. Dry / Wet stays where it is. |
Try this. It responds well to percussion. A single kick or snare, spread out with Density and Drift, turns into a sustained texture.
Atrax sent into Post-Rave through the matrix, Post-Rave with its default settings. Only Post-Rave is heard.
1991 does not scatter grains across a file. It locks onto one fragment, between one and twenty-two milliseconds long, and repeats it with almost no movement until the repetition replaces the original sound. It has its own source: six seconds of electrical interference, sub drone, metallic resonance and tape dropout. Internal generates a new one.
Around the first twelve controls I built a second set that works on the single grain: where it starts, which part of the wave it keeps, the shape of its envelope, where it sits in space and how the filter answers it. All of them start at zero, so the factory presets sound exactly as before.
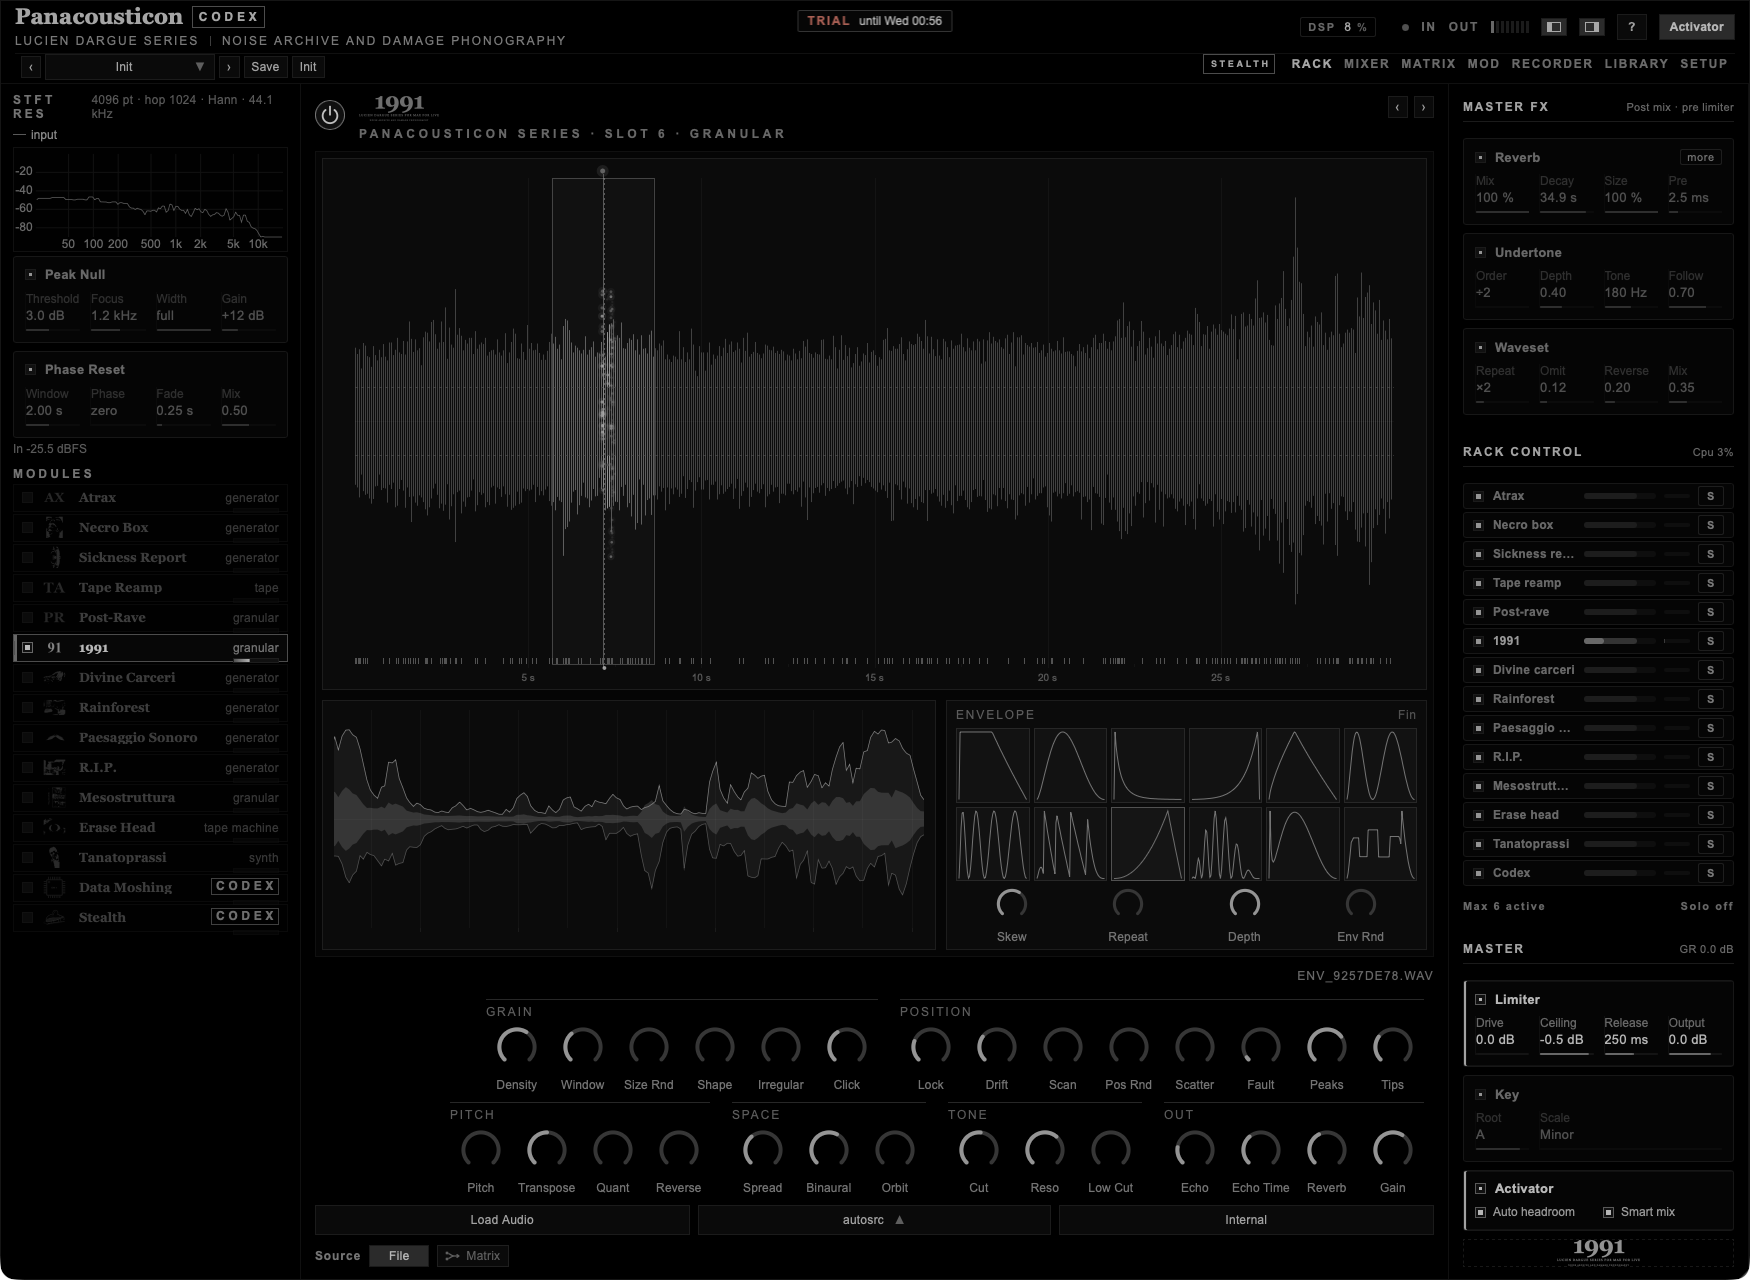
The display has three parts. At the top, the whole file with a time ruler. The box is the read window, and every grain lights up the part of the wave it is actually reading. Small ticks under the wave mark the transients found by Peaks, and two dashed lines show the Tips threshold. Below on the left, the last six seconds of output: the light body is the average level, the outline is the peaks. Below on the right, the envelope panel.
| Control | What it does |
|---|---|
| Grain | |
| Density · Window | Rate and size of each grain. |
| Size Rnd | Random length per grain around Window. |
| Shape | Envelope from a hard trapezoid to a smooth bell. With a curve chosen in the envelope panel, it smooths that curve. |
| Irregular | From a regular stream to irregular, clustered grains. |
| Click | Sharpens the attack of each grain. |
| Position | |
| Lock | The position in the buffer where the engine anchors. |
| Drift | Small movement around that position. |
| Scan | Moves Lock through the file, from very slow to twice real time. |
| Pos Rnd | Local random position around the read point. |
| Scatter | Large, violent jumps. |
| Fault | Small random jumps. |
| Peaks | Starts the grains on the transients of the file. See below. |
| Tips | Keeps only the part of each grain above a threshold. See below. |
| Pitch | |
| Pitch | Spreads the pitch across the grains. |
| Transpose | Fixed transposition of every grain, ±24 semitones. |
| Quant | Snaps the Pitch spread to semitones. |
| Reverse | Probability that a grain plays backwards. |
| Space | |
| Spread | Random pan per grain. |
| Binaural | Each ear reads the grain from a slightly different point. See below. |
| Orbit | The stereo centre moves slowly from side to side. |
| Tone | |
| Cut | Cutoff of the filter. |
| Reso | Resonance, modelled on the Serge VCFQ. See below. |
| Low Cut | High-pass filter. |
| Out | |
| Echo · Echo Time | Ping-pong echo on the grains, from 20 ms to 2 s. |
| Reverb | A large convolution space with a feedback delay. |
| Gain | Output level. |
| Envelope panel | |
| Twelve curves | The envelope of every grain. Click one to choose it. |
| Skew | Moves the peak of the curve earlier or later. |
| Repeat | Plays the curve up to eight times inside the grain. |
| Depth | How deep the curve cuts. Low values flatten it. |
| Env Rnd | Probability that a grain picks a random curve. |
| Internal | Generates a new internal source and drops the loaded file. |
These two controls are what makes 1991 different from the other granular modules. Most granulators choose where to read by position in time. Peaks chooses by content: when a file is loaded it finds the attacks, and as you raise it more grains start exactly on an attack. Tips works on the amplitude. It removes everything under a threshold and keeps only what sticks out, the part a clipper would cut off. The threshold follows the level of the material, and the level is made up so the tips do not disappear. Together they read only the top of the transients: dry, sparse, with full peaks. On the display the lit part of each grain is only the part outside the dashed lines, which is what you hear.
Listen on headphones. With Binaural up, the right ear reads each grain a fraction of a millisecond away from the left one, up to 0.7 ms, which is the time difference the head uses to place a sound. In half of the grains the right ear also reads from 4 to 34 ms away, so the two ears get different material. The level between the ears changes from grain to grain, sometimes against the time difference. The grains spread around the head instead of sitting on a line between the speakers. Spread and Orbit are plain pan and work on speakers too. The little dots on the display are drawn at the height of their pan.
Cut and Reso are modelled on the Serge VCFQ, the variable Q filter of the Serge system. With Reso at zero it is the clean low-pass of the first version. As you raise Reso it becomes a state-variable filter with saturation inside its loop, with part of the band-pass mixed in. Every grain strikes it, so it rings with a dry, woody attack, and close to the top it almost oscillates on its own. The saturation keeps it under control: at the maximum the level rises by about 5 dB.
With grains this short the envelope changes the timbre as much as the pitch does. Classic is the original one. Bell is smooth. Perc and Spike are short and percussive, Swell grows and stops dead. Double, Stutter and Teeth repeat inside the grain and add a buzz at the rate of the repetition. Fin rises slowly and drops. Wobble modulates the level, and Dust is a random step pattern, different for every grain. The levels are matched, so changing curve does not jump in volume. The small drawings follow Skew, Repeat, Depth and Shape while you turn them.
The new controls cost almost nothing: 1991 stays around 2 to 3 per cent in Rack control, because only a few grains play at the same time and the transients are found once, when the file is loaded.
Try this. Load a recording with clear attacks, drums or objects. Peaks at 100 %, Tips around 40 %, envelope Perc, Reso at 70 % and Cut in the middle. Then raise Binaural and listen on headphones.
1991 on its internal source with the default settings.
A deep root tone. Fourteen voices repeat the same slow line in canon over a sub bass, with metallic tones and hiss. Everything goes through tape degradation, a long reverb, a stereo widener and a tape cabinet, until it sits somewhere between a frozen drone and a distant bell. On top of the drone there are two things you will not find in the other modules: Descent, a scale that falls forever, and Shards, a granulator that injects any material into the voices.
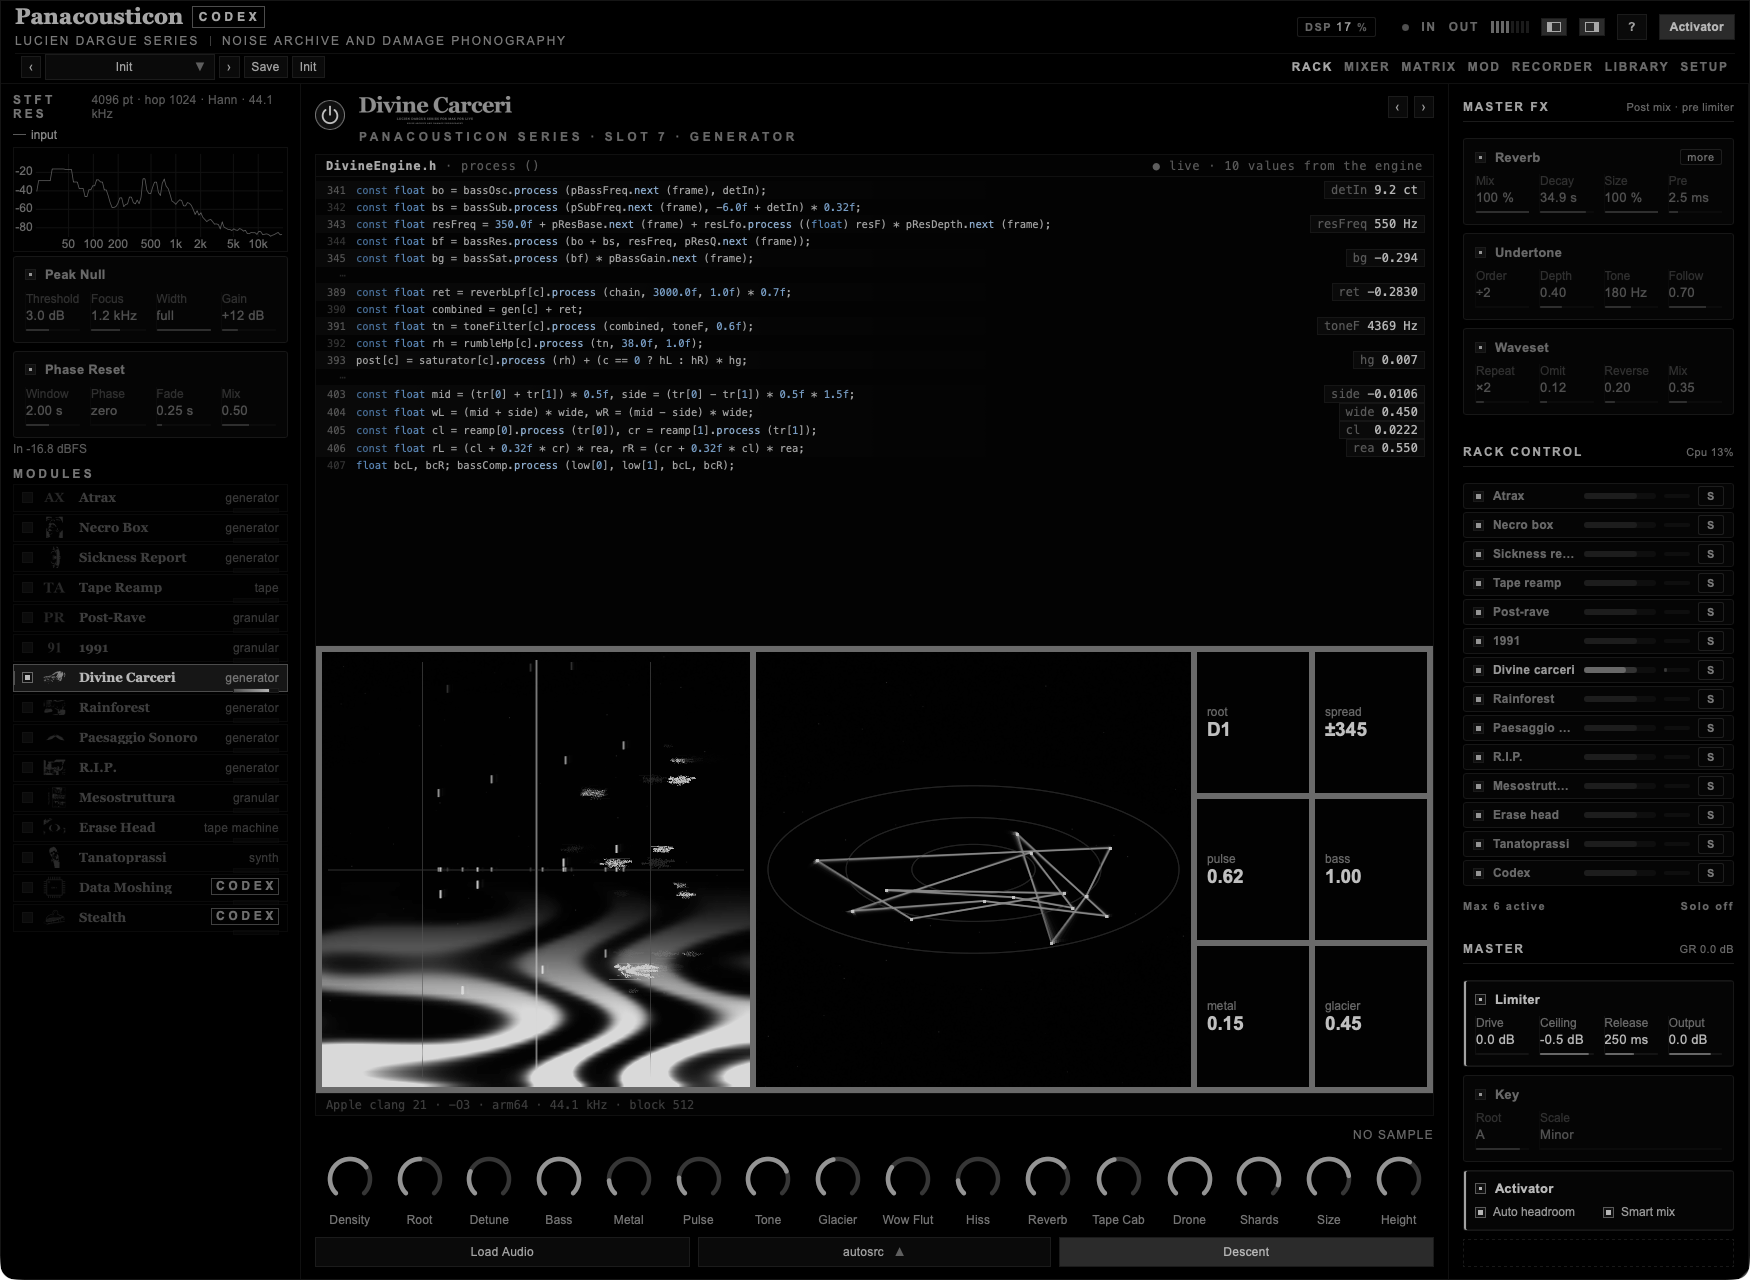
The box under the code is drawn from the engine. On the left, each small mark is a voice: across is pitch, the blue line is the root, and the bass draws a moving terrain at the bottom. The shards are drawn on the same box. On the right, the canon seen from above. The six numbers can be dragged like dials.
| Control | What it does |
|---|---|
| Density | How many voices play. |
| Root | The root tone. |
| Detune | Spread between the voices. |
| Bass | Level of the sub bass. |
| Metal | Inharmonic shimmer above the root. |
| Pulse | How fast the voices fall when Descent is on. |
| Tone | Brightness. |
| Glacier | The freeze: higher values stretch the material until it stops moving. |
| Wow Flut | Tape pitch instability. |
| Hiss | Tape hiss. |
| Reverb | Reverb amount. |
| Tape Cab | Colour of the tape cabinet. |
| Drone | Level of the drone, down to −30 dB. It never goes silent, and the shards are not turned down with it. |
| Shards | Amount and density of the shards. At 0 they are off. |
| Size | Length of each shard, from 3 ms to about 300 ms. |
| Height | Register of the shards. See below. |
| Load Audio · autosrc | The material for the shards: a file of yours or a built-in source. With neither, the shards are made from the drone itself. |
| Descent | Makes the voices fall forever. |
With Descent on, the fourteen voices split into four groups an octave apart and slide down together. When a voice reaches the bottom it fades out and comes back in at the top, so you never hear where the scale closes. It is the Shepard–Risset illusion, built from the voices of the module. Pulse sets the speed: about fifty seconds per octave at the minimum, a fast spiral at the maximum. In the box the voices fall and drift to the left, and each mark is as bright as its voice is loud.
Shards is a granulator that works by injection. You give it a material, and every voice of the cluster fires short grains of it. The grains are not transposed: they are moved up in frequency by a fixed number of hertz, which breaks the harmonic ratios of the source. A voice, water, a room recording: everything turns into glass and metal, but keeps its grain and its rhythm. Each shard follows the height of its voice, so with Descent on the shards fall with the cluster and wrap around with it.
Size and Height decide how much of the original material you hear.
| Setting | Sound |
|---|---|
| Size short | Under 10 ms a shard is a coloured click. You hear its spectrum, not its source. |
| Size long | From about 50 ms the articulation of the material comes through. Above 200 ms you recognise it. Longer shards are fired less often, so the level stays the same. |
| Height top half | Frequency shift. At the top the shards sit between 5 and 16 kHz. Going down, the shift gets smaller and the material returns to its own register, still inharmonic, like a radio that is badly tuned. |
| Height at the middle | The material at its own pitch. |
| Height bottom half | Real transposition, down to three octaves below. The material is recognisable and dark, like a tape slowed down. With Descent on, it falls like the voices. |
Binaural. Listen on headphones. The two ears read the material from different points and with frequencies a few hertz apart, so left and right never match. Each shard starts at a random place in the stereo field and slides somewhere else while it plays, and the whole swarm drifts from one side to the other. In half of the shards the timing between the ears points to one side and the level to the other, so the position does not settle and the sound seems to be inside your head. The beating between the ears is clear below about 1.5 kHz, so it is stronger with Height low.
The shards are drawn where you hear them: across is their place in the stereo field, left to right, and up and down is the height of their voice. A shard flashes when its grain starts, gets wider with Size, and the largest one shows the terrain.
I made it with musique concrète in mind. A recording goes in, and what comes out keeps the texture of the source without its identity; with Size and Height you decide how much of it comes back. Drone lets you push the drone down to a floor and leave the material in front. The shards also lend themselves to a multichannel version, with each one leaving from its own output, for rooms and installations with more than two speakers. It is the next step I want to take.
The shards cost very little: under one per cent of a core at the maximum, and nothing when Shards is at 0.
Try this. Load a voice or a water recording (autosrc 15). Turn on Descent, set Shards to 70 %, Size to 60 %, Height to 25 % and Drone low. Put on headphones and move Height slowly towards the middle: the material comes back.
Divine Carceri with its default settings.
A synthesized environment, built from noise beds more than from notes: mist, insect swarms and electric discharges under slow low voices and occasional calls, in a dense, wet space with an eleven-second reverb and a long echo. It is closer to a field-recording instrument than to a synthesizer.
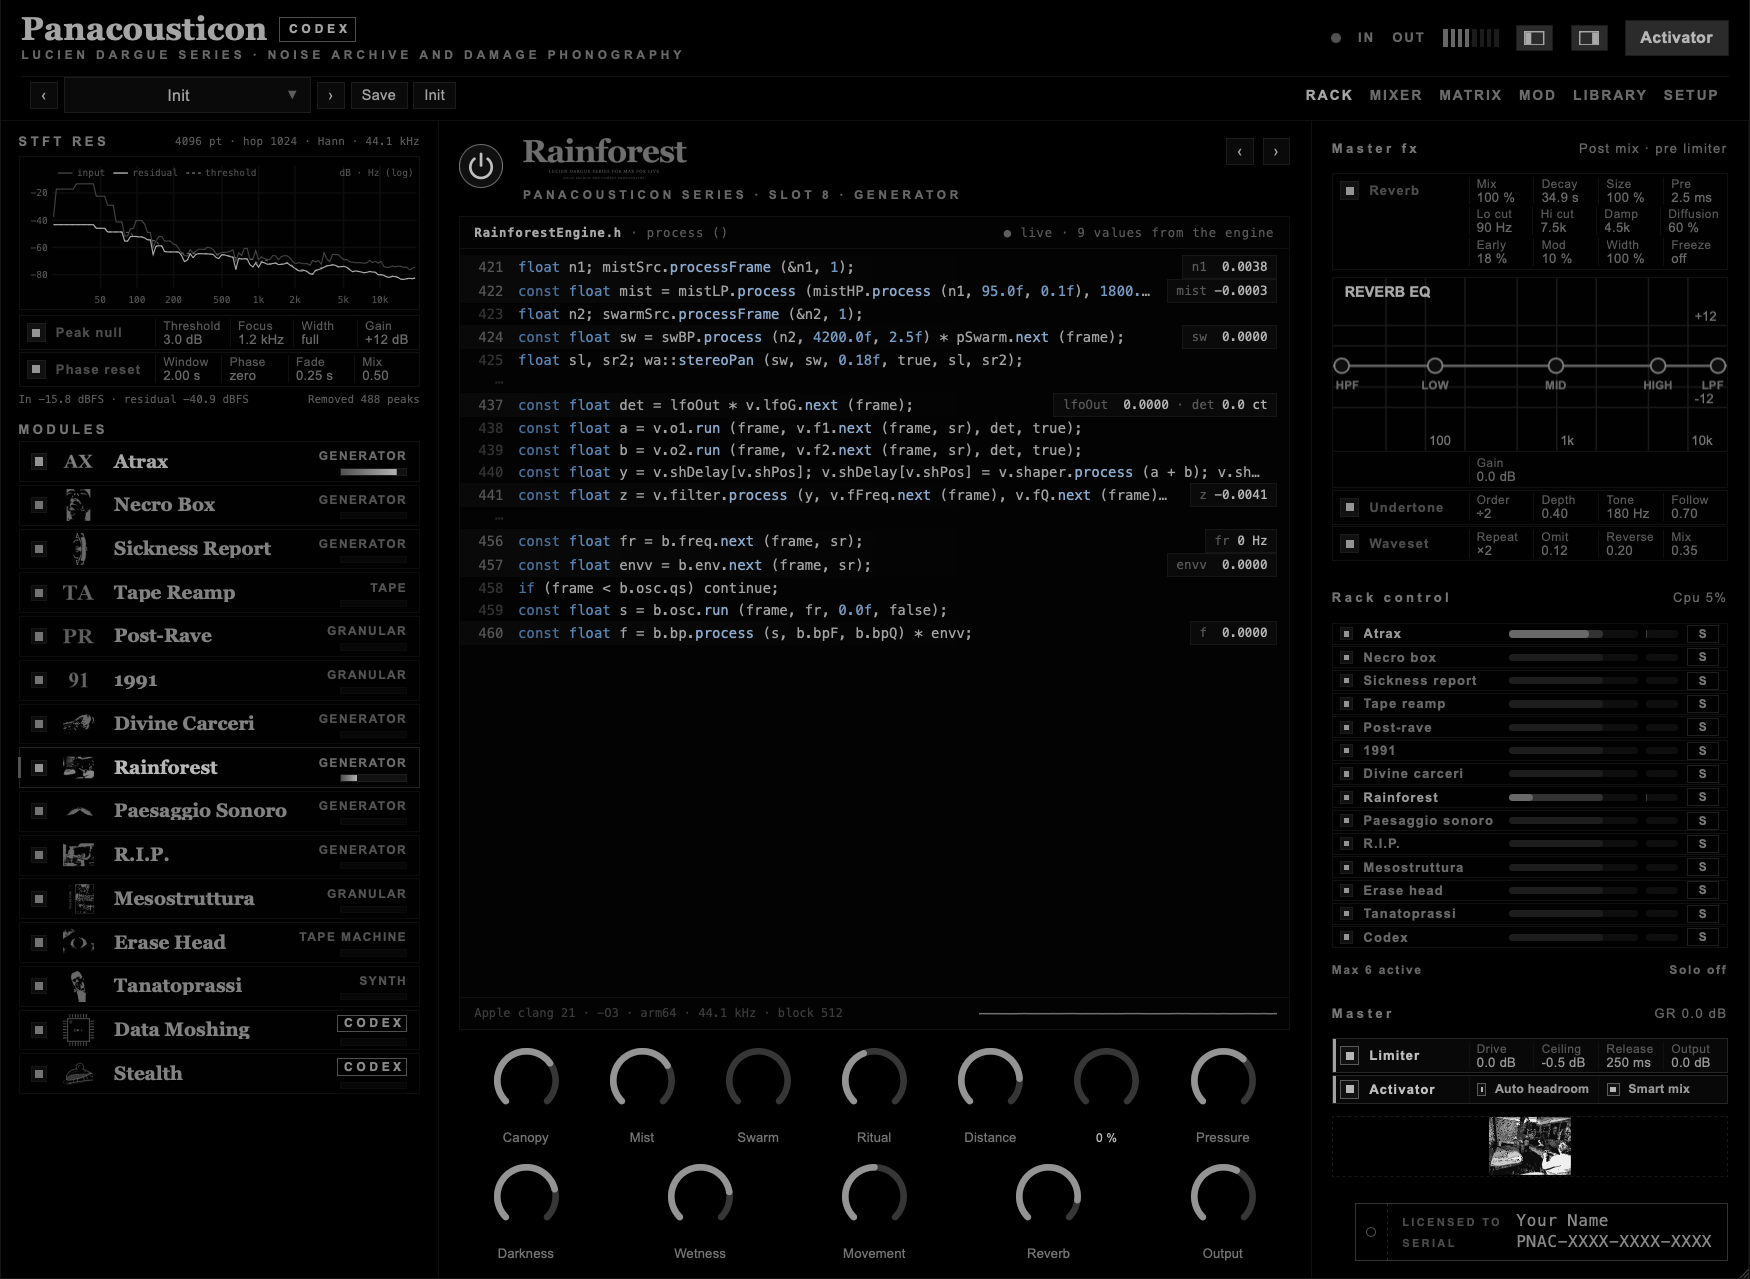
| Control | What it does |
|---|---|
| Canopy | Resonance of the low voices, and a little more mist. |
| Mist | The noise bed. |
| Swarm | Bursts of dense, high insect noise. Off by default. |
| Ritual | The calls. |
| Distance | Pushes everything back and adds grain. |
| Electricity | Electric discharges. Off by default. |
| Pressure | The low pressure tones: how many, how often, how saturated. |
| Darkness | Overall darkness. |
| Wetness | Feedback of the echo. |
| Movement | Speed and depth of the slow modulation inside the voices. |
| Reverb · Output | Reverb amount and output level. |
Try this. Listen to it, not to the names of the controls. It does not try to depict anything. Raise Swarm and Electricity a little for a texture that sits behind other material, and use Distance to push it further back.
Rainforest with its default settings.
Clusters of slow voices fade in and out on their own schedule, spread over five octaves and sliding in pitch, with short melodic fragments buried underneath. Every 18 to 44 seconds, depending on Density, a new wave of 10 to 44 voices comes in, each with a fade-in, a sustain and a fade-out of several seconds. New waves arrive before the old ones finish, so the layers pile up: after three to five minutes the texture settles on a plateau.
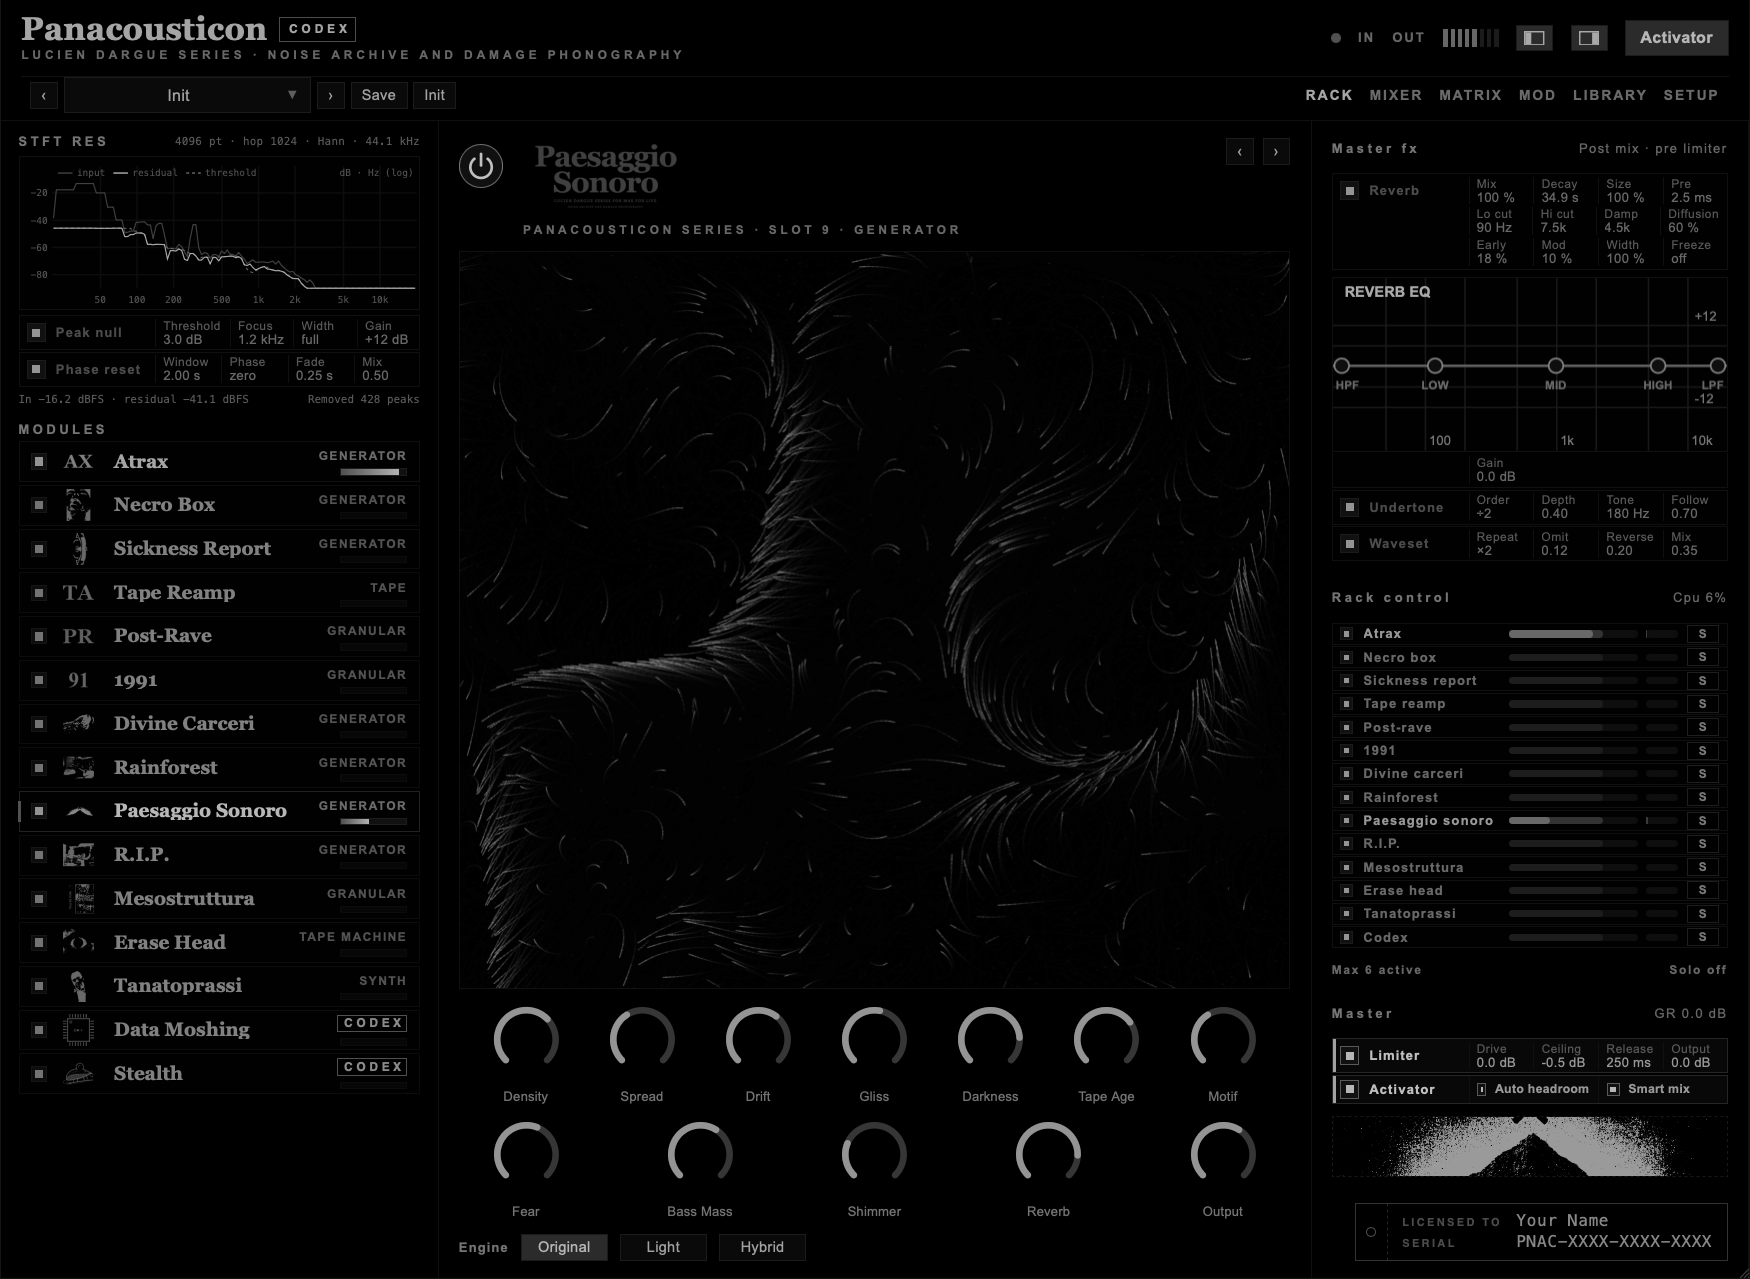
| Control | What it does |
|---|---|
| Density | How often a wave comes in, and how many voices it has. |
| Spread | How wide the clusters are in pitch. |
| Drift · Gliss | Slow pitch movement and pitch slides. |
| Darkness | Overall darkness. |
| Tape Age | Wear of the tape. |
| Motif | How often the buried melodic fragments come up. |
| Fear | Tension in the clusters. |
| Bass Mass | Weight of the low register. |
| Shimmer | High overtones. |
| Reverb · Output | Reverb amount and output level. |
| Engine | Original: up to 44 voices and a nine-second reverb. Light: 3 to 8 voices and two echoes instead of the reverb, much cheaper. Hybrid: few voices with the full reverb. |
Lowering Density does not undo the build-up quickly. The voices already playing live their full span, so a crescendo that took minutes takes about as long to recede.
Try this. Start with Output low and bring it up once you can hear where the texture is going. Then leave the room for a few minutes. This module works best when you leave it alone.
Paesaggio Sonoro with its default settings, two minutes after it was switched on.
A fragile melodic cell comes back at irregular times, repeating and decaying over a slow drone. Faint fifths sit under it. The reverb lasts ten seconds.
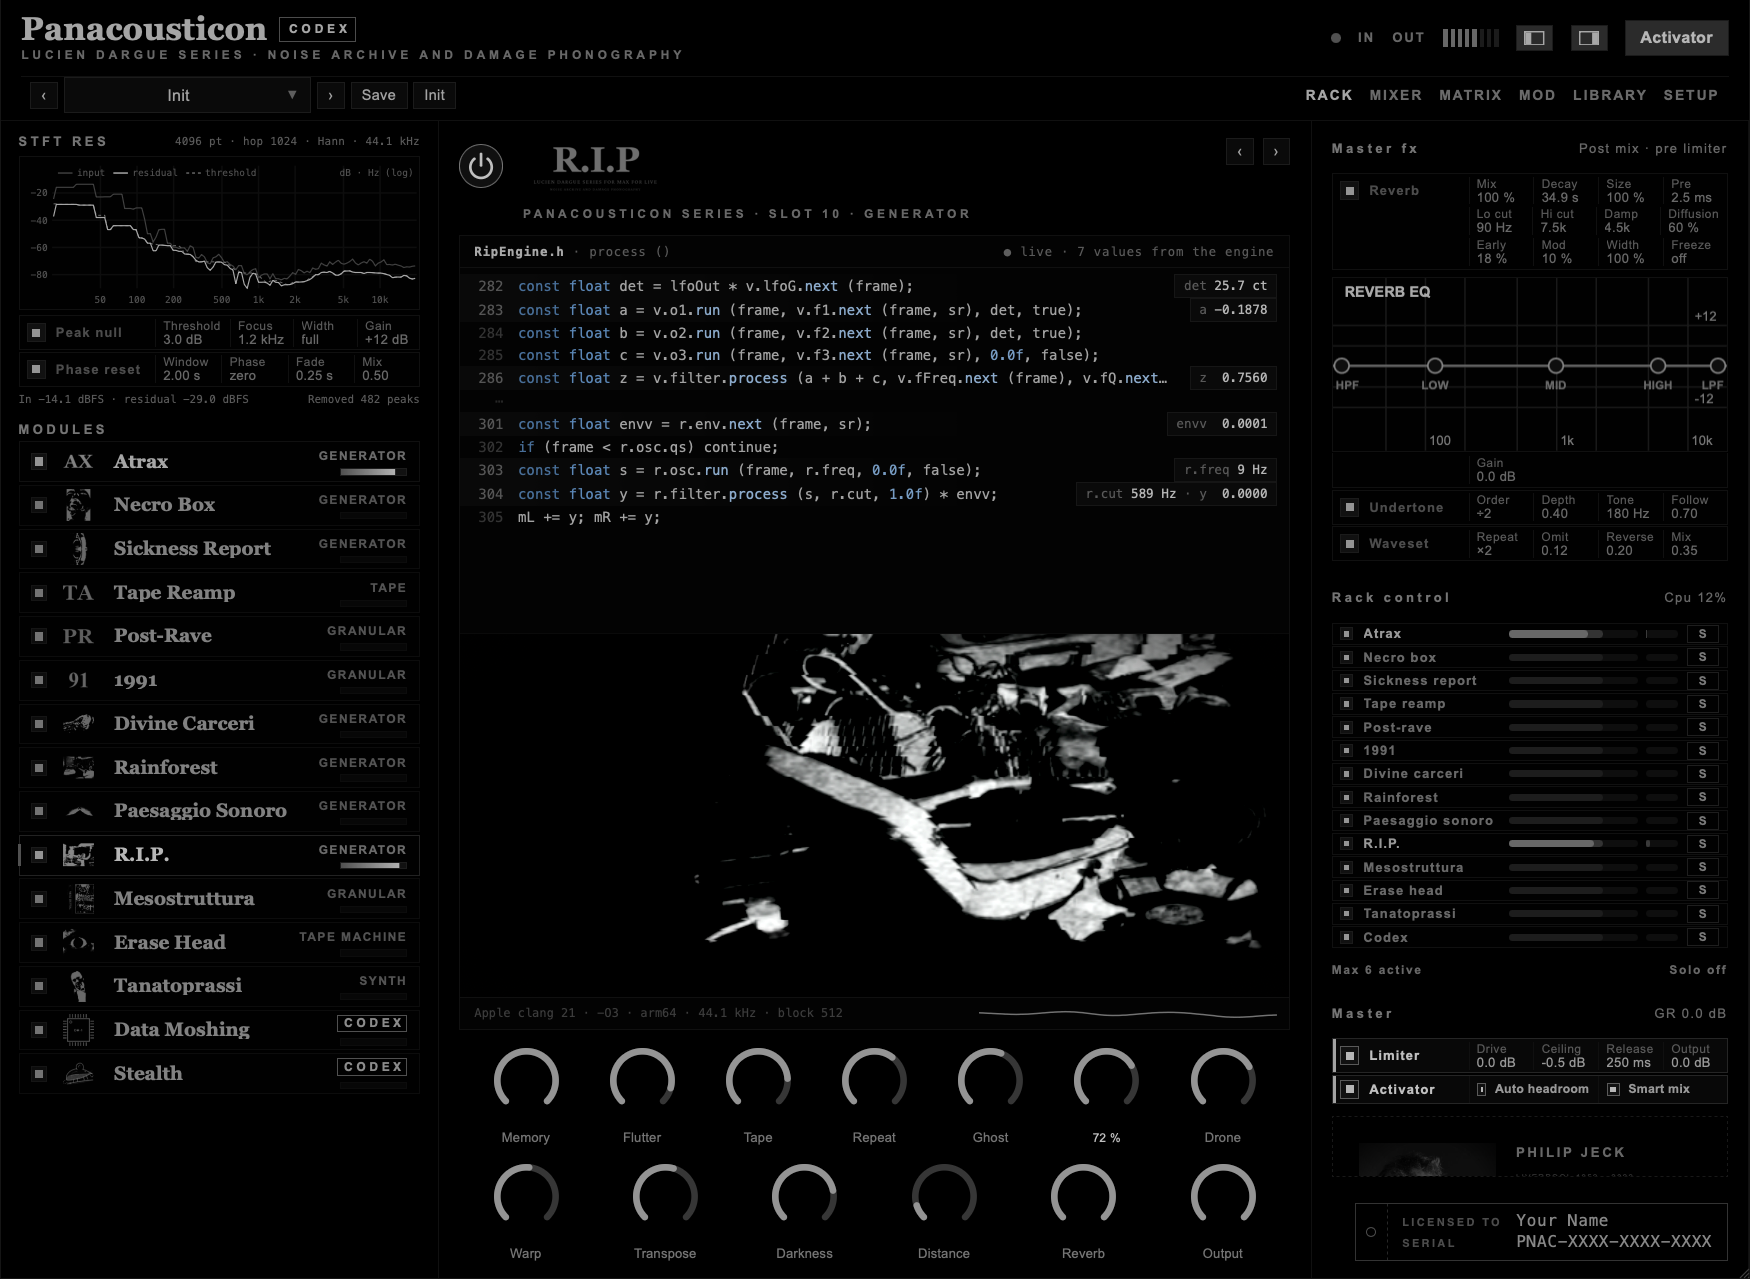
R.I.P. is for Philip Jeck. Under the code runs a film from one of his live sets, and the dials move it: Transpose sets its speed, Flutter makes it waver, Repeat loops a short piece of it, Ghost and Decay add echoes, Memory jumps to another moment, Warp, Darkness, Distance and Tape change the picture. Every note the module plays lights the film for an instant.
| Control | What it does |
|---|---|
| Memory | How intact the melody stays each time it returns. Lower values break it up more on every repetition. |
| Flutter · Tape | Pitch flutter and tape wear. |
| Repeat | Echoes of the melody. |
| Ghost | A faint second copy of the melody. |
| Decay | How long the notes ring. |
| Drone | Level of the drone underneath. |
| Warp | Bends the playback. |
| Transpose | Moves the register down, out of the way of other material. |
| Darkness · Distance | Tone, and how far away it sounds. |
| Reverb · Output | Reverb amount and output level. |
Try this. Lower Memory gradually over a long stretch, instead of setting it once. Hearing the melody come apart over several minutes is most of what this module is for.
R.I.P. with its default settings.
A granular player you drive with the mouse. Click in the field: the horizontal position sets where grains are read in the file, the vertical position how strong the gesture is. Grains repeat there and fade with Decay.
This module is worth a closer look. It does more than cut audio into grains: it looks for the smallest changes of energy in the signal, the hidden transients and micro-events that an ordinary granular engine averages away, and brings them forward. On quiet or nearly static material it works like a microscope. Getting this behaviour right took months of comparison with more conventional granular tools.
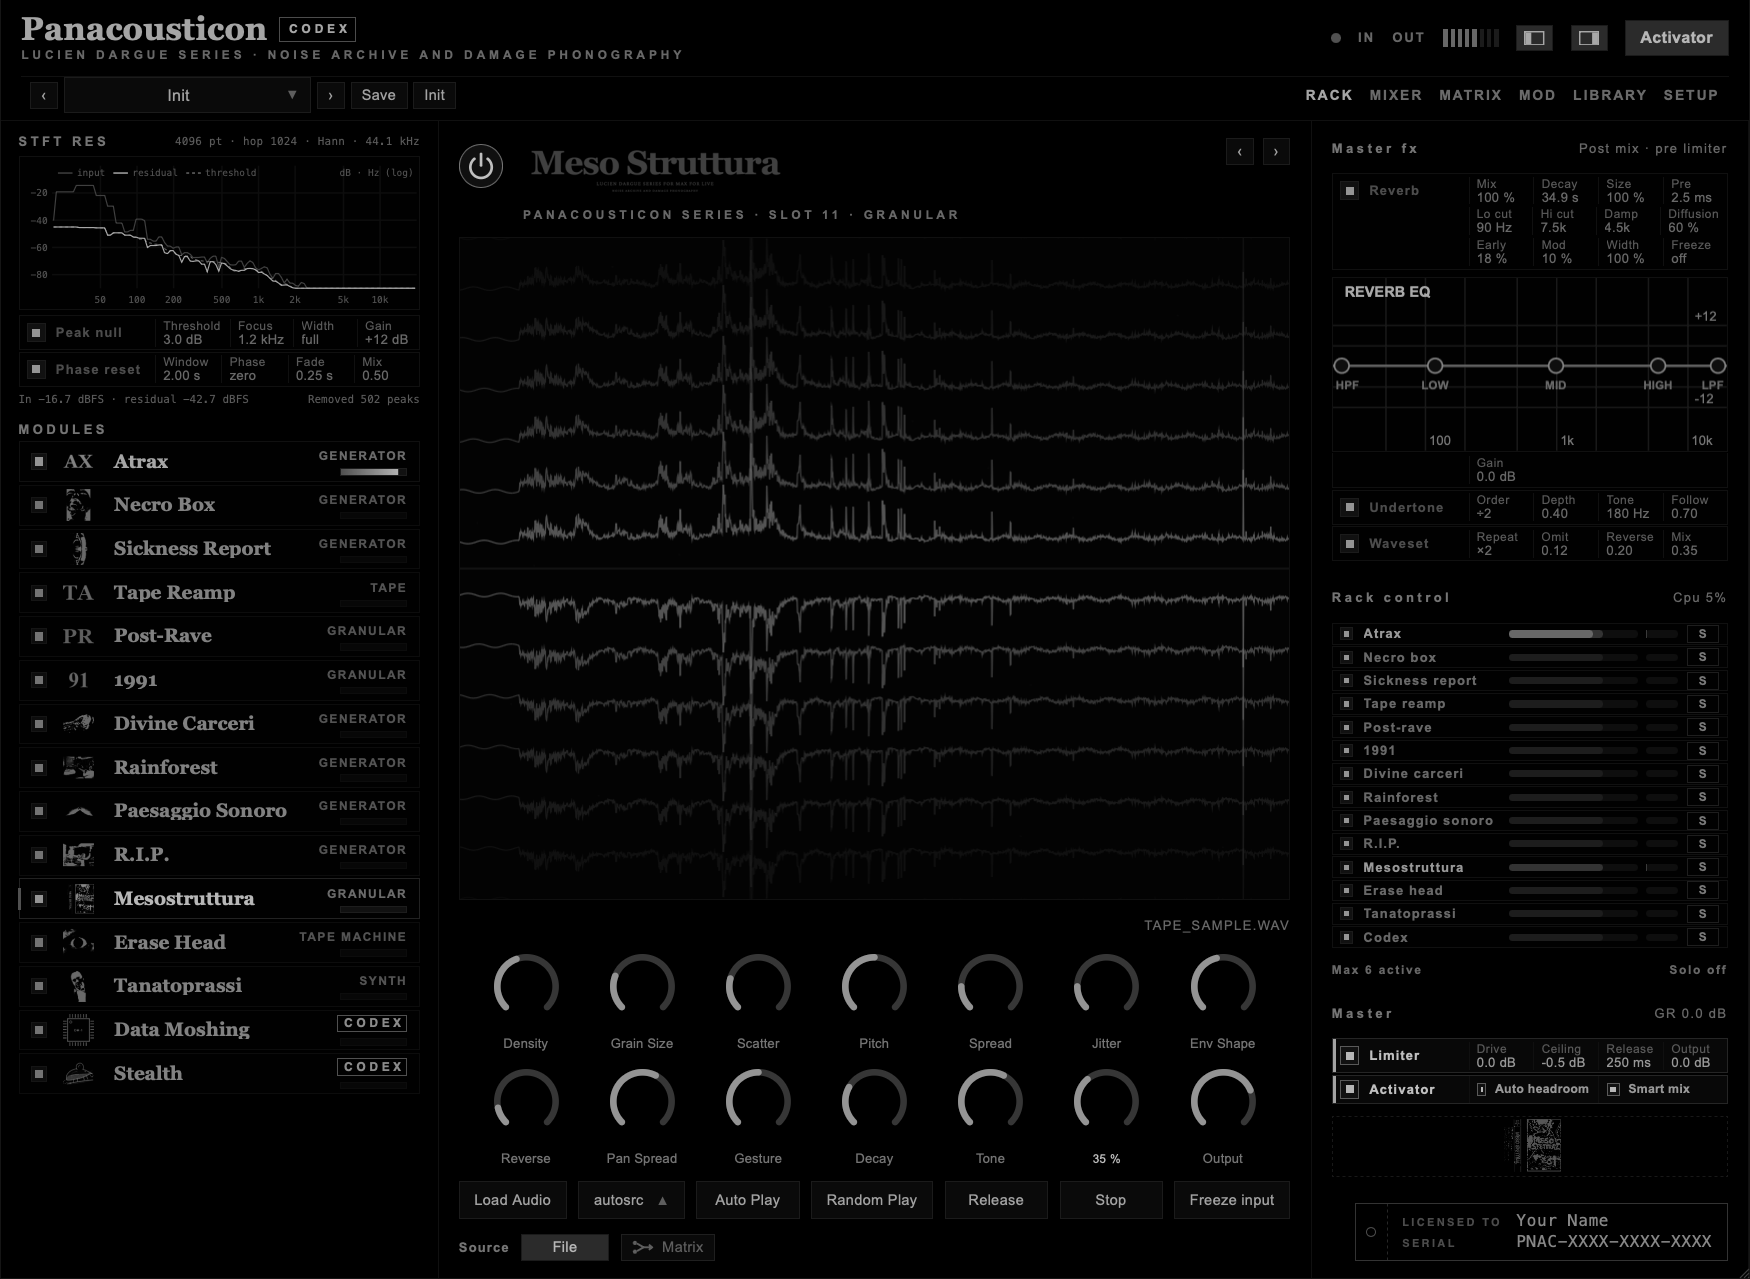
| Control | What it does |
|---|---|
| Density | Grains per second. |
| Grain Size | Length of each grain. |
| Scatter · Jitter | How far the grains stray from the position you clicked. Low values stay close to the source; high values make a cloud with no clear origin. |
| Pitch · Spread | Base pitch of the grains and how far it spreads. |
| Env Shape | Shape of each grain, from soft to sharp. |
| Reverse | Probability that a grain plays backwards. |
| Pan Spread | Stereo spread of the grains. |
| Gesture | How much the vertical position of your click changes the scatter. |
| Decay | How long the grains keep repeating after a click. |
| Tone · Reverb Send · Output | Brightness, reverb and output level. |
| Auto Play | Scans through the file on its own. |
| Random Play | Jumps to random positions. |
| Release | Lets the current gesture fade out. |
| Stop | Stops playing. |
| Freeze input | With Source on Matrix: stops recording what comes in and keeps playing the last eight seconds. |
With Source on Matrix, Mesostruttura records the incoming sound into an eight-second buffer and plays grains from it. Without a click, Auto Play or Random Play it stays silent.
Try this. Feed it something simple, then push Scatter all the way up while you listen. The point where you lose track of the source is usually the most useful setting, not the most extreme one.
Mesostruttura on the Tape Reamp source with Auto Play, default settings.
A tape machine with two decks. It has three generators of its own: a growling voice (Mouth), an unstable filtered feedback network (Feedback) and a detuned chord layer (Jester Drone). Each deck is a loop of tape. Print records onto it what the machine is playing now, and the deck plays it back, bent by Speed, Wow, Flutter and Wear. Deck A sits on the left, deck B on the right.
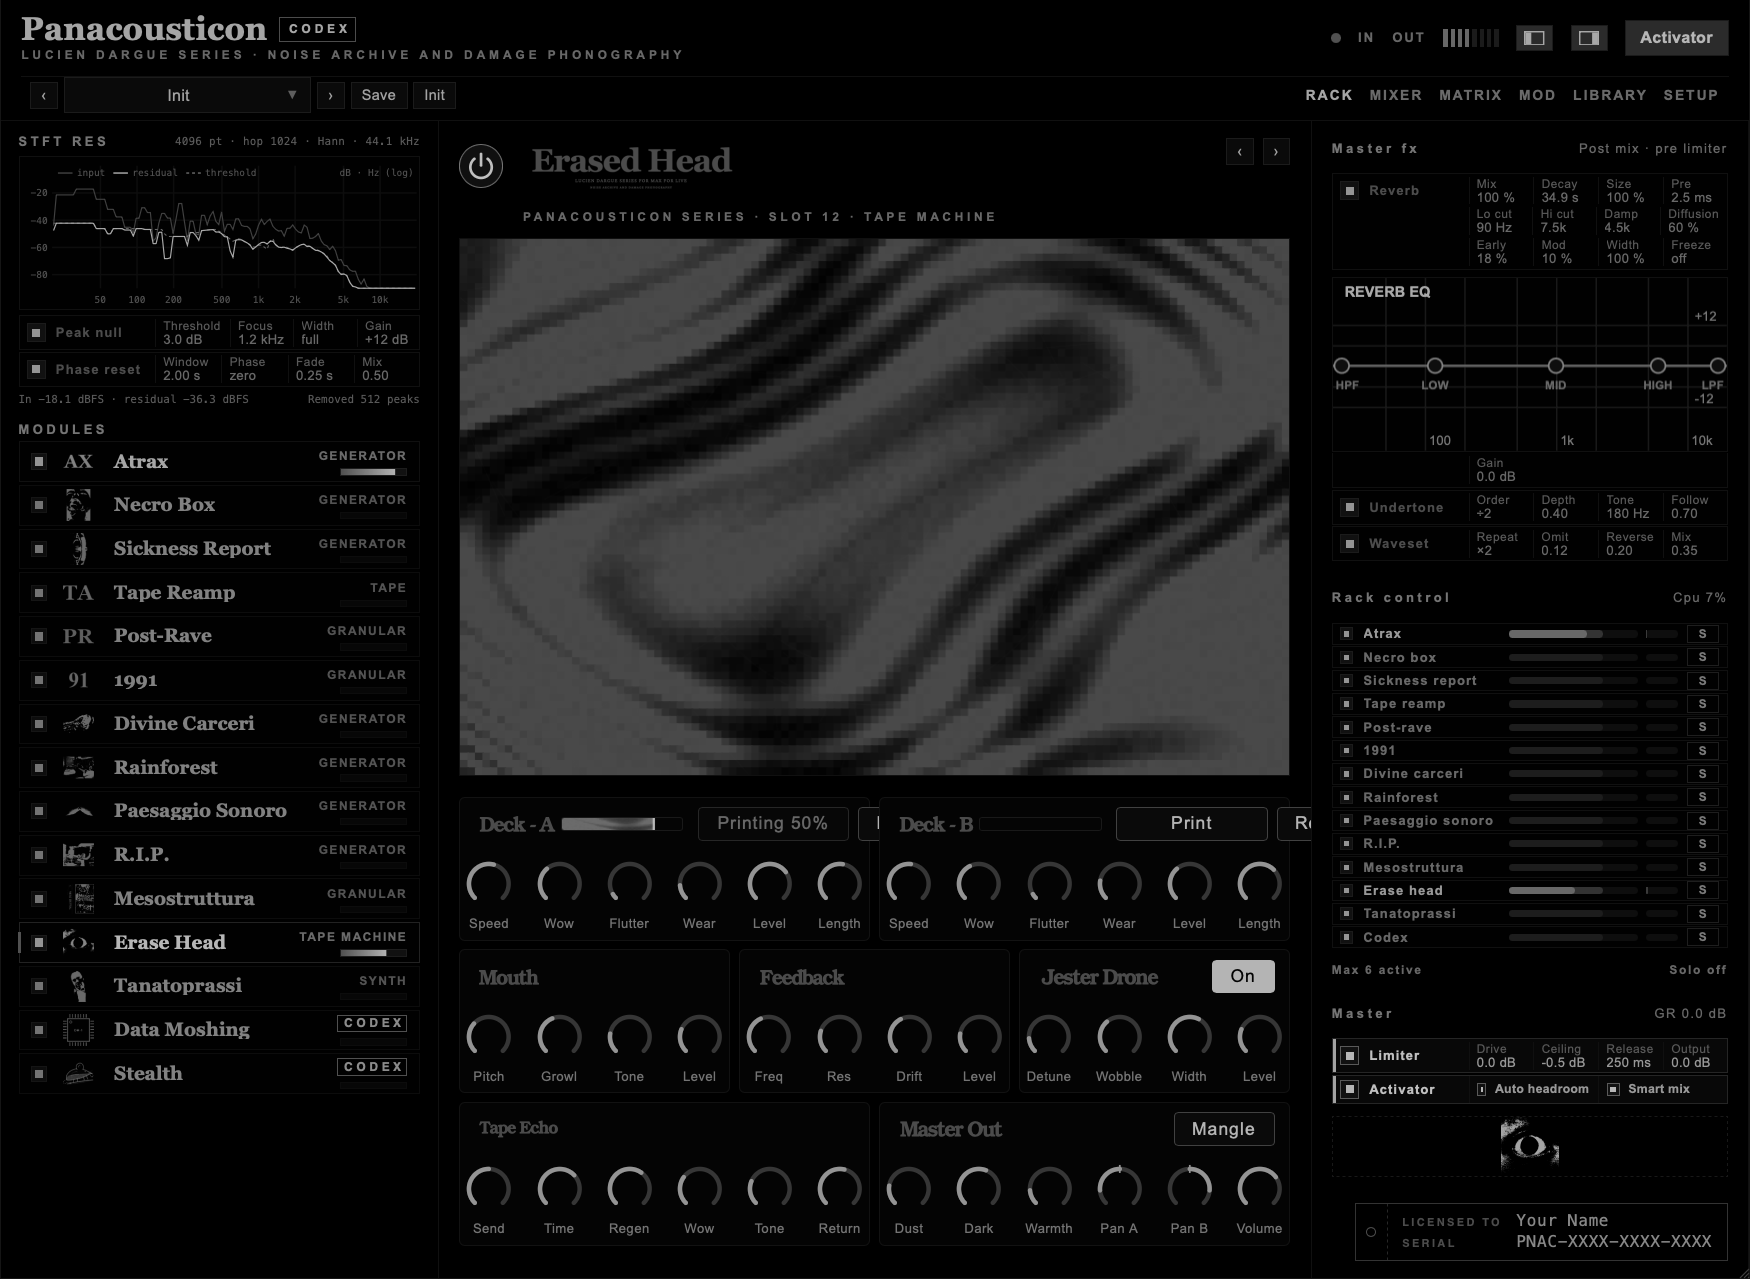
When you press Print, the head comes down with a thump and the deck stops playing its tape. For as long as Length, you hear from that deck what it is recording, clean; the button counts the percentage. Then a second thump, the motor starts again from almost still, and the deck plays the new loop from the beginning: slower, darker, wobbling. Half of the old loop stays under the new one, so printing again and again wears the tape down, one generation after another. When Erase Head starts, deck A prints by itself after a second, and deck B after deck A.
| Section | Controls |
|---|---|
| Deck A · Deck B | Speed, Wow, Flutter, Wear, Level, Length. Wear also brings dropouts, more of them as it goes up. Length changes the loop at once. A slow deck gets some of its treble back, so it does not sink into a rumble. The strip left of Print is the level of the deck. Rev stops the reel and spins it the other way. |
| Mouth | Pitch, Growl, Tone, Level: the voice generator. Above the middle, Growl breaks the voice into syllables. |
| Feedback | Freq, Res, Drift, Level: the filtered feedback network. |
| Jester Drone | Detune, Wobble, Width, Level, and On: the chord layer. Width opens its four voices across left and right. |
| Tape Echo | Send, Time, Regen, Wow, Tone, Return. |
| Master Out | Dust, Dark, Warmth, Pan A, Pan B, Volume. Dust adds hiss and crackle. Pan A and Pan B place the two decks: at L100 and R100 they are hard left and hard right, in the middle they meet. Mangle sets every control except Volume to a random value. |
Erase Head has no Source switch: it always listens to the matrix as well as to its own generators. A Print records the matrix too.
Try this. Wait for both decks to print, then turn down the Level of Mouth, Feedback and Jester Drone: what is left is tape. Turn Rev on for deck A, slow deck B down, and print deck B again. Every Print is one more generation.
Erase Head with its default settings, after a Print on each deck.
The most complete voice in the plugin. Two oscillators with sub and noise, ring modulation, two LFOs, a resonant filter with envelope and formant, then drive, bitcrush, tape delay, reverb and a three-band EQ. It is monophonic and the last note has priority. Play it from MIDI, from the keys on screen, from your computer keyboard, or with its eight-step sequencer.
The reference is the cold, clinical electronics of Close To A Corpse by Atrax Morgue, originally on Slaughter Productions. It is not an emulation: it is the territory the drive, bitcrush and tape-delay chain was built for. One of the presets, Corpse-Synthesizer, takes its name from a track on that record.
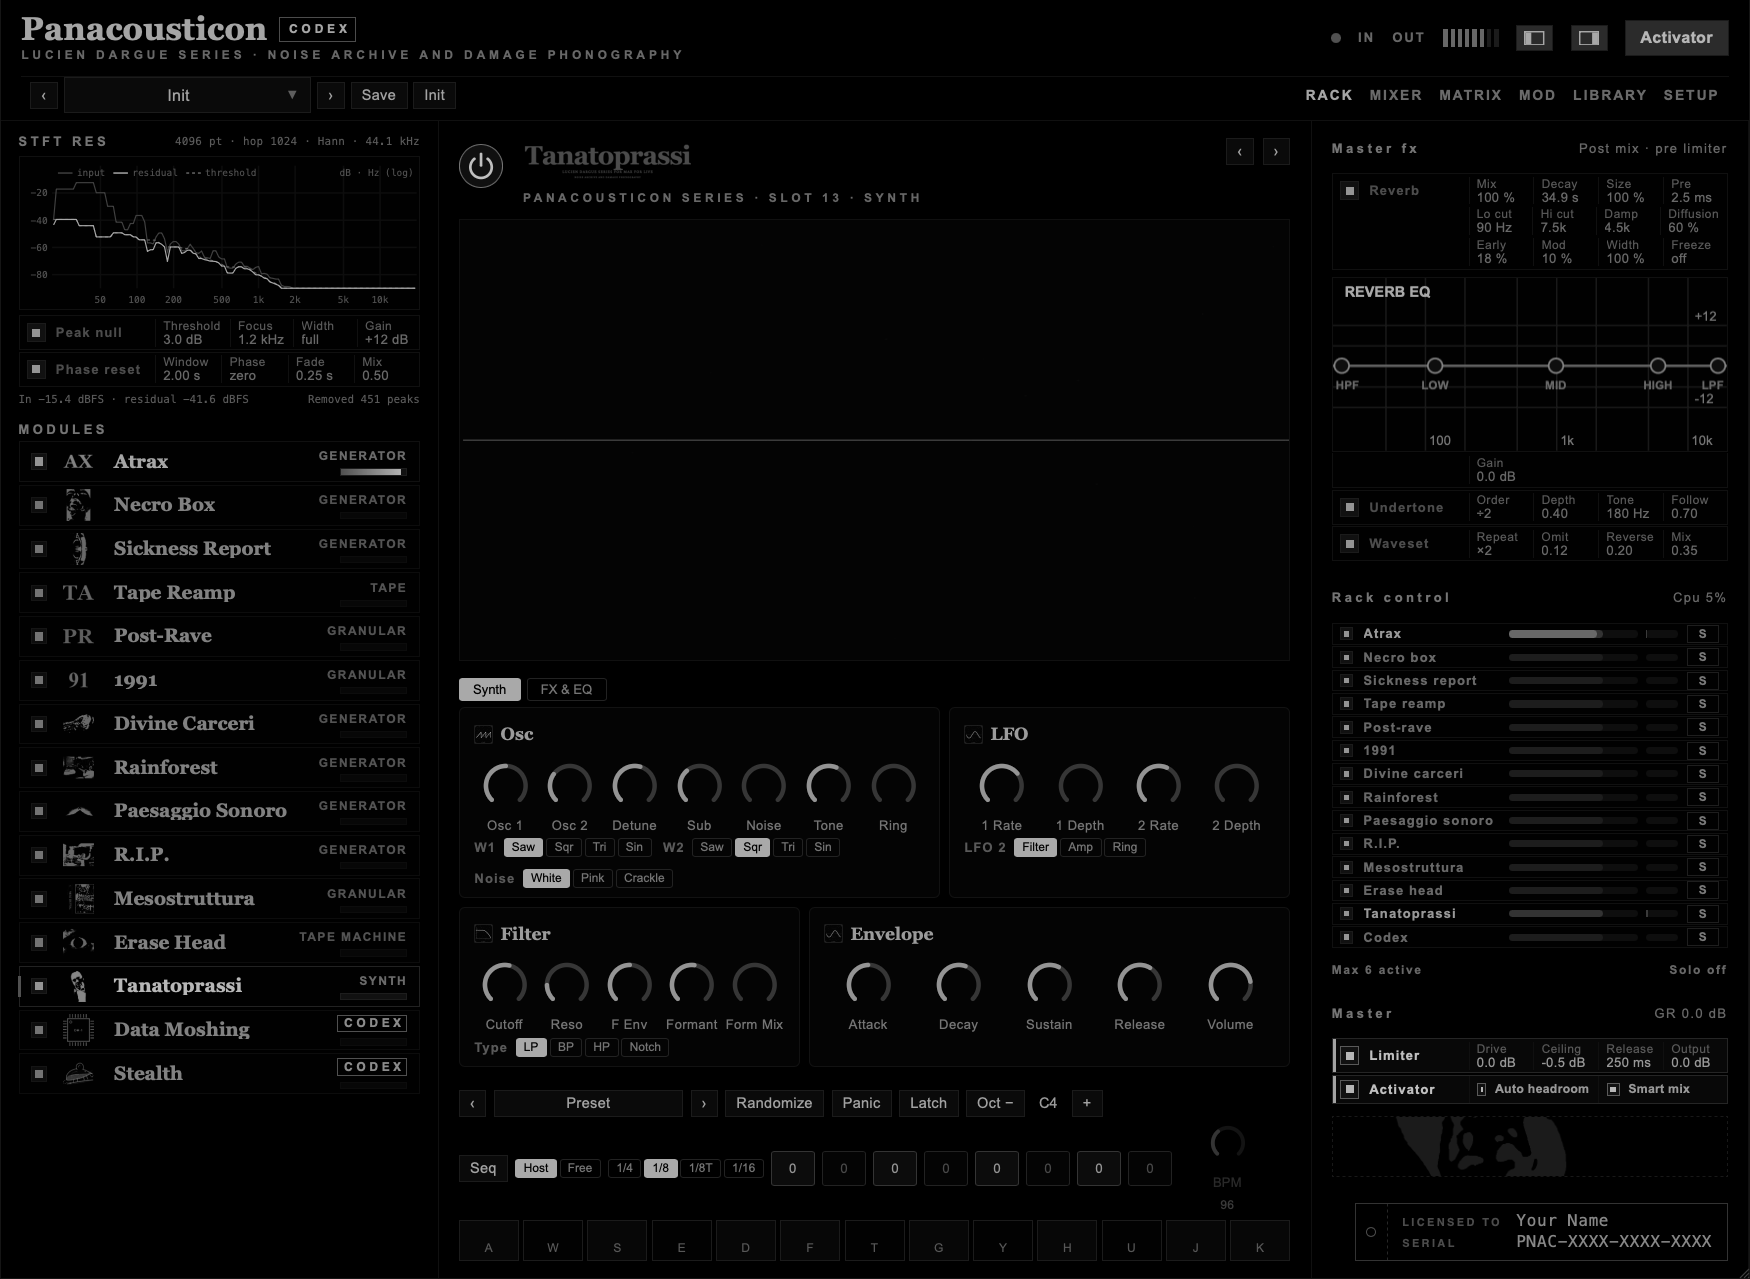
The controls are on two pages, Synth and FX & EQ.
| Section | Controls |
|---|---|
| Osc | Osc 1, Osc 2 (levels), Detune, Sub, Noise, Tone (of the noise), Ring. W1 and W2 choose the waveforms: Saw, Sqr, Tri, Sin. Noise chooses White, Pink or Crackle. |
| LFO | 1 Rate, 1 Depth, 2 Rate, 2 Depth. LFO 2 goes to Filter, Amp or Ring. |
| Filter | Cutoff, Reso, F Env, Formant, Form Mix. Type: LP, BP, HP, Notch. |
| Envelope | Attack, Decay, Sustain, Release, Volume. |
| FX | Drive, Crush, Bits, Rate, Delay, Feedback, Delay Wet, Wow, Reverb. |
| EQ | HPF, Low dB, Low Hz, Mid dB, Mid Hz, Mid Q, High dB, High Hz. |
| Control | What it does |
|---|---|
| ‹ Preset › | Sixteen sound presets for this module. They change only Tanatoprassi. |
| Randomize | Random values on the sound controls. |
| Panic | Silence in 30 ms, whatever the release. |
| Latch | Holds the note after you let go of the key. |
| Oct − · + | Moves the keyboard by octaves. The name shows the lowest key. |
| Seq | Starts the eight-step sequencer. |
| Host · Free | Host follows the tempo and transport of your DAW. Free uses the BPM dial. |
| 1/4 · 1/8 · 1/8T · 1/16 | Step length. |
| Steps | Click a step to switch it on or off. Drag it up or down to change its pitch, −12 to +12 semitones. Double-click sets it to 0. |
| Keys | Thirteen keys. On the computer keyboard: A W S E D F T G Y H U J K, while Tanatoprassi is open. |
Try this. Start from a preset rather than from the default sound, and change one section at a time. With this many controls, the fastest way in is to change something that already works.
Tanatoprassi played by its own sequencer, default sound.
The fourteenth module, new in this version. The sound is written into the RAM of a digital board and read back by C++ code that you can change while it plays. It has its own chapter: see chapter 10, where you also find how I use it as a thin layer under the mix, the snippets and five recipes.
The factory preset Data Moshing/Bit Rot Echo: Atrax sent into the board through the matrix, with the feedback line changed to a saturated read of the RAM.
The matrix connects the modules. Rows are sources: the fourteen modules and the plugin input. Columns are destinations: the six modules that take an input, and Out. The number in a cell is the send gain, from 0 to 1. The bar under it shows the level that is actually passing.
This is the part of Codex I care about most. Send a module into another, send the second back into the first, and you have a feedback loop: the sound starts to feed on itself and changes in ways no single module can. In most plugins that is an accident to avoid. Here it is something you build on purpose, and the matrix measures every loop so you can keep it under control.
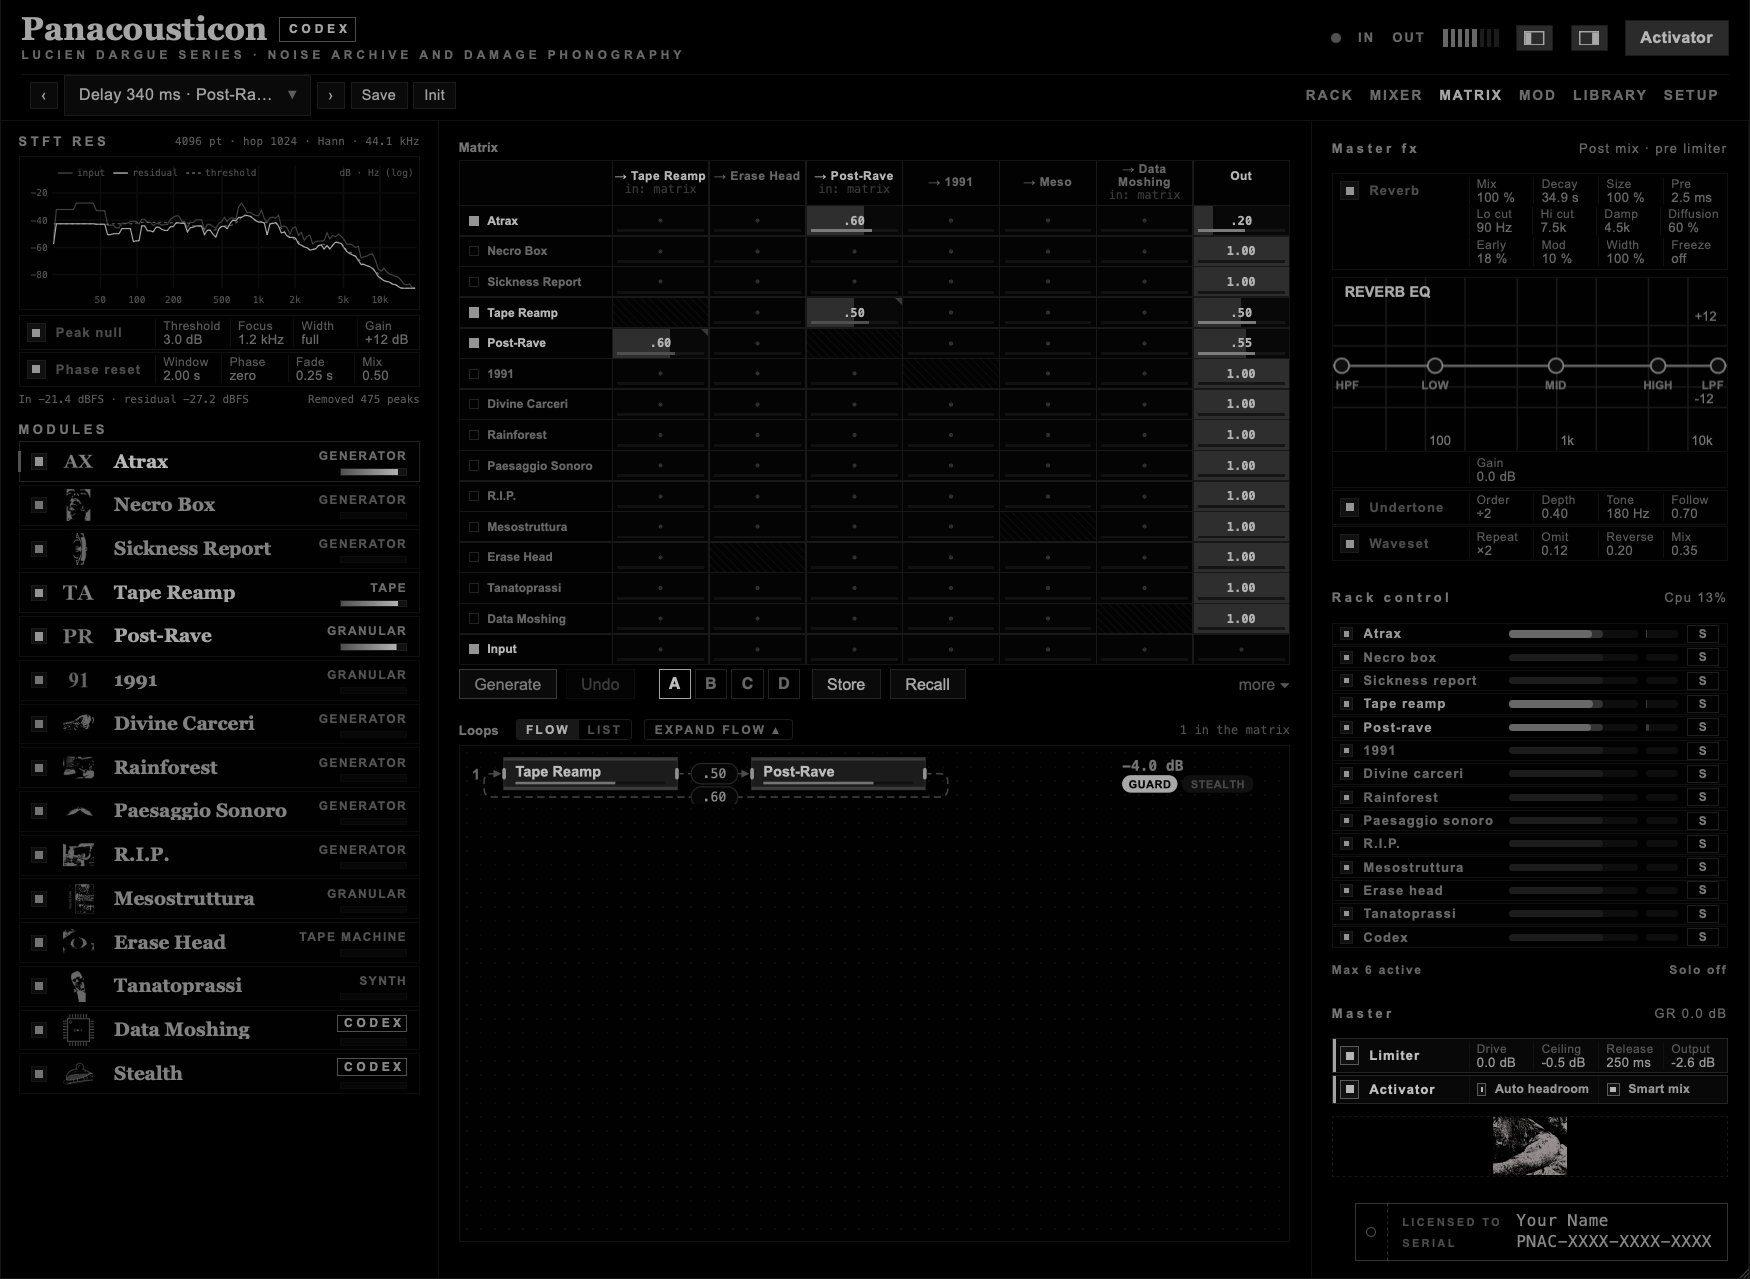
The tab has two parts. At the top, the grid, with one row of quick controls under it: Generate, Undo, the scenes A to D, Store and Recall. more ▾ opens the settings of Random, the scene morph and the selected cell. Below, the loops: Loops for the feedback loops between modules and Stealth for the loops inside the Stealth sheet. A part with no loops disappears and leaves its space to the other. EXPAND FLOW makes the grid tighter and the loops bigger; MATRIX gives the space back.
| Gesture | Result |
|---|---|
| Drag a cell | Sets the send gain. |
| Double-click a cell | Toggles between 0 and 1. |
| Click a cell | Selects it and shows it under Cell. |
| Click a row or column name | Switches that module on or off. |
| in: matrix | Under a destination that listens to the matrix. A destination without it plays its own file. Switch it with Source, under the module. |
Active cells are red. Cells that are part of a feedback loop have a darker red bar. Drag a cell left and right: the fill follows the gain, with fine steps under Shift. A module name in orange is on, but paused by the active-module limit (chapter 14): it is silent until you switch another module off.
The row Input is the plugin's sidechain input. Route a track of your DAW into it and Codex processes it like any other source.
Generate builds a random patch from the modules that are on. Switch on the modules you want first, then generate. It always builds the loops first, then adds the other sends.
| Control | What it does |
|---|---|
| Density | Probability of a send between any two modules, besides the loops. |
| Loops | How many feedback loops to build, 0 to 4. Each loop has two or three modules. |
| Gain min · Gain max | Range of the random send gains. |
| Keep out | On: every module also keeps a send to Out, so nothing disappears from the mix. |
| Generate | Makes a new patch. It sets Source to Matrix on the destinations it uses. |
| Undo | Goes back to the patch before the last Generate. |
The header shows the seed of the last patch. Modules paused by the active-module limit are left out, and the header says how many.
Four scenes, A to D, each holding every send gain. Click a letter to select it, Store to save the current grid there, Recall to move to it. The move is not instant: every gain travels to its new value over Time (0 to 60 s), along a Curve that is linear or smooth. Morph shows the move in progress. A slow morph between two scenes is a good way to make a patch evolve on its own.
Each cell can do more than set a level. Select it to see:
| Control | What it does |
|---|---|
| Gain | The same as the number in the cell. |
| Delay | A delay on that send, from 0 to 2000 ms. In a loop, this sets the time of each turn. |
| Polarity | + or −. Inverting one send in a loop changes which frequencies grow and which cancel. |
| Tone | A low-pass filter on the send, from 40 Hz to off. Double-click for off. In a loop it darkens the sound on every turn. |
| Level | The level passing through the cell now. |
The plugin finds every loop in the patch and lists it with its path, for example Tape Reamp → Post-Rave → Tape Reamp. Only modules with Source on Matrix count; Erase Head always does.
| Column | What it shows |
|---|---|
| loop gain | How much the sound grows or shrinks on each turn. Above 0 dB a loop runs away. |
| guard | On by default. Keeps the loop gain under −1 dB by turning the sends down when needed. When it is working it shows how much it takes off. |
| stealth | Puts a very quiet noise, −72 dBFS, into every module of the loop. A loop then rings on its own even when nothing is playing into it. |
Click guard or stealth to switch them. With Guard off you are on your own: a loop above 0 dB grows until the limiter catches it. That can be exactly what you want, briefly.
The loops can be read in two ways. LIST is a table with the columns above. FLOW draws every loop as a chain of boxes, with the send gain on each cord and the loop gain on the right; GUARD and STEALTH can be switched from there too. EXPAND FLOW ▴ gives the loops the space of the grid, MATRIX ▾ brings the grid back.
Under the loops between modules, with the CODEX badge, Stealth lists the loops inside the Stealth sheet: one row per loop, with its objects and arguments, the gain per turn in dB, a bar with the level and the state of the loop (ringing, decaying, held, cycling or waiting). Click a row to open the sheet. The states are explained in the Stealth manual: The loops in the MATRIX.
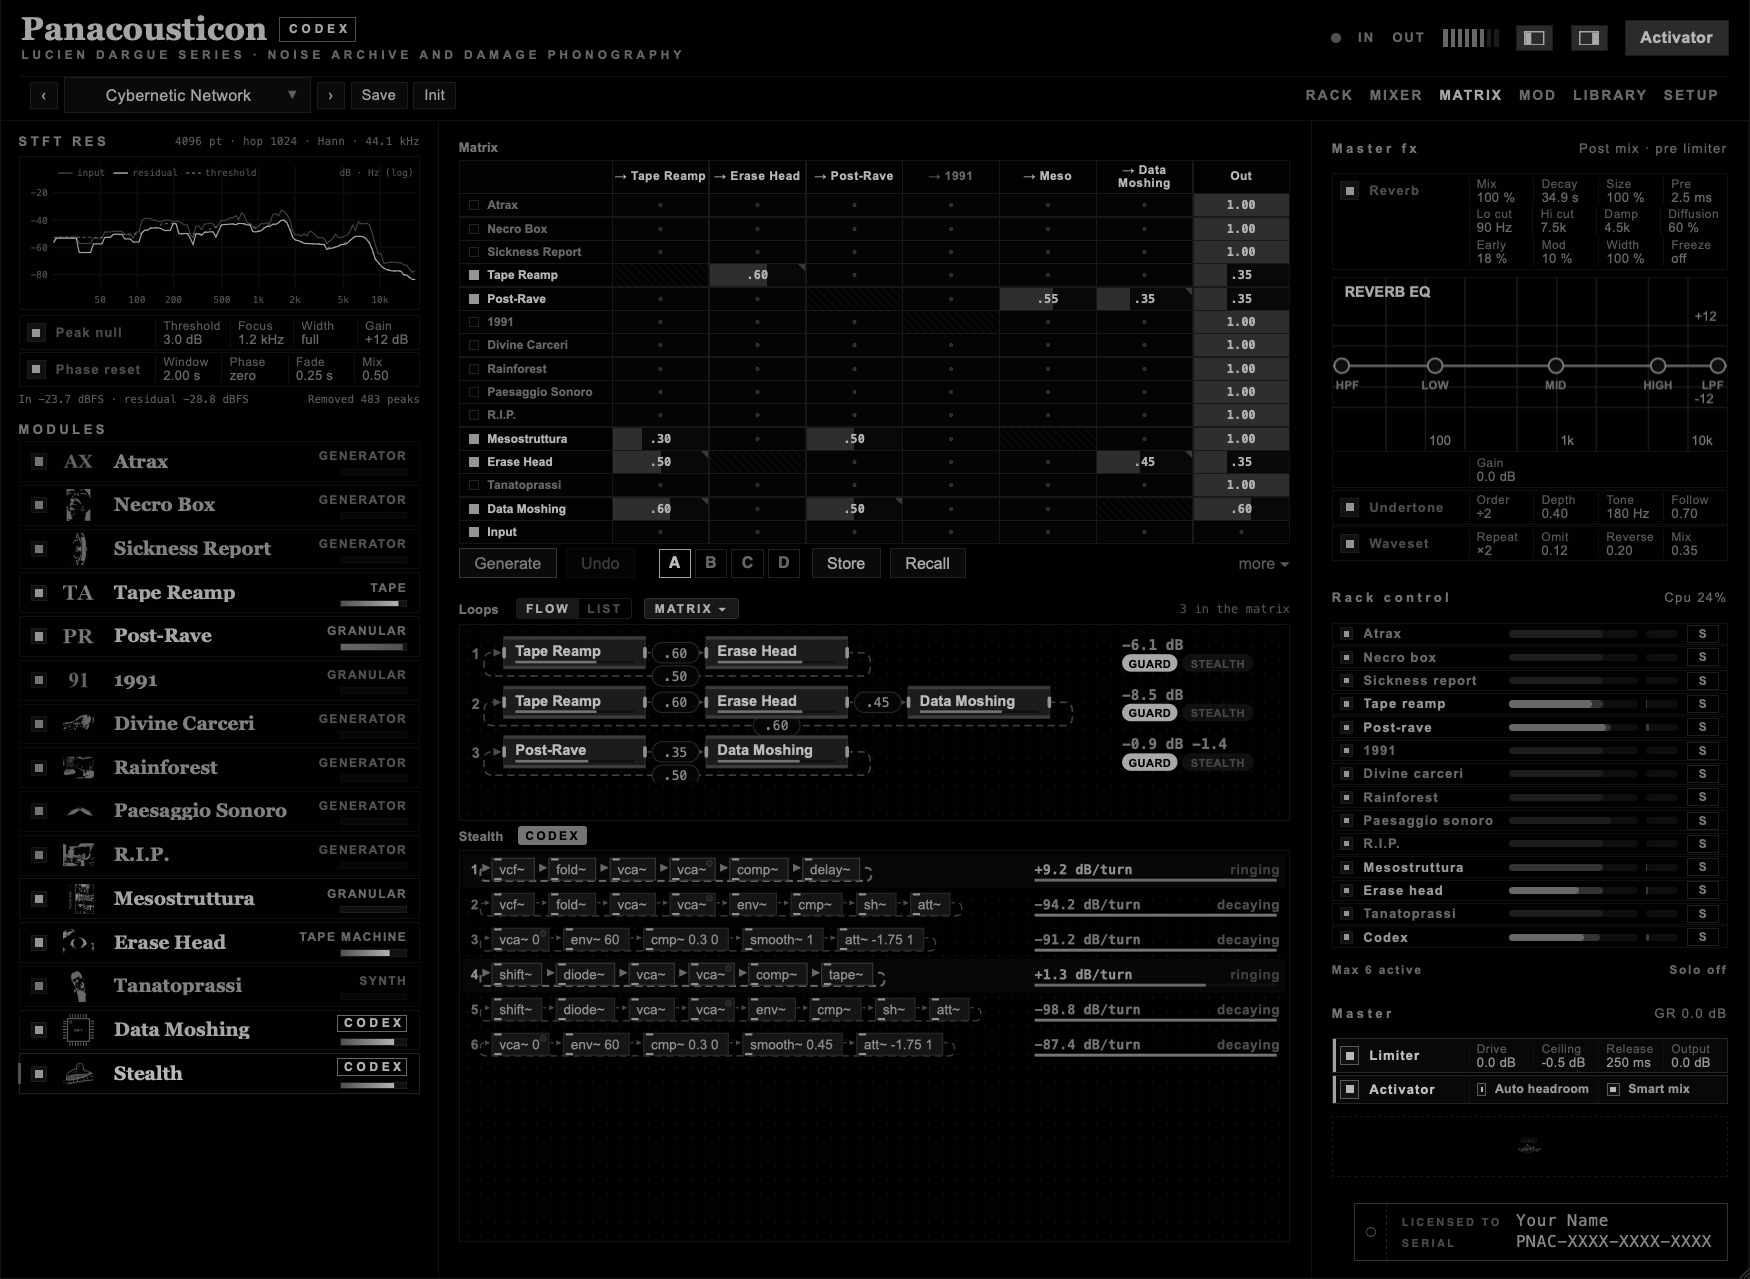
Feedback is the subject of Codex, so the loops of the sheet are shown here, next to the loops between modules. The numbers are not drawn for effect: they are read from the running engine many times a second. Watching them while you play is the quickest way to learn what a patch does.
The factory preset Delay 340 ms · Post-Rave ⇄ Tape Reamp · Atrax: Atrax feeds a loop between Post-Rave and Tape Reamp. The send from Tape Reamp back to Post-Rave has a delay of 340 ms and inverted polarity.
The factory preset Stealth · Meso ⇄ Data Moshing. No generator is on. The example starts two seconds after loading: the loop grows out of the stealth noise alone and reaches its level after about fifteen seconds. Mesostruttura holds one position, set by the preset. About Guard and Stealth: Feedback loops.
The MIXER tab has a strip for every module that is on, each with a meter under its name, so you see at once what is playing. The modules that are off wait under + N modules off · show; click it to see them too. Click a strip to select it: the EQ curve of that module appears at the top.
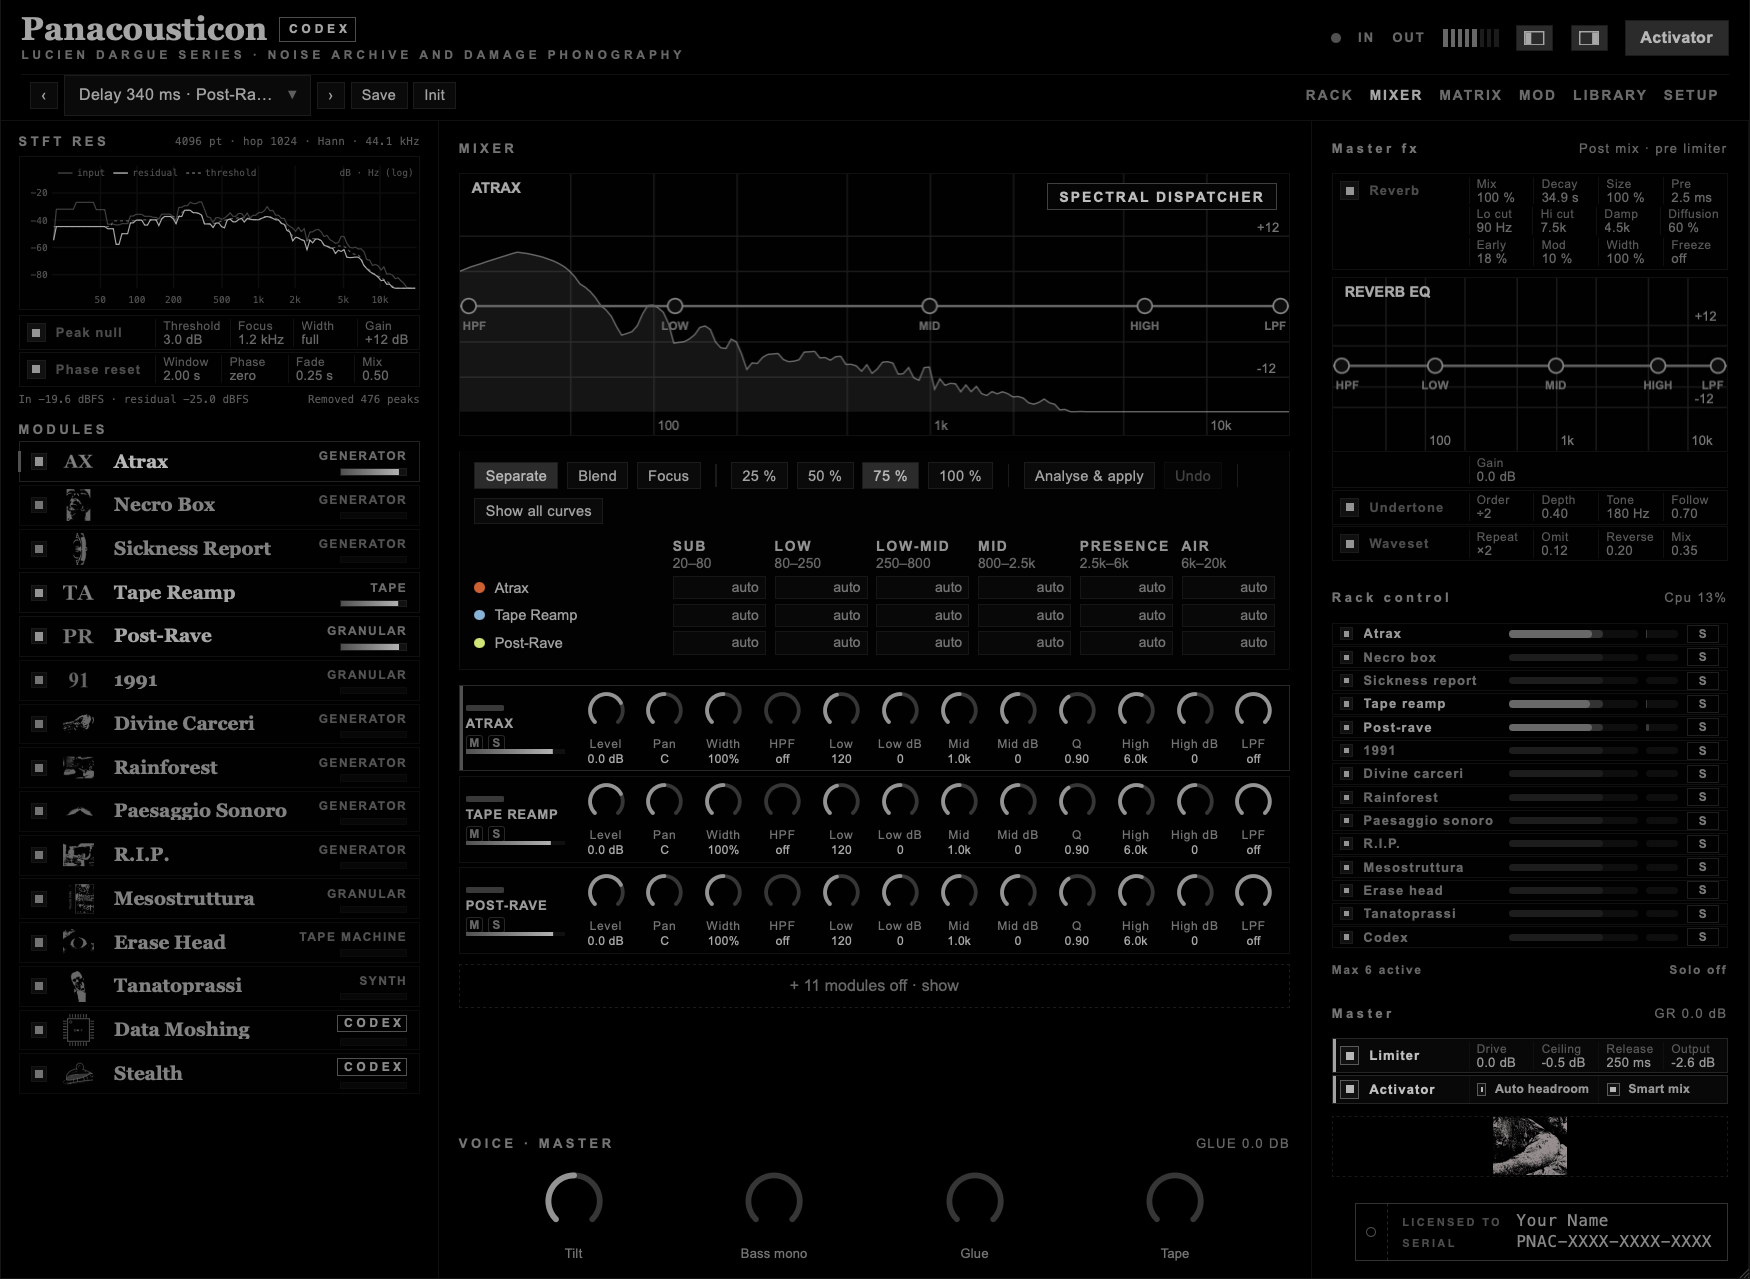
| Control | What it does |
|---|---|
| Square | Switches the module on or off. |
| M · S | Mute and solo. |
| Level | Level of the module in the mix. |
| Pan · Width | Position and width of the stereo image. |
| HPF · LPF | High-pass and low-pass filters. At the ends of their range they are off. |
| Low · Low dB | Low shelf: frequency and gain. |
| Mid · Mid dB · Q | A bell: frequency, gain and width. |
| High · High dB | High shelf: frequency and gain. |
On the EQ curve you can drag the dots directly. The wheel over the Mid dot changes Q. Double-click resets.
The strips are not only for balance. A module mixed far below the others, with its EQ carved around the source, works as a layer rather than as a sound. Data Moshing at about −10 dB under two generators is the clearest case: see A layer under the mix and Example 10.1.
When the strips change because of a modulation, the curve and the dots on the graph move with them.
Under Data Moshing there is a second strip, Stealth. Data Moshing is now the sound of the board: what goes straight from inlet~ to the dacs. Stealth is everything that comes out of the objects of the patch. Each has its own level, pan, width and EQ, so I can turn the patch up and leave the board where it is, or carve the two apart.
When I load a preset made before this strip existed, Stealth starts with the same settings as Data Moshing, and the preset sounds exactly as before. The two part as soon as I move one of them. If I open the MIXER while I am in Stealth, the Stealth strip is the one selected. In the Spectral Dispatcher Stealth is one more member of the group: it is listened to on its own and gets its own share of the bands, while Data Moshing is listened to without it.
Every module already comes balanced: its level is calibrated against the others, it has its own limiter, and Smart mix keeps making room between the modules in six bands while they play. With a few modules that is enough. With many modules on, or in complex patches through the matrix, the same frequencies can still pile up in more than one strip; that is where the dispatcher helps. The SPECTRAL DISPATCHER tab, at the top right of the EQ graph, opens a panel that listens to the modules and shares the spectrum between them. It writes its result into the normal EQ knobs of each strip, so you can always touch them by hand afterwards, and it saves with the preset like any other setting.
| Control | What it does |
|---|---|
| Separate | Every module keeps the bands where it is strongest; the others make room there. For clarity, when the layers blur into each other. |
| Blend | Brings the tonal balance of every module closer to that of the group, so they fuse into one texture. |
| Focus | The module selected in the mixer stays as it is; the others step back where it is strong. For a lead with a bed behind it. |
| 25 % to 100 % | How deep the changes go. |
| Analyse & apply | Listens to each module that is on for about a second and a half, measures its spectrum in the six bands, then sets the curves. A bar shows the progress. It works once, when you press it: nothing changes while you play, unlike Smart mix. Stealth has its own strip and is analysed like any other module. |
| Undo | Puts the curves back as they were before the last apply. |
| Show all curves | Draws the EQ of the other modules behind the selected one, each in its own colour, with a legend at the top of the graph. Hover a name or a band to light it up; click a name to hide it. |
Under the buttons there is the dispatcher itself: a row for every module that is on and six bands, Sub, Low, Low-mid, Mid, Presence and Air. After an analysis each cell shows how much of that band the module holds. Drag a cell to decide it yourself, for example give the Low band to the module with the bass you like; double-click puts it back on auto. Click a module name to hide its curve.
The changes are meant to be subtle. The dispatcher only acts where two or more modules really share a band, and it leaves alone the bands where a module is almost silent. For a stronger result use 100 %, set the cells by hand, or try Focus.
Four controls on the sum of all modules, before STFT Res and the master.
| Control | What it does |
|---|---|
| Tilt | Tilts the spectrum around 650 Hz, up to 6 dB. Positive is brighter, negative darker. |
| Bass mono | Below this frequency the sound is mono. Off at the bottom of the range. |
| Glue | A gentle bus compressor. The header shows how much it takes off. |
| Tape | Soft saturation. |
The MOD tab moves the parameters of the modules and of the mixer over time. There are 24 sources in seven families (LFO, MSEG, FOLLOW, RANDOM, CHAOS, XY and the eight macros) and 32 slots. A slot connects one source to one parameter.
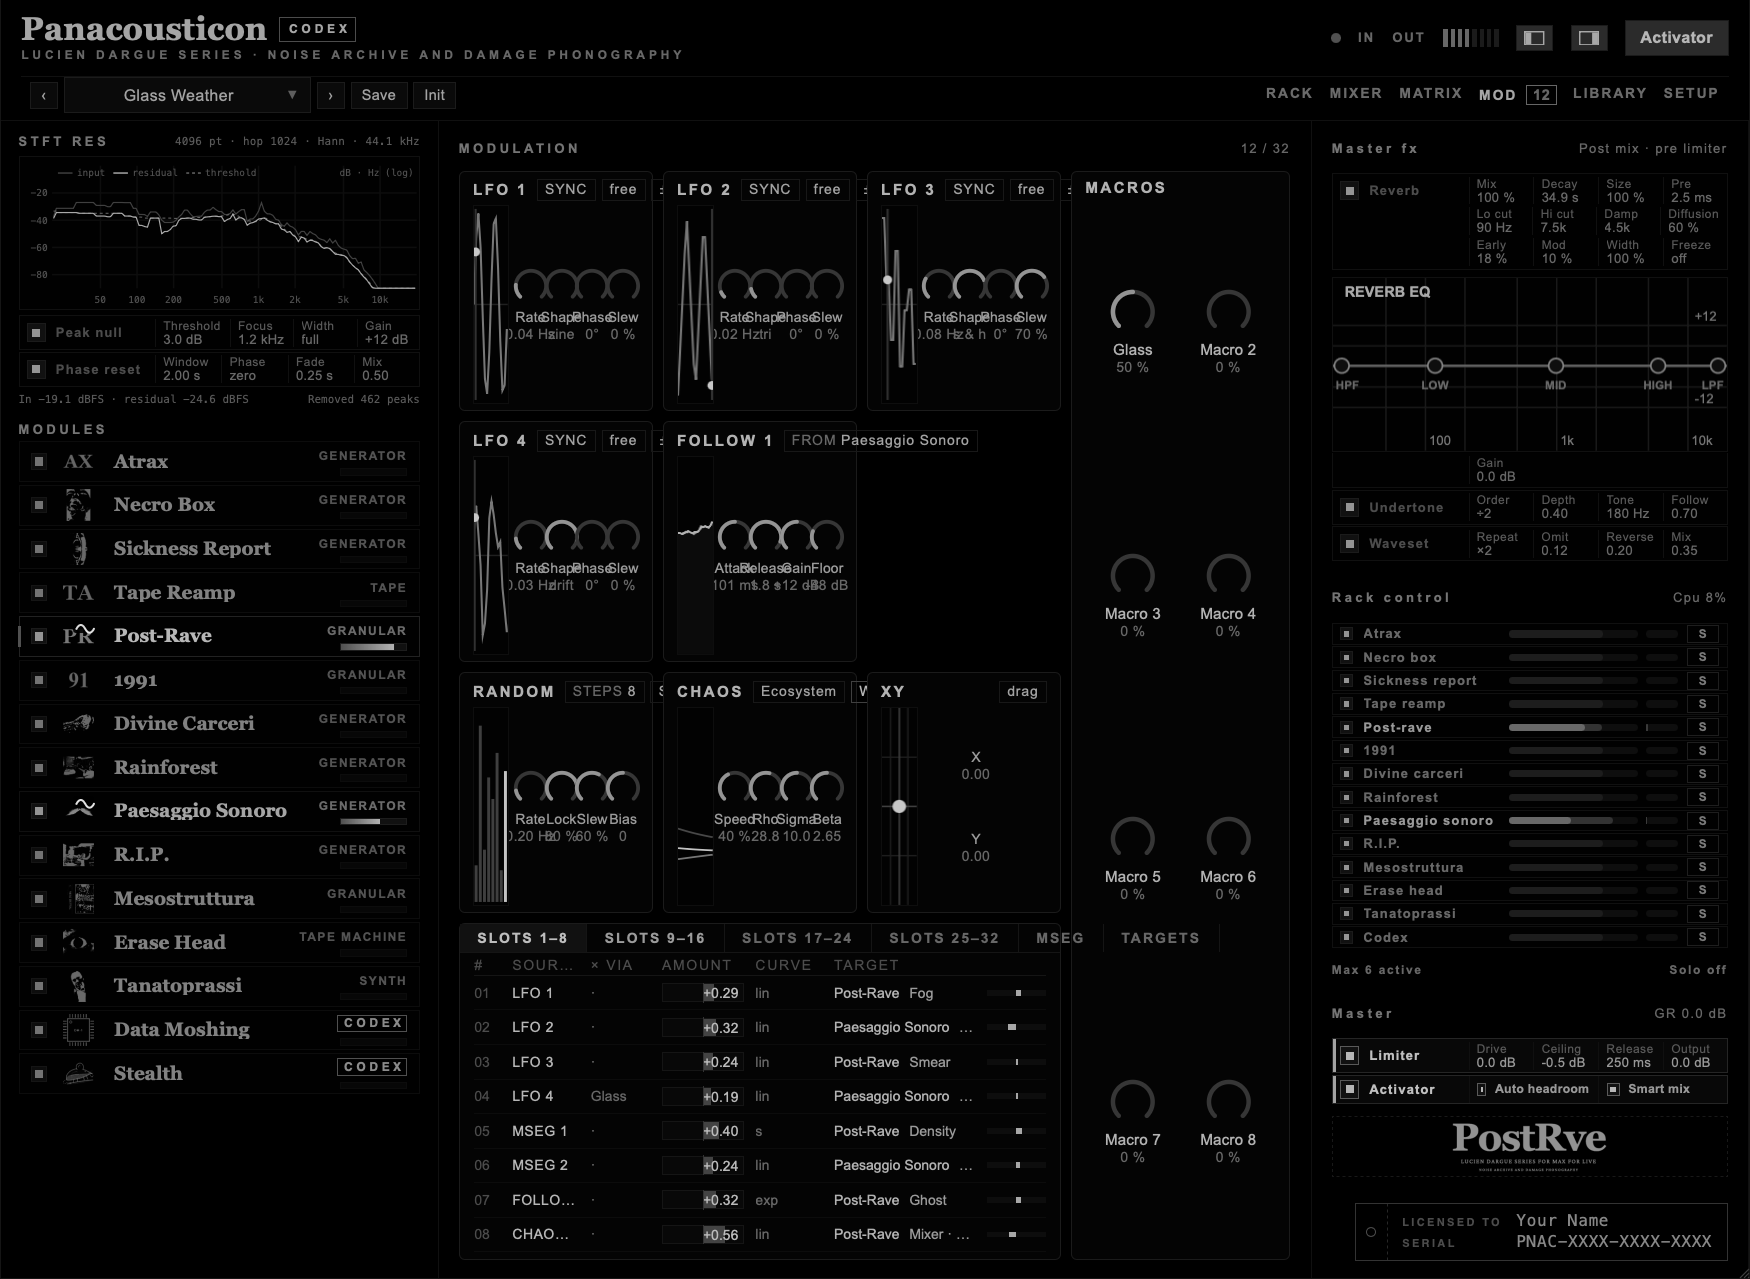
| Source | What it does |
|---|---|
| LFO 1–4 | Rate, Shape, Phase and Slew. Shape slides through nine waveforms: sine, tri, saw, ramp, square, pulse, s & h, drift and exp. SYNC locks Rate to note values; host follows the transport; ± or + makes it bipolar or one-sided. |
| MSEG 1–4 | Envelopes you draw (see below). |
| FOLLOW 1–2 | Follows the level of a module or of the Input. Attack, Release, Gain and Floor. |
| RANDOM | A row of random steps. Lock decides how often a step is kept: at 100 % the row repeats. Rate or SYNC, Slew and Bias. |
| CHAOS | A Lorenz attractor or an ecosystem of four competing species, with three outputs, X, Y and Z. Speed, Rho, Sigma and Beta shape the motion. WANDER sends 2, 4 or 6 wanderers that take hold of random parameters of the modules that are on, move them for a few seconds and let go. |
| XY | A pad with two outputs. Drag the point, or let it move by itself with orbit or chaos. |
| MACROS | Eight knobs your host can automate. Click a name to rename it. |
The slots are at the bottom of the page, eight per tab. In each row: SOURCE, × VIA, AMOUNT, CURVE and TARGET. Click SOURCE to choose the source and TARGET to choose the module and the parameter. Drag AMOUNT left or right: to the left the modulation is reversed, Shift drags finely, double-click sets it to zero. × VIA scales the slot with a second source, for example a macro. CURVE changes the response: lin, exp, s or step. The small bar at the end shows the slot moving.
TARGETS shows every module with the number of slots that reach it and how much it is moving now.
Choose MSEG 1 to 4 and draw. Drag the points; double-click on empty space adds a point, double-click on a point removes it. Time is the length of the whole envelope, from half a second to a minute. Smooth rounds the segments. Jitter changes the length a little on every pass.
| Control | What it does |
|---|---|
| LOOP off | The envelope runs once and stays on its last value. |
| LOOP whole | It starts again from the beginning, like a drawn LFO. |
| LOOP from N | It runs once, then repeats from point N. Shift-click a point to choose it. |
| TRIG | free runs on its own; follow 1 restarts it when FOLLOW 1 rises; host bar restarts it at every bar. |
A modulated dial shows the modulation in a brighter colour, red in the Codex theme, moving inside its arc. The ring around the dial is the range the modulation can cover. Plain dragging still moves the value, and the modulation moves around it. The picture of the module moves with the modulation too. A modulated module also shows a small wave on its icon in the left column.
| Gesture | Result |
|---|---|
| Shift + drag | On a modulated dial, changes the depth of its first slot without opening the MOD page. While you drag, the dial shows MOD and the depth, for example MOD +35 %. Below zero the modulation is reversed. |
| Option + drag | The same. Alt on Windows. |
| Option + Shift + drag | The same, in finer steps. |
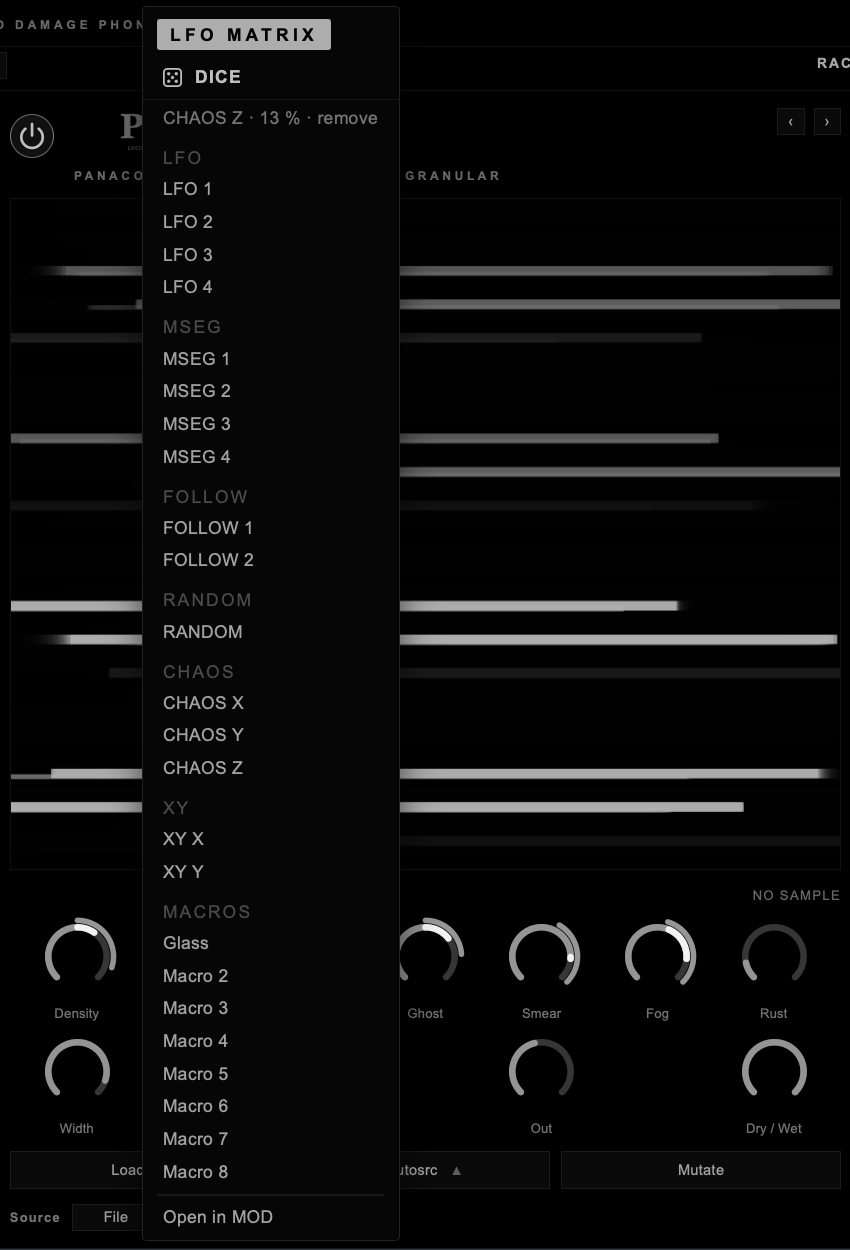
Right-click any dial of a module, or Ctrl-click it, and the LFO MATRIX menu opens on it. The values of the Master fx (Reverb, Undertone and Waveset) work the same way: right-click Mix, Decay or Size of the Reverb, for example, or drop a source on them. A modulated value shows a small dot next to its name, and its bar moves with the modulation.
| Line | What it does |
|---|---|
| DICE | Rolls a modulation: a source at random among the LFOs, MSEGs, FOLLOW, RANDOM and CHAOS, with a random amount and curve. If the source is an LFO that nothing uses yet, its rate and shape are rolled too. Roll again and a second one is added. |
| The modulations on this dial | One line each, with its source and amount. Click one to remove it. |
| LFO · MSEG · FOLLOW · RANDOM · CHAOS · XY · MACROS | Click a source and it goes into the first free slot at 25 %. |
| Open in MOD | Goes to the MOD page. |
| not modulatable · all 32 slots in use | Shown instead of the sources when the dial cannot be modulated, or when every slot is taken. DICE is not there either. |
A small dot flies from the dial to the MOD tab, with the name of the source and the amount, and the number on the tab goes up by one.
The same thing works the other way round, starting from the MOD page. Grab a source and drop it on a dial: it goes into the first free slot at 25 %, as with the menu.
| What you grab | Source |
|---|---|
| The name of the card: LFO 1–4, FOLLOW 1–2, RANDOM | That source |
| X, Y or Z next to CHAOS | One of the three outputs of CHAOS |
| X or Y under the XY pad | One of the two outputs of the pad |
| 1–4 in the MSEG editor | That MSEG |
| The name under a macro | That macro. A plain click on the name still renames it. |
While you drag, hold the source over a module in the left column, or over the Rack or Mixer tab: after a moment it opens, and the dials you can modulate light up. Drop on one of them. Esc cancels. If that source already moves that dial, nothing is added.
The MOD page lists the Master fx as a target of their own, after the fourteen modules. The modulation moves the whole sound at once, because the Master fx sit after the mix.
Stealth is not a target. It is a patching environment with its own sources and connections: chapter 10.
The master section is in the right column. The signal goes through it in this order:
modules → matrix → Out → Voice · master → STFT Res → Undertone → Waveset → Reverb → Limiter → output
| Control | What it does |
|---|---|
| Limiter | The square switches the limiter on or off. |
| Drive | Gain into the limiter. |
| Ceiling | The highest peak that comes out, default −0.5 dB. |
| Release | How fast the limiter lets go, default 250 ms. |
| Output | Level after the limiter. |
| Key | Off by default. The square puts the tonal modules in one key; Root and Scale choose it. Click a value for the list, or drag it up and down. |
| Activator | The main gate, the same as the button in the top bar. |
| Auto headroom | On by default. Turns the sum down as more modules play, so six modules are not six times louder than one. |
| Smart mix | On by default. When two or more modules play, it makes room between them in frequency, so a module covered by the others comes back. With one module it changes nothing. |
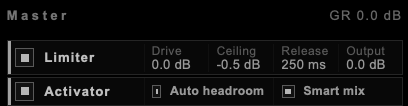
Smart mix listens to every module in six bands. In each band the module that needs it less steps back by a few dB, and the level it takes away is given back to the whole mix, so the loudness stays where it was. Switch it off and on while a dense preset plays to hear what it does. How it decides: Codex · Smart mix.
Key moves the notes of the tonal modules to the nearest note of one scale, so what you record fits a track in that key. It acts on Necro Box (Pitch), Sickness Report (pads and bells, whose Root and Scale it replaces), Divine Carceri (Root), the voice of Erase Head (Mouth pitch) and Tanatoprassi (MIDI, the keyboard and the sequencer). Detune, drift, wow and the spread of the voices stay as they are, around the new note. Atrax, Rainforest, Paesaggio Sonoro, R.I.P. and the granular modules have no notes to move.
The scales are Minor, Major, Dorian, Phrygian, Harmonic minor, Minor pent and Major pent. Key is not part of the presets: it stays as it is when you load another one, and the project saves it.
The header shows GR, how much the limiter is taking off. If it is always working hard, turn the modules down in the mixer rather than raising Ceiling.
Three processors on the whole mix, after the modules and before the limiter: Reverb, Undertone and Waveset. All three are off by default. Click the square or the name to switch them on, drag a value to change it, double-click a value to put it back.
A long reverb for the whole machine: eight delay lines that feed each other, with a tail from a fraction of a second to more than a minute. It is the last thing before the limiter, so every module, Stealth included, ends in the same room.
| Control | What it does |
|---|---|
| Mix | How much of the room you hear. At 100 % only the room. |
| Decay | How long the tail lasts, in seconds. |
| Size | How big the room is. |
| Pre | The gap before the room answers, in milliseconds. |
| Lo cut · Hi cut | What goes into the room: no rumble below Lo cut, no hiss above Hi cut. |
| Damp | Above this frequency the tail darkens as it decays. |
| Diffusion | Low: you hear the echoes. High: a smooth, even tail. |
| Early | The level of the first reflections. |
| Mod | A slow movement inside the tail, so long tails do not ring metallic. |
| Width | From mono to wide. |
| Freeze | Holds the room as it is, for ever, and lets nothing new in. |
Under it, REVERB EQ shapes the room alone, not the dry sound. It is the same curve as in the MIXER: drag HPF, LOW, MID, HIGH and LPF; Gain sets the level of the room after the EQ.
Adds a sine tone one octave or more below what is playing. It follows the zero crossings of the low end and divides them, like an octave pedal, so the new tone moves with the sound.
| Control | What it does |
|---|---|
| Order | ÷2, ÷3 or ÷4: one octave down, an octave and a fifth down, two octaves down. |
| Depth | Level of the undertone. |
| Tone | Only the sound below this frequency (30 to 1000 Hz) is followed. |
| Follow | How fast the undertone follows the level of the sound. Low: slow and smooth. High: fast, it pumps with the source. |
The same 20 seconds of Necro Box. A without, B with the settings of the factory preset Undertone 1/2 · Necro Box: ÷2, Depth 0.6, Tone 120 Hz, Follow 0.5. The difference is in the sub: listen on monitors or headphones that reach it.
Cuts the sound into wavesets, the pieces between one upward zero crossing and the next, and plays with them: repeats some, drops some, turns some around. The pitch stays close to the original, the texture breaks.
| Control | What it does |
|---|---|
| Repeat | How many times each waveset plays, ×1 to ×8. |
| Omit | Probability that a waveset is replaced by silence. |
| Reverse | Probability that a waveset plays backwards. |
| Mix | Balance between the clean and the processed sound. |
The same 20 seconds of Atrax. A without, B with the settings of the factory preset Waveset x3 · Atrax: Repeat ×3, Omit 0.10, Reverse 0.20, Mix 0.60.
A long, dark hall after the whole mix, made for drones and slow textures. It starts from the settings I use on Comb Swarm: a 35-second tail, the input cut below 90 Hz and above 7.5 kHz, the highs softened at every pass. At 100 % Mix there is only the reverb, the dry sound is gone; turning it on makes everything a few dB louder.
| Control | What it does |
|---|---|
| Mix | Balance between the dry sound and the reverb. |
| Decay | How long the tail lasts, 0.2 to 60 seconds. |
| Size | The size of the room. |
| Pre | Time before the reverb starts, up to 250 ms. |
| Lo cut · Hi cut | Filters on what goes into the reverb. |
| Damp | Above this frequency the tail darkens at every pass. |
| Diffusion | How quickly the echoes melt into one another. |
| Early | Level of the first reflections. |
| Mod | A slow drift inside the tail, so it never sounds metallic. |
| Width | Stereo width of the reverb. |
| Freeze | Holds the tail as it is, for as long as it stays on. |
| Gain | Level of the reverb after its EQ. |
Above the Reverb controls sits Reverb EQ, a graph that works like the EQ on the MIXER, only on the reverb: the spectrum of the tail behind, a curve with HPF, Low, Mid, High and LPF dots to drag. I use it to take the edge off the highs or to warm the tail without touching the dry sound.
STFT Res sits at the top of the left column and works on the whole mix. It has two processors, Peak Null and Phase Reset, and a plot that shows what they do. Both are off by default. While the plugin window is open, the plot keeps analysing the sound even when the processors are off; the sound does not change.
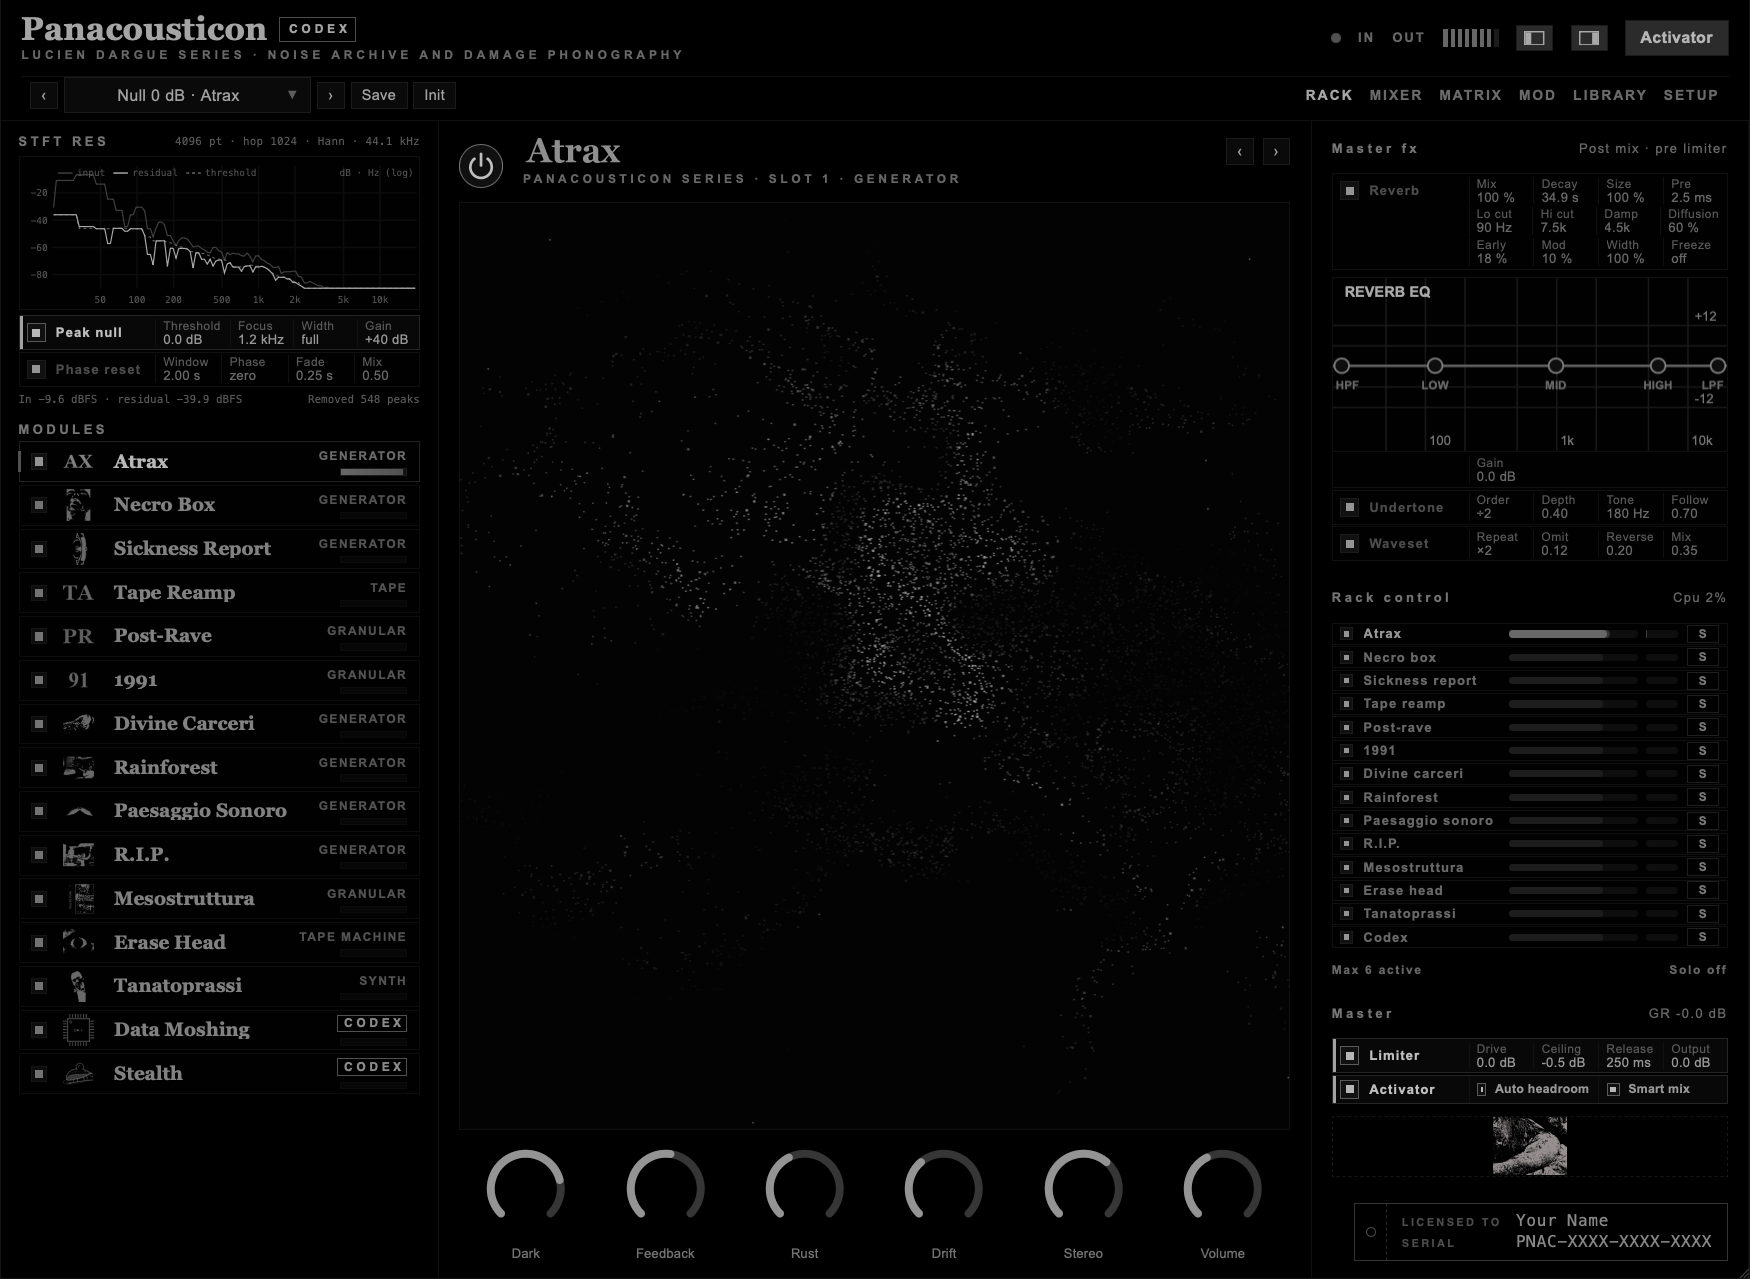
Peak Null finds what sticks out of the spectrum, the notes and the resonances, and pushes it down to the floor. What is left is the residual: grain, hiss, attacks, the tails nobody listens to. With a drone, this often reveals a whole second sound that was always there under the first.
| Control | What it does |
|---|---|
| Threshold | How far above the floor a peak must be to be removed, −12 to +24 dB. Lower removes more. |
| Focus | Centre of the band where Peak Null works. |
| Width | Width of that band in octaves, up to full (the whole spectrum). |
| Gain | Brings the residual back up, 0 to +40 dB. It never makes it louder than the input was. |
The plot is also a control. With Peak Null on: drag sideways to move Focus, drag up and down to move Threshold, use the wheel to change Width, double-click to go back to the full spectrum.
The light blocks are what Peak Null removes now: every peak that stands above the dashed threshold, inside the Focus band. Lower the threshold and more blocks appear; raise it and only the tallest peaks are left to remove. While the threshold moves, the line above the plot shows its value and how many peaks are removed. Hovering shows the frequency and the level under the pointer, and where a peak is cut, the level it is brought down to, for example 1.20 kHz · −34 dB → −52 dB.
The same 20 seconds of Atrax. A is the sound as it is, B is what Peak Null leaves. Switch while it plays: the position does not move.
Phase Reset takes a long window of sound, keeps the level of every frequency and throws the timing away: all the phases are set to zero, or to random values. Then it loops the result, crossfading each window into the next. Zero makes everything start at the same instant, a soft click repeated at the length of the window. Random makes a still, smeared cloud with the colour of the original.
Quad works on long windows, from half a minute to two minutes. The left channel gets every phase at zero, the right one every phase at 90 degrees, so the two sides move together but never coincide. Over a long window only what repeats survives: the beat and the bar come back as soft pulses, single notes spread into chords that last the whole window, short hits become a thin layer of noise. The level follows the original, and the pulses are left free. A long window needs its whole length before the first sound, and memory while it is on: about 220 MB at one minute, 450 MB at two. Back under ten seconds, or off, the memory is given back. The six Phase Ghosts presets in the Library show quad on small dance tracks: listen to the first window, then to what is left.
Quad comes from a record I love: Summer Mix by The Automatics Group (Theo Burt), first released in 2011. Dance anthems from the late '90s and the '00s, each one transformed whole, with the phases reset. It inspired me a lot, and Phase Reset on quad is my way of reaching that place inside Codex.
| Control | What it does |
|---|---|
| Window | Length of the window, 0.25 s to 2 min. |
| Phase | zero, random or quad. |
| Fade | Crossfade between windows, 0.05 to 2 s. |
| Mix | Balance between the clean and the processed sound. |
When Phase Reset is on, the plot shows it in time, in its own lane marked PHASE RESET: the last 8 seconds, with now on the right. The grey line is the sound before, the white area the sound after. Every new window starts at a vertical line, and the slope next to it is the fade. Turn Window and the bands get longer or shorter; turn Fade and the slopes get wider. With both processes on, Peak Null keeps the upper lane and Phase Reset takes the lower one. When you touch a control, or hover its row, its own lane lights up and the other one dims, and the line above the plot shows the values.
The factory preset Phase random 8 s · Divine Carceri.
Audio is data. In this module the signal is written into the RAM of a digital board, read back, and mixed out again. The code that does it is on screen, in the CPP INSPECTOR, and it is the code that runs: when you change a line, it is compiled and swapped in while the sound keeps going.
Data Moshing and Stealth make up Codex, the area for live coding and patching. In the module list they are two entries, one under the other: Data Moshing opens the patch and the code, Stealth opens the patching sheet. It is the same module, with one switch and one preset. Codex has its own pages: the circuit, the code, Stealth Patching, the snippets and the recipes. You can play it without them. To start, load the preset Data Moshing/Pad Lab, or send a module into it from the MATRIX and raise WET.
CODEXCircuit Bender EnvironmentLive coding and patching for noise textures and broken soundscapes, from the first patch to the codeenter → STEALTHFeedback Patching EnvironmentThe sheet, the 73 objects one by one, the menus, slot~, DICE and OBJ, patch files, the presets made in Stealth and every keyenter →On Necro Box, Sickness Report, Divine Carceri, Rainforest and R.I.P. the real code of the engine fills the middle column, in a large box. The code is taken from the source when the plugin is built; nothing on screen is invented or decorated, and the values are read from the engine as it runs. On Data Moshing the code is in the CPP INSPECTOR, where you can also change it.
Turn a dial there and the box glides to the lines that read it, with a small swing: they light up and pulse while the dial moves, and next to them you see the value the engine is using. Let go and the light fades, and after a few seconds the box goes back.
More on what you are looking at in Codex · the code box.
A preset holds the whole state: which modules are on, every control, the mixer, the matrix with its scenes and cell settings, STFT Res, the master. Files loaded into modules are remembered by their location on disk.
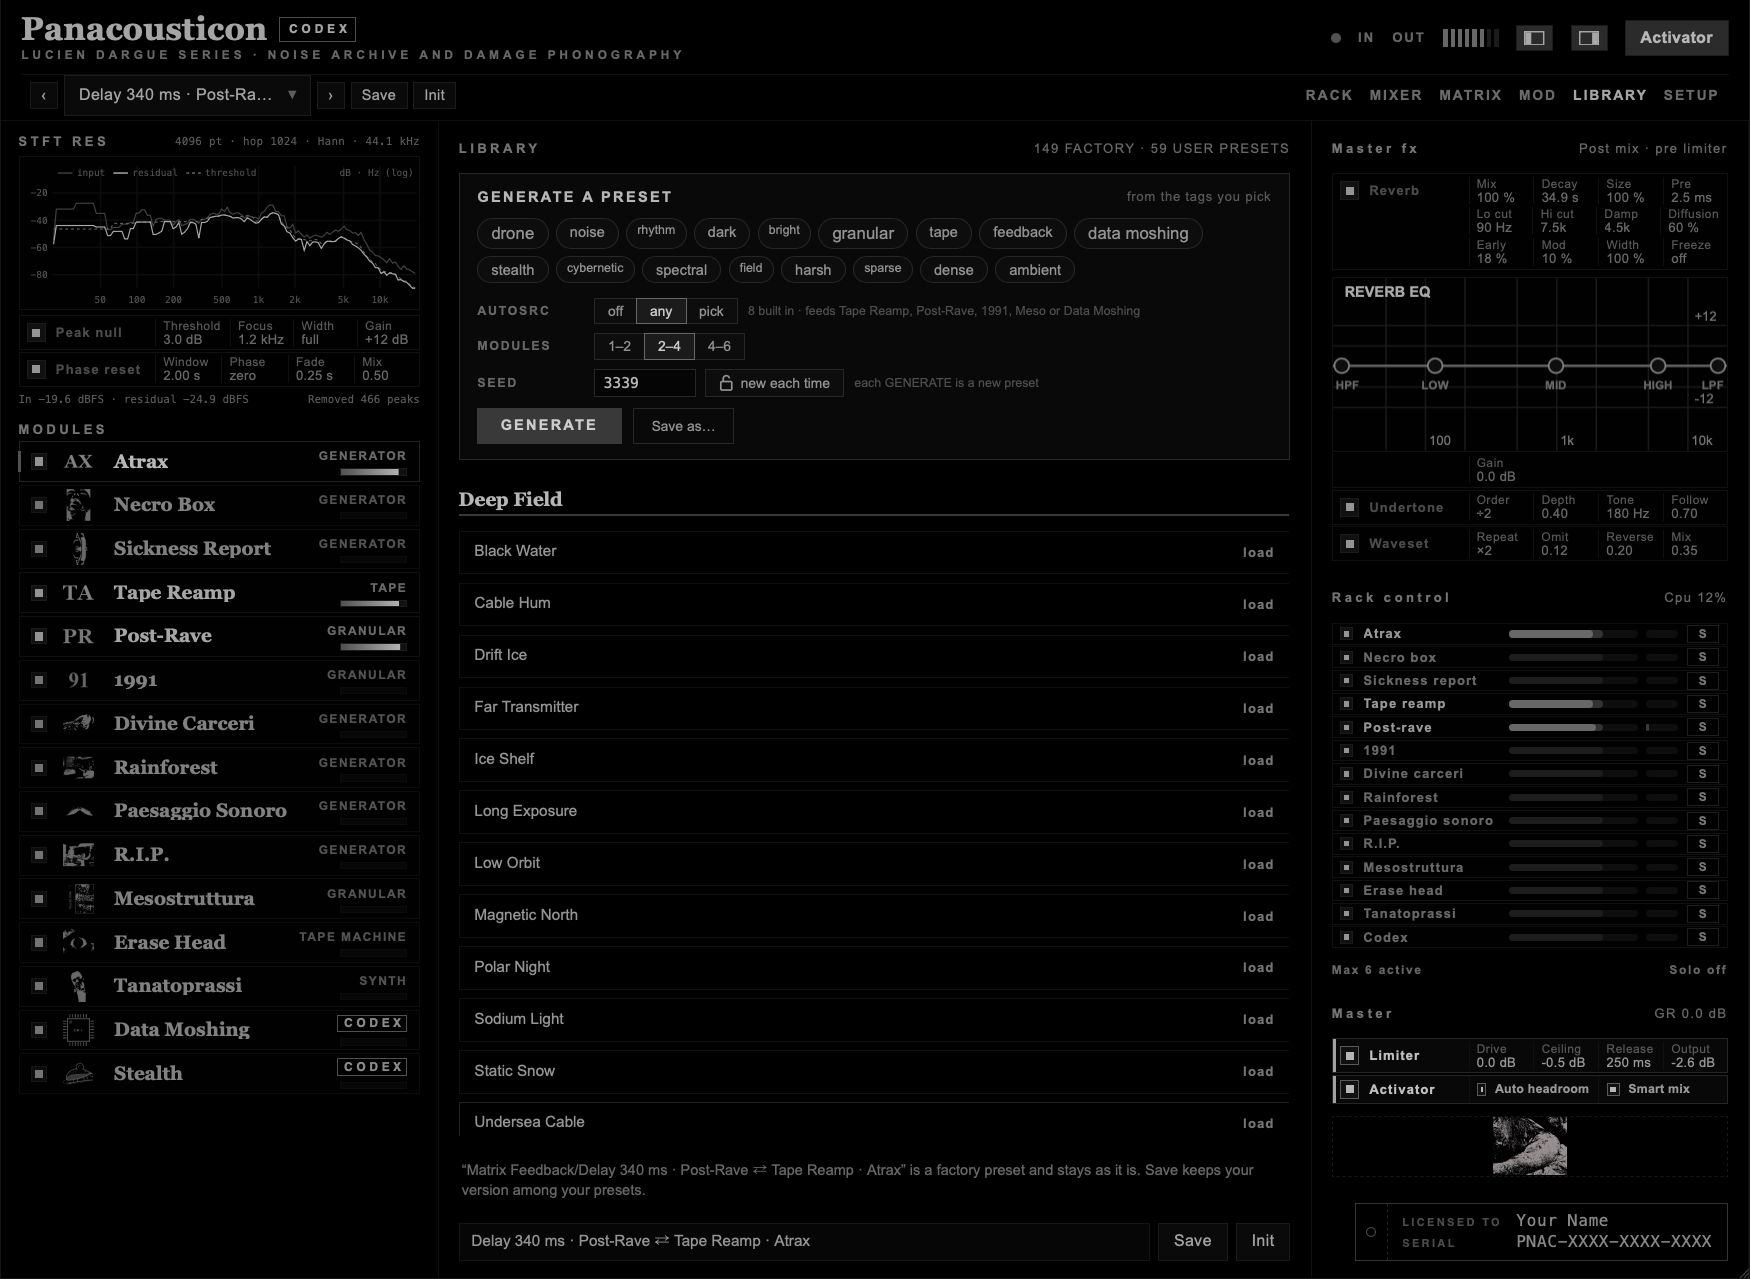
The presets sit in columns, one block per category. Above them a cloud of tags asks what sound you want: ambient, drone, rhythm, melodic, field; calm, still, moving, pulsing; dark, bright, pure, noisy, deep, wide; feedback, glitch, spectral, granular and others. Click a tag and the list keeps only the presets that have it; click more and they must have all of them. The number on each tag says how many presets you would get. Clear shows them all again. Your own presets have no tags, so they show only when nothing is picked.
Above the tags there is a search field. Type part of a name, or of a category, and only the presets that match stay in the columns; several words narrow it down. Enter loads the first one, Esc clears the field. It works together with the tags.
Click a preset to load it. The arrows next to the preset name in the top bar step through the list. To save, type a name in the field at the bottom and press Save or Enter. If a preset with that name already exists, Codex asks before overwriting it: Overwrite (or Enter) replaces it, Cancel (or Esc) keeps it. Save in the top bar asks the same for the preset you have loaded. Factory presets never change: saving one keeps your version among your presets, under the same name; Init goes back to the default state.
You do not need to open the Library to change preset. Click the preset name in the top bar and a menu drops down, as in most plugins: the categories on the left with the number of presets in each, the presets of the category under the mouse on the right. The current one is marked with a red dot. Click to load; Esc or a click outside closes the menu.
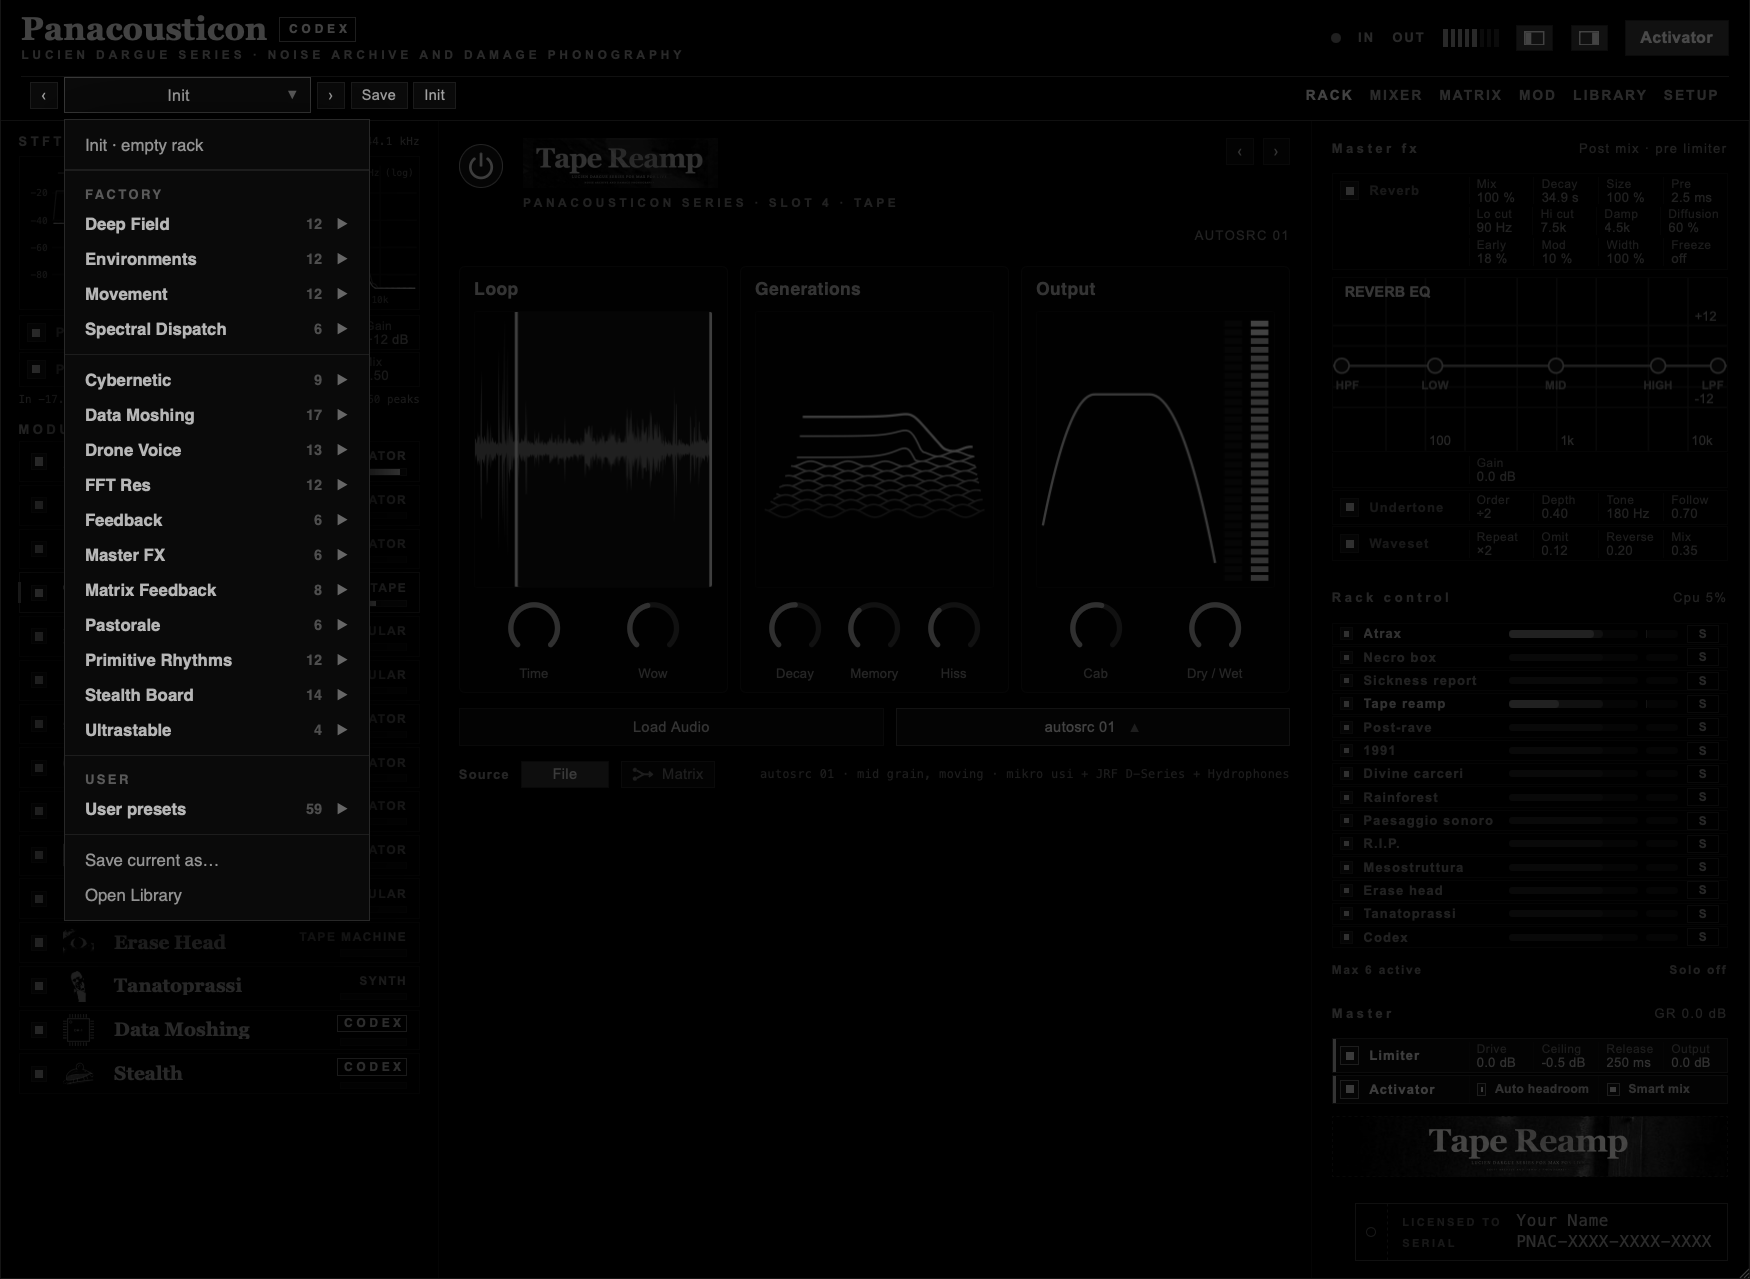
Some presets are very loud on purpose: walls of noise, feedback that runs hot. Going from a quiet preset to one of these can be a big jump.
Codex protects you when you change preset. The sound fades in, then the level can only rise a little at a time, starting from where the previous preset was, and short peaks are held back too. After about ten seconds the new preset plays at its own level, untouched. The same happens when you open a project, press Init or start the plugin.
Even so, set your monitors at a sensible level before you start, and keep them low while you explore presets you do not know yet.
Under the list, the Generate a preset bar shows the tags you picked and its own GENERATE button, which works with the panel closed. Click the bar to open the panel. It builds a new patch from the tags you pick: ambient, drone, noise, dark, granular, tape, feedback, data moshing, stealth, cybernetic and others. The tags choose the modules: ambient and drone keep out the rhythmic ones and take the pulse off Necro Box. With cybernetic the Stealth sheet is built as a set of feedback loops with no oscillators, each with its own sensor, as in the Cybernetic presets. It chooses the modules, sets their controls, routes the matrix and brings the levels to a sensible loudness while it starts.
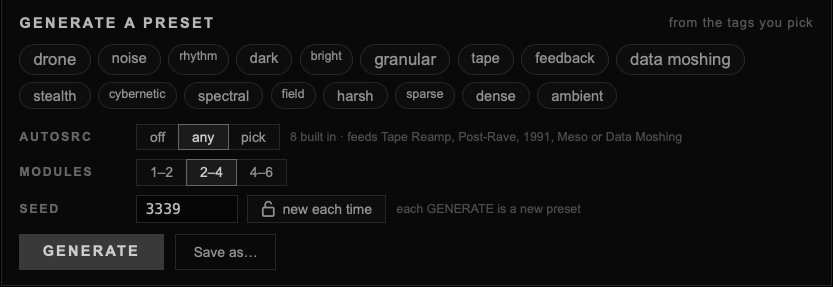
| Control | What it does |
|---|---|
| Tags | Click to pick, click again to drop. With no tag the choice is open. |
| AUTOSRC | off: no built-in sound. any: modules that take audio may get one of the autosrc sounds. pick: always the one you choose. |
| MODULES | How many modules: 1–2, 2–4 or 4–6. |
| SEED | The number behind the choices. With the lock open every GENERATE is a new preset. Close the lock, or type a number, and the same tags give the same preset again. |
| GENERATE · Save as… | Builds the preset and plays it. Save as keeps it in your presets. |
| Category | Presets | What they show |
|---|---|---|
| Data Moshing | 17 | Code and board settings for the RAM board. |
| Feedback | 6 | Long patches built around loops in the matrix. |
| Matrix Feedback | 10 | One process each: delay, polarity, tone or stealth on a loop. |
| FFT Res | 12 | Peak Null and Phase Reset on different modules. |
| Master FX | 6 | Undertone and Waveset. |
| Cybernetic | 12 | Feedback patches with no oscillators, after Jaap Vink and Agostino Di Scipio: loops that switch themselves off when they get too loud and grow back (Cybernetic presets). |
| Ultrastable | 6 | Patches that change their own rules when they cannot stay in balance, after W. Ross Ashby's homeostat (Ultrastable presets). |
| Stealth Board | 16 | Stealth bending the board: a module goes into the RAM and the patch works on it, moves its dials or writes into the memory. Grainy and broken on purpose (Stealth and the board). |
| Primitive Rhythms | 13 | Rhythm built from logic: a clock, a binary counter, AND, OR, XOR and cellular automata firing clicks, sines and noise. Dry, precise, hard left and right (Primitive Rhythms presets). |
| Drone Voice | 14 | Drones built like the voices of the eurorack drone modules: a cluster of oscillators, a multi-notch filter, a VCA and a delay that turns into diffusion, with a frequency shifter inside the feedback (Drone Voice presets). |
| Bezier | 6 | Deep generative drones made only with Stealth objects and drawn with curved, coloured cords (Bezier). |
| Pastorale | 6 | Pastoral music from reed~: drones, a chanter, the ciaramella, bells, birds and wind (Pastorale presets). |
| Overture | 6 | The patches Codex opens on, first in the preset menu. Each one is built around interfera~ left free, so a new field recording arrives every time and every launch opens somewhere else: three stochastic, three hypnotic. What they download is deleted when you leave the patch, unless you click Like it? Keep it (Overture presets). |
| The Planets | 6 | Six movements of Holst taken back into Stealth: his rhythms, motifs and harmony played by objects of the sheet (The Planets). |
| Internet Archive | 3 | Old audio from the Internet Archive through internetarchive~, turned into landscapes. |
| Discover | 2 | The two patches the guided chapters land on, so you can keep playing with them. |
| Interfera | 8 | Relaxed field-recording soundscapes around interfera~: a recording drawn from a world, contact mics, tape and a slow pad (Interfera presets). |
| Phase Ghosts | 7 | Small dance tracks in Stealth (chord progressions, a lead, slow pads, Sickness Report, birds from the archive) with Phase Reset on quad. The first window plays the track; after it the notes become one breathing chord, the kick a soft pulse, the hits a layer of noise (Phase Reset). |
| Deep Field | 14 | Soft soundscapes. |
| Autogenic Training | 9 | Slow, quiet presets for study and sleep, made with modules and Stealth patches together (Autogenic Training). |
| Movement | 12 | Reflective ambient patches that use many kinds of modulation at once. They open on the MOD page. |
| Environments | 12 | A Stealth drone with two modules, every strip with its own EQ and slow moving pans. Six of them blend modules through the matrix. They open on the MIXER. |
| Spectral Dispatch | 6 | Four or five modules each, with the EQ shared out by the Spectral Dispatcher. They open on the MIXER with the dispatcher showing. |
Presets built on feedback, in the Matrix or in Stealth Patching, come back with exactly the same settings but never with exactly the same sound. Why, and what Codex does about it: Presets and patches that keep changing.
The names say what each preset does: the process and its value first, then the modules. Null −6 dB · Divine Carceri is Peak Null at a threshold of −6 dB on Divine Carceri. Loop 2 · Tape Reamp ⇄ Erase Head · Divine Carceri is a loop between Tape Reamp and Erase Head, fed by Divine Carceri.
Autogenic training is a relaxation method from the 1930s: lying still, you repeat short formulas about heaviness, warmth, the heartbeat, the breath, the belly and the forehead, until the body lets go. The eight presets of this category take their names from those exercises. I made them to study and to sleep with Panacousticon playing in the background.
Each one puts modules and a Stealth patch together. A module plays slowly, a slot~ takes it into the sheet, and a capstan~ running at a fraction of its speed drags it, so the sound bends and comes back in long cycles. A fault~ with a very low stress adds a small non-linearity: now and then the level dips by a few dB and recovers. The levels are around −22 LUFS, lower than the other categories, and there are no sudden hits.
| Preset | What happens |
|---|---|
| Far City | Atrax far away, like traffic in the distance, with autosrc 11 under it. The capstan turns slowly under Atrax. |
| Heaviness | Paesaggio Sonoro on a slow capstan, a heavy crinkle, with Atrax very low underneath. |
| Breathing | Water on stones, autosrc 09, swelling about every eleven seconds, through Post-Rave and a slow capstan, over a deep Divine Carceri. |
| Warmth | Eight low saw waves, filtered dark, moving very slowly; the steadiest of the set. |
| Heartbeat | A soft double beat, 52 a minute, in the sub, with the air of a small room (autosrc 10) and Atrax far away. |
| Solar Plexus | Sickness Report, dark and slow, on an eccentric capstan: the wow follows the turns of the motor. |
| Cool Forehead | Rainforest without its discharges, rare drops on a spring and the hiss of a machine left on. |
| Resting State | Atrax and Paesaggio Sonoro on one slow capstan, with autosrc 11. The quietest, around −24 LUFS. |
They also play under the opening screen, with Deep Field and Drone Voice. Every patch opens in Stealth with a note that says how it is built. Set your volume before you lie down: the presets do not get louder over time, but they do not get quieter either.
| System | Folder |
|---|---|
| macOS | ~/Library/Panacousticon/Presets |
| Windows | %APPDATA%\Panacousticon\Presets |
Presets are small text files: your own end in .pnac and hold the whole state, the factory ones end in .pnap. You can copy them between computers. If a preset refers to an audio file that is not there, the module loads without it.
Your DAW also saves the whole state with the project, preset or not.
RECORDER records every source of Codex on its own track, each in its own WAV file: the master, each module, Data Moshing, the Stealth sheet and every rec~ object of the patch. It is also where I listen to the stems one at a time and balance them, like a desk in a control room: with CONTROL ROOM on, what you hear is what goes into the files.
A rec~ can go anywhere in a Stealth patch, not only before the dac. Up to sixteen of them, in four groups, each one a track of its own. This way I keep the parts of a patch as well as its mix.
rec~ on a buffer~ and one after its filters: the dry sound and the processed one of the same moment, on two tracks.rec~ on a verb~, a spring~ or a tape~ keeps the reverb or the echoes on their own track, to place them later.floor~, fault~, or a tap~ that reads the RAM of the board: the parts of the sound that stay under the mix.rec~ on an envelope or on chaos~ keeps the voltage itself, to use elsewhere.All the armed tracks start together, with the modules and the master, and line up in any DAW. RETRO 60 S works on them too, so a tail that has already rung can still be saved.
The page opens from RECORDER in the top bar and from the RECORDER tab on the right edge. While a take is recording, a red dot pulses next to both.
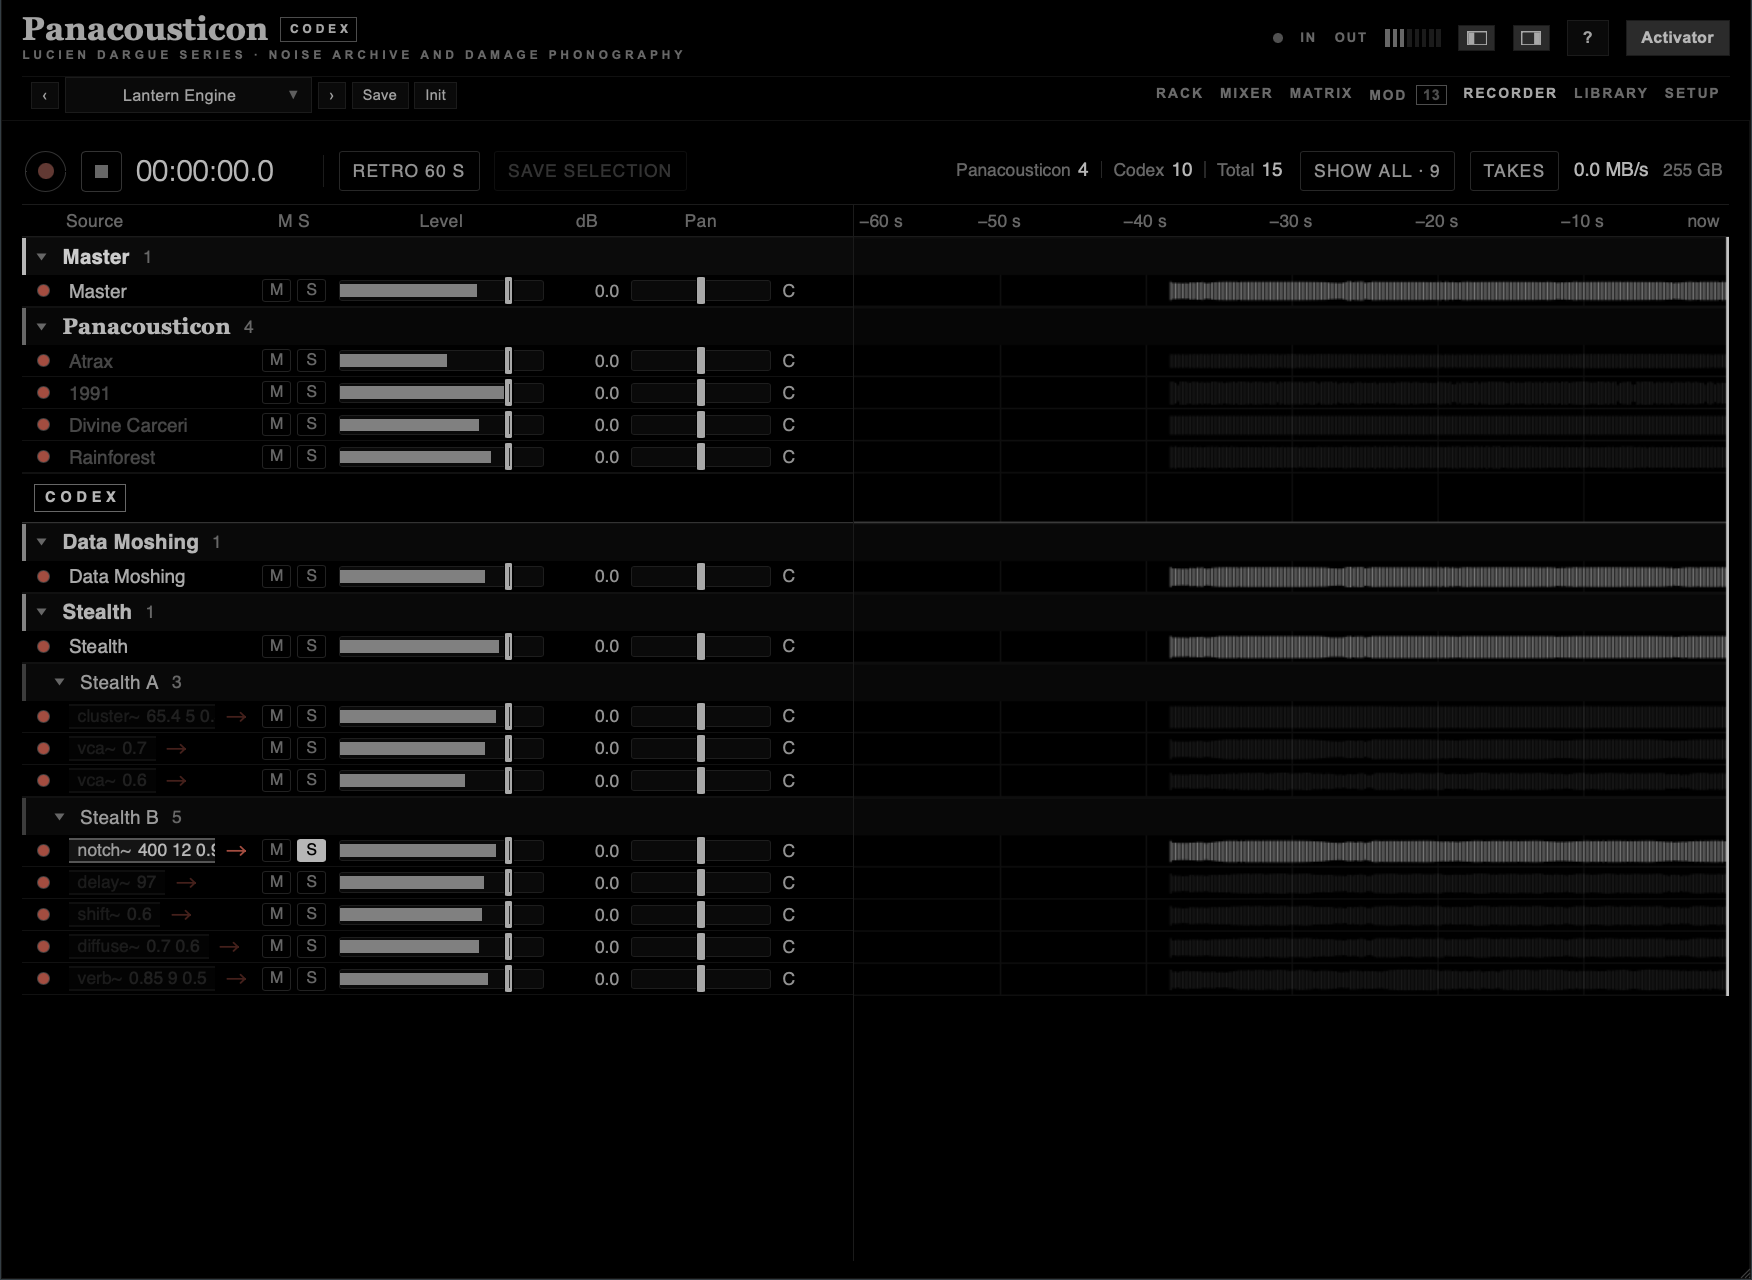
notch~ is soloed, so the other stems fade in their lanes.| Group | What it holds |
|---|---|
| Master | The final output of Codex. |
| Panacousticon | One track for each module that is on. SHOW ALL lists the modules that are off too, ACTIVE ONLY hides them again. |
| Data Moshing | The whole module: the board and the sheet. |
| Stealth | Only what the sheet sends to its dac. |
| Stealth A · B · C · D | One track for each rec~ object, in the group of its argument. The track is named after the object that feeds it: click the name and Codex jumps to the sheet with that object framed and blinking, together with its rec~. In a crowded patch it is the quickest way to find who is making the sound you are hearing. In the factory presets every sound that reaches the dac has its own rec~: voices in A, effects in B. |
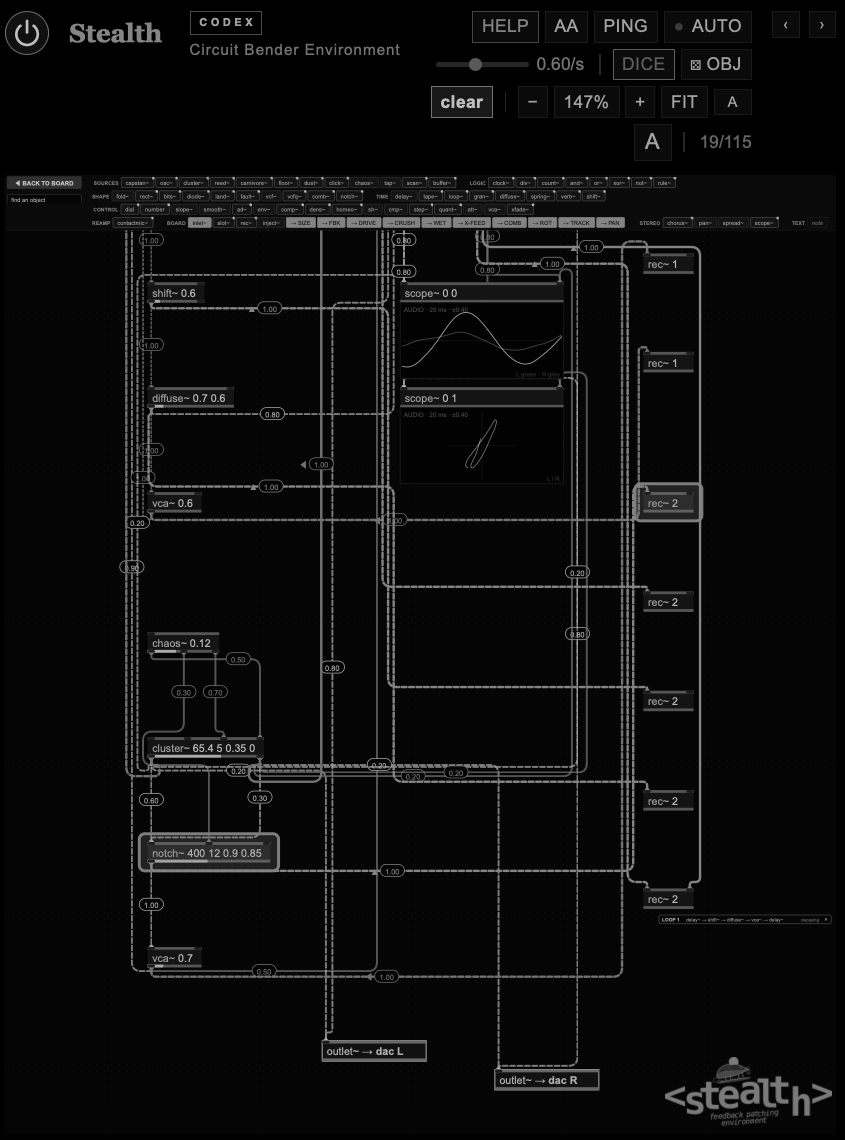
notch~ in the Recorder: the sheet, with the object and its rec~ blinking.| Control | What you hear | What goes into the file |
|---|---|---|
| Dot (arm) | Nothing changes. | The track is recorded and keeps its last 60 seconds. |
| M | The track and what depends on it go silent. | Everything, always. |
| S | Only the soloed tracks. Alt-click solos one track alone. | Everything, always. |
| Level · dB | The level of the track. | The same level. |
| Pan | With CONTROL ROOM on, the place you give the track. Off, the source keeps its own panning. | orig: the track as it is. Once you move it: the place you set. |
Level and Pan are sliders: click the track and the value goes there, or drag the handle; the wheel moves them too. Shift gives fine steps, a double-click goes back to 0 dB or to orig. The dB value can also be dragged up and down.
The pan starts on orig: the track keeps the stereo image it was born with. As soon as I move it, the track is folded to mono and placed where I put it, so L100 is really all on the left, even for a sound that was all on the right.
Every preset starts with a clean desk: no solo, no mute, every level at 0 dB and every pan on orig. The armed tracks stay armed.
Mute and solo are only for listening, so a forgotten solo never costs you a take. A soloed stem plays as it is, wherever it sits in the patch, even when it feeds a reverb and not the dac. The most specific solo wins: if Stealth is soloed and one of its stems too, you hear only that stem, and the S of Stealth turns dashed to show it. On a stem inside the patch, M takes the output of that object away from everything after it: a muted delay~ also silences what the delay feeds.
While you listen, a filter at 20 Hz takes away DC and slow modulations, so a control signal on a rec~ does not thump in the speakers. You still see it in its lane, and the file keeps it whole, to use elsewhere as a control voltage.
CONTROL ROOM, in the bar, changes what reaches the speakers, not what is recorded.
| CONTROL ROOM | What you hear |
|---|---|
| Off | The patch and the modules as they are, with their own panning and the pans of the MIXER. The pans of the Recorder go only into the files. |
| On | The mix of the tracks, as a sound engineer hears the musicians at the desk: each track with its level, its pan, its mute and its solo. For Stealth you hear its rec~ objects instead of its dac, and the Stealth track works as their group fader. |
A rec~ is a microphone placed in the patch. With CONTROL ROOM on you hear those microphones, so the sound changes as much as they differ from what goes to the dac. A rec~ on a dry buffer~ brings in a sound the dac never had; a rec~ on a cord at 0.5 plays at half the level of one at 1.00; two rec~ in a chain, before and after an effect, are both heard. A rec~ with only its left inlet cabled is a mono track in the centre.
Try this. To start from the same sound as the patch, put each rec~ on the cords that go to the dac, with the same level. Turn CONTROL ROOM on: nothing changes. Then move levels and pans in the Recorder and mix it as you like.
The Stealth track keeps recording what the sheet sends to its dac, with CONTROL ROOM on or off.
The lanes show the last 60 seconds of each track, on the same dB scale as the meters, so a quiet stem is visible too. A lane is bright when the track is armed, faint when it is not, and fades further when you are not hearing it.
| Control | What it does |
|---|---|
| ● · ■ | Start and stop. All the armed tracks start together; the counter shows the time. After the stop the page shows the take you just made; Live goes back. |
| RETRO 60 S | Saves the last minute of the armed tracks, without having pressed record. |
| CONTROL ROOM | You hear the mix of the tracks with their levels and pans, as they go into the files. See Control room. |
| Selection | Drag a rectangle over the lanes to pick a stretch of time and some tracks. The armed tracks inside it fill, and a label shows its length, its tracks and Save. With no armed track inside, the rectangle is dashed and, when you release it, the dots of those tracks blink. SAVE SELECTION in the bar does the same as the label. |
| TAKES | The list of your takes, with length, tracks and size. A take opens its folder; the cross moves it to the Trash after you confirm, and Delete all empties the list. Deleting the take on screen clears the lanes. |
| MB/s · GB | The data being written while you record, and the free space on the disk. |
The takes are in ~/Music/Panacousticon Codex/Takes, one folder each, named with a number, take or retro and the date. Each track is a stereo WAV at 32-bit float, named after its group and source, so the files line up in any DAW. Next to them, state.xml holds the whole state of Codex when the take started.
EXPLORER is a map of sounds. Codex measures every file you give it and places it on the map so that near means similar: the same microphone, the same room, the same kind of noise land next to each other. I built it because I have more recordings than I can remember, and a list of names tells me nothing about what is in them.
There are two maps. States places the presets of Codex. Audio places your own files. From there you listen, you cross two sounds into a third with New Spectra, you pull a corpus out of the network with the Cloud, and you scatter a whole area of the map through time with Texture. It grew into the largest part of Codex, so it has a page of its own.
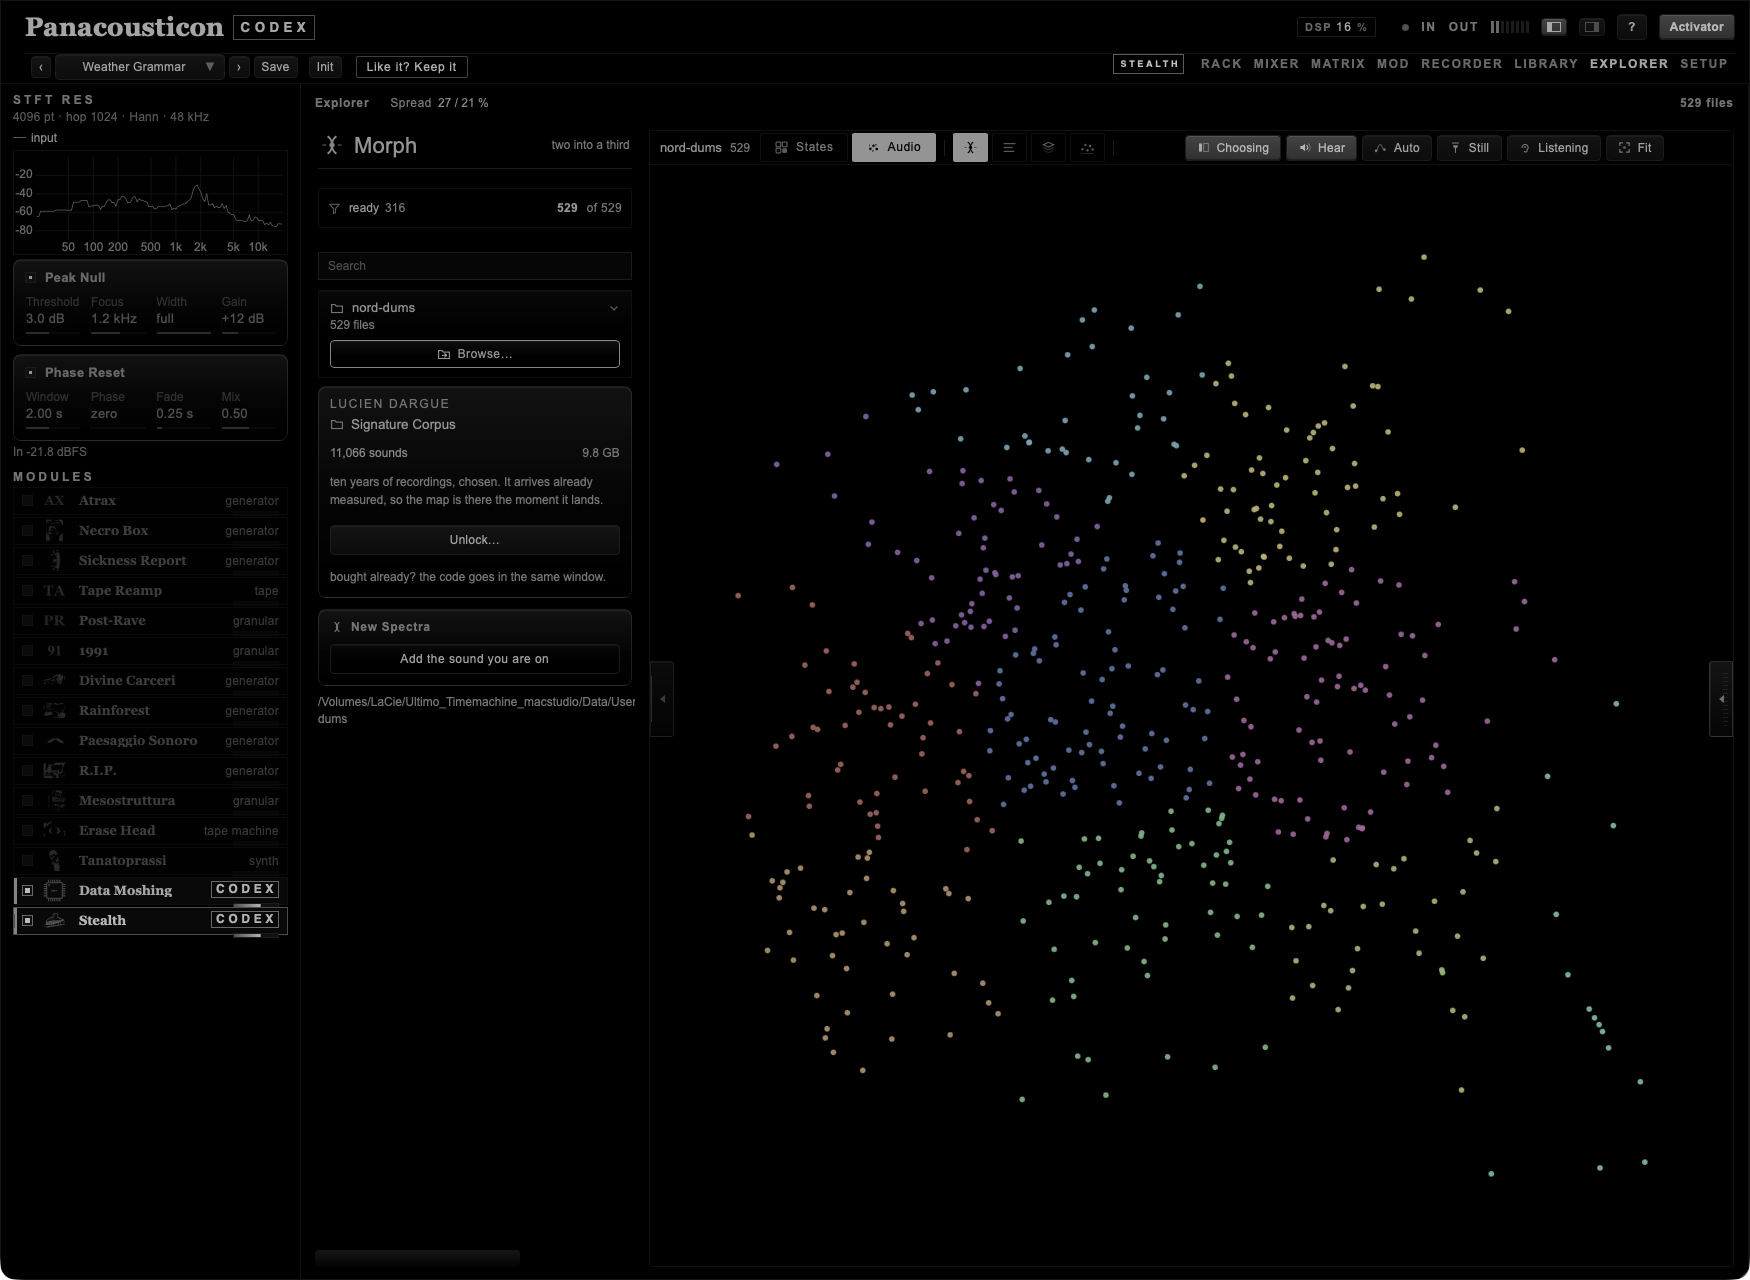
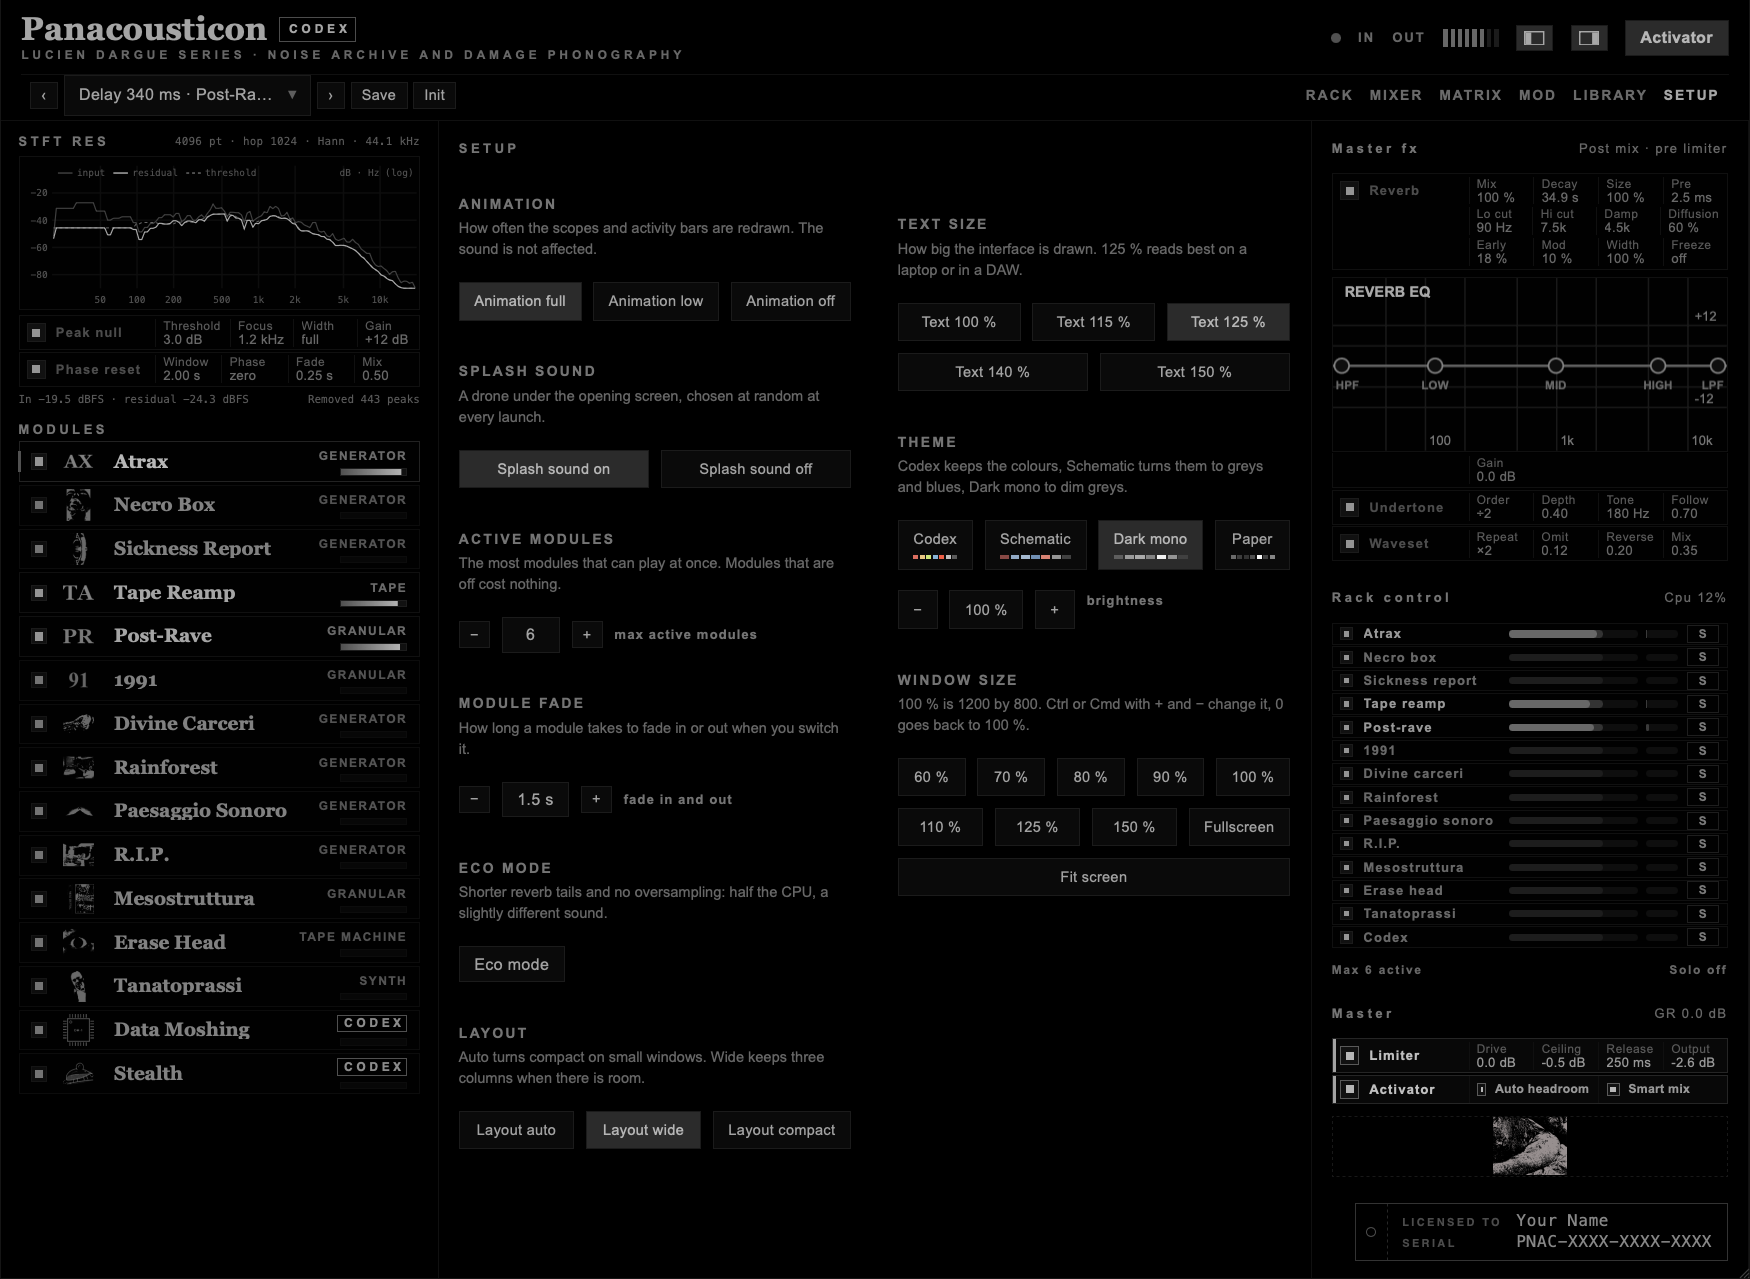
| Setting | What it does |
|---|---|
| Animation full · low · off | Drives the scopes and activity bars. Low runs at 10 frames per second, off stops all drawing. The sound is not affected. |
| Max active modules | The rack refuses to switch on more modules than this. Default 6. Modules that are off, not routed anywhere, or without a source cost nothing. |
| Module fade | Switching a module on or off fades it in or out over this time instead of cutting it. 0.1 to 5 s, default 1.5 s. |
| Eco mode | Shortens the convolution reverb tails to two seconds and turns off oversampling in the shapers. It changes the sound slightly and halves the cost. Meant for laptops. |
| Layout auto · wide · compact | Auto switches to the compact layout in small windows. Wide keeps the three columns whenever the window is big enough for them, about 1680 pixels wide, and falls back to compact below that. Compact always uses the icons and the drawer. |
| Text 100 % to 150 % | How big the whole interface is drawn. Inside a DAW or on a laptop 125 % is the most readable. Text never gets smaller than about 12 pixels on screen. |
| Theme | Codex keeps the colours. Schematic turns them into greys and blues, with a dull red only for feedback and warnings. Dark mono turns everything into greys on black, with a thin line of light along the top edge of every panel and a shadow under it, so the surfaces read as objects; it is the theme Codex opens with. Paper is a light grey theme, ink on paper, for people who find high contrast tiring. Brightness lifts or lowers the whole theme. The sound is not affected. |
| Window size · Fullscreen | Sizes in percent of 1200 by 800, and Fit screen. Fullscreen works in the standalone. The size you choose stays until you choose another: no preset changes it, and neither does the theme. |
| Interfera: Keep files · Delete on close | Where the recordings of interfera~ go, 30 seconds each, about 5 MB. With Keep files they stay, up to 400 MB, and a preset brings back the same recording; the oldest go first. With Delete on close the ones found in a session are deleted when Codex closes, and nothing stays on the computer. Open folder shows them, Clear now deletes them all (click it twice); what is playing keeps playing. |
| Licences · Sources | Many recordings on radio aporee ::: maps are CC BY-NC-SA. Codex distributes none of them: your computer fetches each one from the Internet Archive. CC BY asks for credit when you publish music made with them, so Codex keeps a private list, Sources, with the code, the item and the licence of each recording. It is never shown on the panel and never saved in a preset. |
| Splash sound on · off | The drone under the opening screen, chosen at random at every launch of the standalone. |
Codex is an instrument with a stereo output and a stereo sidechain input. The input appears as the source Input in the matrix. MIDI goes to Tanatoprassi; the other modules ignore it.
A multi-output version, with every module on its own track in your DAW, comes with the full release. Until then, the Recorder records each module, and in Stealth each object, on its own track, ready to take into your DAW and process apart.
| macOS | Windows | |
|---|---|---|
| System | macOS 11 Big Sur or later | Windows 10 or 11, 64-bit |
| Processor | Apple silicon or Intel | 64-bit Intel or AMD |
| Formats | VST3, AU, Standalone | VST3, Standalone |
| Host | Any 64-bit host that loads VST3 or AU instruments | Any 64-bit host that loads VST3 instruments |
| Screen | At least 1280 pixels wide; 1366 × 768 or larger recommended. The plugin window needs about 1200 to 1300 pixels of width to show everything. | |
| Other | — | Microsoft Edge WebView2 Runtime |
Codex is an instrument with MIDI input, a stereo output and a stereo sidechain input. It runs at the sample rate of your project. There is no 32-bit version.
Run the installer and choose the formats you want. It puts the files here:
| Format | Location |
|---|---|
| VST3 | /Library/Audio/Plug-Ins/VST3/Panacousticon Codex.vst3 |
| AU | /Library/Audio/Plug-Ins/Components/Panacousticon Codex.component |
| Standalone | /Applications/Panacousticon Codex.app |
You can also copy the files there by hand. The same folders inside your home folder (~/Library/Audio/Plug-Ins/…) work too, but then the plugin is only there for your user.
Then restart your host, or rescan its plugins. In Logic, Panacousticon Codex appears under AU Instruments, from the maker Panacousticon; Logic checks every new AU the first time, and if it fails there the Plug-in Manager shows why. In Live, turn on the VST3 or AU folders in Settings → Plug-ins.
Run the installer. It puts the files here:
| Format | Location |
|---|---|
| VST3 | C:\Program Files\Common Files\VST3\Panacousticon Codex.vst3 |
| Standalone | C:\Program Files\Panacousticon Codex\Panacousticon Codex.exe |
The window of the plugin is drawn by WebView2, the browser engine that Windows uses for many applications. It is already there on Windows 11 and on an up-to-date Windows 10. If the plugin opens with an empty window, install the Microsoft Edge WebView2 Runtime from Microsoft's site and open it again.
There is no AU on Windows: AU is an Apple format.
The standalone version is the same instrument without a host. The audio and MIDI settings open from Audio → Audio/MIDI Settings… in the menu bar on Mac, and from Options at the top left of the window on Windows: choose the output device, the sample rate and the buffer size there, and tick your keyboard under Active MIDI inputs to play Tanatoprassi. The standalone remembers its state when you close it.
| What | macOS | Windows |
|---|---|---|
| User presets | ~/Library/Panacousticon/Presets | %APPDATA%\Panacousticon\Presets |
| Standalone settings | ~/Library/Application Support/Panacousticon Codex.settings | %APPDATA%\Panacousticon Codex.settings |
Factory presets are inside the plugin, so they cannot be lost or deleted. Audio files you load stay where they are: a preset only remembers where to find them.
Delete the files listed under macOS or Windows above. Your presets stay in their folder until you delete them yourself.
| Problem | What to do |
|---|---|
| The plugin does not appear | Check that the file is in the right folder, then rescan the plugins in your host. |
| No sound | Activator off, or every module off. After Init and on a new instance every module is off: switch one on. |
| A module does not play | It may be paused by the active-module limit (its name is orange in the matrix), or it needs a source: a file, or Source on Matrix with something sent into it. |
| Tanatoprassi is silent | It needs MIDI, the keys on screen, or Seq on. |
| The CPU is high | See Saving CPU in chapter 14. |
| Empty window on Windows | Install the WebView2 Runtime. |
Feedback. A loop multiplies the sound by its loop gain on every turn. Below 0 dB it fades out, above 0 dB it grows. Each turn also adds the colour of the modules it passes through, so the sound slowly turns into the resonance of the loop itself. That is the idea behind Guard: hold the gain just under 0 dB, where the loop rings longest without running away.
STFT. The short-time Fourier transform cuts the sound into short overlapping windows and measures every frequency in each one. Peak Null uses windows of 4096 samples and compares each frequency with the floor around it; whatever stands above the floor plus the threshold is brought back down. Phase Reset uses one long window: it keeps the magnitude of every frequency and replaces the phase, which carries the timing.
Wavesets. A waveset is the piece of sound between two upward zero crossings. On a pitched sound it is about one period; on noise it is a short random fragment. Working on wavesets instead of on fixed slices changes the sound without moving the pitch much.
Undertone. Counting zero crossings and dividing them is how old analogue octave dividers worked. Here it is done on a filtered copy of the low end, and the result is a sine wave, so the undertone stays clean even when the source is not.
Data Moshing. The board is a model of a real circuit: a converter, a RAM chip with an address bus and a data bus, a clock. The editable lines are the places where the digital path can be changed. The code is parsed, compiled into bytecode and run by a small virtual machine, one sample at a time. When a line does not compile the old program keeps running; that is why you never hear a gap.
Everything you can do with a key or a gesture that is not written on a panel, in one place. On Windows read Ctrl for Cmd and Alt for Option. In a DAW some keys go to the DAW first; in the standalone they all reach Codex.
| Keys | What they do |
|---|---|
| Cmd + + · Cmd + − · Cmd + 0 | Window bigger, smaller, back to 100 % |
| Cmd + [ · Cmd + ] | Hide or show the left column, the right column |
| F11 | Full screen, in the standalone |
| Option + Shift + S | Smart mix on or off, with a short message |
| F1 · ? | Smart Help on or off; ← → for the tour, Esc to leave (chapter 3) |
| Cmd + Shift + H | The opening screen, on the Mac |
| Click the Panacousticon name, the CODEX badge or the Data Moshing title | The opening screen |
| Keys | What they do |
|---|---|
| Click the black screen | Goes on to the grid of the modules |
| Click a tile | Opens that module |
| Tab | Changes the look of the grid; it is remembered |
| Esc | Closes the opening screen |
| SOUND ON · OFF | The drone under the opening screen, in the standalone |
| Keys | What they do |
|---|---|
| ‹ › next to the name | Previous and next preset |
| In the preset menu: ↑ ↓ ← → · Enter · Esc | Move through categories and presets · load · close |
| Gesture | What it does |
|---|---|
| Drag up or down · Shift + drag | Change · change finely |
| Double-click | Back to the default value |
| Shift or Option + drag a modulated dial | The depth of its modulation; with both, in finer steps |
| Right-click, or Ctrl-click | LFO MATRIX on that dial (chapter 7) |
| Hover | A short description, after a moment |
| Double-click the brightness of the theme, in SETUP | Back to 100 % |
| Gesture | What it does |
|---|---|
| Double-click a cell of the matrix | Between 0 and 1 |
| Double-click Tone in the matrix | Off |
| Drag a dot on an EQ curve · wheel on the Mid dot · double-click | Move it · change Q · reset |
| MSEG: double-click empty space · double-click a point · Shift-click a point | Add a point · remove it · loop from there |
| Click the name of a macro | Rename it |
| STFT plot with Peak Null on: drag sideways · drag up and down · wheel · double-click | Focus · Threshold · Width · the full spectrum again |
| Keys | What they do |
|---|---|
| Click a framed line, type, Enter | Compiles the line; you hear it at once |
| Cmd + V in a framed line | Pastes over the whole line |
| Esc in a framed line | Back to what it was |
| With LEARN on: ↑ ↓ · Enter · Esc | Hear the snippets one by one · keep one · back to yours |
| Esc in FULL | Leaves FULL |
The keys of the Stealth sheet are in the Stealth manual: Keys and gestures.